
Installation guide


3
Promise Technologies
Pegasus J2 Driver anD WebPaM LiTe sofTWare
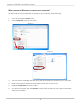
Before connecting the Pegasus J2 to your Windows computer, it is necessary to rst install a driver.
e driver is located on the Product CD, or can be downloaded from the PROMISE website. If you are
installing from the CD, look for the WebPAM LITE including driver option in the menu that appears
automatically aer inserting the CD into the DVD/CD drive on your computer.
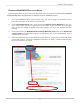
If you prefer to download the installation package, go to the PROMISE Download Center and get the
le “WebPAM LITE including driver” for the Pegasus J2 for Windows. You can follow the step-by-step
instructions in “Download WebPAM LITE including Driver” on page 7.
Summary of WindoWS Setup procedure
e setup process for Windows is summarized below. Read “Install J2 on Windows” for step-by-step
installation instructions.
1. Install the the packaged software and driver WebPAM LITE including driver located on
the Product CD, or download it from PROMISE. See download instructions in “Download
WebPAM LITE including Driver” on page 9.
2. Connect the J2 to your Windows computer with a Thunderbolt cable.
3. Launch WebPAM LITE and complete transition to Windows le system and striped RAID
conguration.* This step is not the same on all versions of Windows.
*Striped RAID not supported on Windows 7 Home Basic and Windows 7 Starter editions