
Installation guide


30
Pegasus J2 Windows Installation Guide
J2 Webpam lite SoftWare in WindoWS
Once the WebPAM LITE soware is installed, the J2 will be automatically detected when it is connected
to your Windows computer. You can also launch the full soware user interface to update device
rmware, to view real time information, to manually import the disk (if you have “Safely Removed” the
J2 in the current Windows session) or to perform the Safely Remove procedure.
To view the WebPAM LITE user interface, click on the WebPAM LITE icon in the System Tray, in the
menu that appears, choose the Launch WebPAM LITE option. e Device menu appears presenting a
virtual front view of the J2. Use this menu to manually Import the J2 drive or to Safely Remove it.
iMPorT Disk WiTh WebPaM LiTe
To import the J2 into Windows (i.e. Windows recognizes the J2 as a n attached storage device),
simply click on the Import Disk button in the Device menu. A message appears when it is successfully
imported. Open My Computer to view the J2 drive.
is procedure is only necessary if the J2 has been Safely Removed (see below) and you do not want
to detach and reattach the underbolt cable. e J2 is automatically imported into Windows as soon
as the J2 is physically connected via the underbolt cable.
safeLy reMove The J2 WiTh WebPaM LiTe
To remove the J2 using the WebPAM LITE user interface, simply click on the Safely Remove button
in the Device menu. A message appears when it is removed and it is safe to disconnect the underbolt
cable. If the procedure fails, try the procedure again until you see the message conrming it is safely
removed.
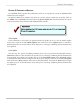
WebPAM LITE Device manager
Click here to Import
Click here to Remove