
Installation guide


!
14
Pegasus J2 Windows Installation Guide
Step 3: configure J2 for WindoWS
Follow the instructions in this section to complete the installation of the J2 on your Windows computer.
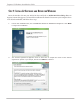
e procedure to congure the J2 for all supported versions of Windows begins with WebPAM LITE
and clicking the Switch to Windows button.
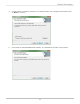
e default le system on the J2 is used with the Mac OS X, therefore the drive must be formatted with
NTFS, a le system compatible with Windows. Formatting the drive erases all data.
Some editions of Windows are then automatically directed to use the Windows Disk Management
menu to complete the conguration. If your version of Windows requires further conguration in
Windows Disk Manager, follow the additional instructions for the version of Windows you are running.
check WinDoWs version
If you do not know what version on Windows is running on your computer, do the following:
1. Click on the Windows Start menu.
2. Select Computer from the menu bar.
3. The next screen will display the disk drives and other hardware connected to your computer.
4. Right-click anywhere within the white space (don’t click on any icons).
5. Highlight Properties and click to open.
6. You will be presented with the System screen which includes all of the basic information
about your computer.
The Windows edition and the system type (32 or 64-bit) are listed. Go to “What version of
Windows is running on my computer?” on page 4 to view examples of the Windows menus
to check the version.
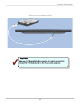
Regardless of what version of Windows you are running, aer it has been switched to Windows and
congured, the J2 is automatically mounted when Windows is booted up or the underbolt cable
connection is established.
To disconnect the J2 while Windows is running, be sure to perform the Safely Remove function see
“Safely Remove J2 from Windows” on page 29.