
User manual


FastTrak TX4310 Quick Start Guide
4
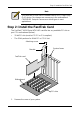
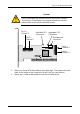
2. Remove the inside slot cover of an available 32-bit PCI slot on the
motherboard.Install the FastTrak card into the open PCI slot (above).
3. Fasten the FastTrak card bracket to the system case (above).
4. Attach your system case's 2- or 4-pin LED cable to the LED connector on the
FastTrak card (see Install the Disk Drives, below).
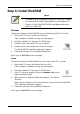
Step 3: Install the Disk Drives
The FastTrak TX4310 RAID Controller card supports only Serial ATA disk drives.
For optimal performance, install disk drives of the same model and capacity. The
drives’ matched performance allows the logical drive to function better as a single
drive.
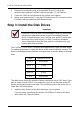
The table above shows the number of drives required for each RAID level. If you
plan to create a mirror (RAID 1) for protection, you can use two new drives OR
use an existing drive and a new drive. The new drive must be the same size or
larger than the existing drive.
1. Install the disk drives into the disk drive bays of your system.
If you are using SuperSwap Enclosures, the SMBus ID of each disk drive
must match the Channel number.
Important
If you wish to include your current bootable Serial ATA drive using
the Windows operating system as part of a bootable Mirrored
(RAID 1) logical drive on your FastTrak card, do NOT connect the
disk drive to the FastTrak yet. You MUST install the Windows
driver software first onto this drive while it is still attached to your
existing disk drive controller.
Level Number of Drives
RAID 0 any number
RAID 1 2 only
RAID 5 3 or 4
RAID 10 4 only
JBOD any number