FASTTRAK TX4310 QUICK START GUIDE Version 1.0 © 2005 Promise Technology, Inc. All rights reserved.
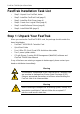
FastTrak TX4310 Quick Start Guide FastTrak Installation Task List • Step 1: Unpack Your FastTrak, below • Step 2: Install the FastTrak Card (page 3) • Step 3: Install the Disk Drives (page 4) • Step 4: Create Your Logical Drive (page 6) • Step 5: Install Software Drivers (page 8) • Step 6: Install WebPAM (page 9) Step 1: Unpack Your FastTrak When you receive the FastTrak TX4310 card, the package should contain the items listed below: • FastTrak TX4310 RAID Controller Card • Quick Start Guide
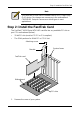
Step 2: Install the FastTrak Card Note The FastTrak TX4310 RAID Controller card is a PCI Plug-n-Play (PnP) device. No changes are necessary in the motherboard CMOS/BIOS Setup for resources or drive types in most applications. Step 2: Install the FastTrak Card The FastTrak TX4310 Serial ATA RAID card fits into any available PCI slot on your PC's motherboard (below): • 32-bit PCI slot (must be PCI 2.2 or 2.
FastTrak TX4310 Quick Start Guide 2. Remove the inside slot cover of an available 32-bit PCI slot on the motherboard.Install the FastTrak card into the open PCI slot (above). 3. Fasten the FastTrak card bracket to the system case (above). 4. Attach your system case's 2- or 4-pin LED cable to the LED connector on the FastTrak card (see Install the Disk Drives, below).
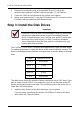
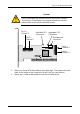
Step 3: Install the Disk Drives Caution Use of removable disk drive enclosures other than Promise Technology’s SuperSwap is not supported and may result in performance loss or other undesired results. Port 1 / Channel 1 Individual LED Aggregate LED Connectors Connectors Port 2 / Channel 2 Management Connector Port 3 / Channel 3 Port 4 / Channel 4 2. Attach one Serial ATA data cable to each disk drive. Then attach the other ends of the cables to the connectors on the FastTrak card (above). 3.
FastTrak TX4310 Quick Start Guide Step 4: Create Your Logical Drive You will now use the onboard FastBuild BIOS utility to create a logical drive with the attached drives. For an explanation of the logical drive concepts, see Chapter 6 of the FastTrak TX4310 User Manual. Important Even if you plan to use the WebPAM software to manage your logical drive, you must still create your first logical drive using the FastBuild Utility, as described here. 1. Boot your system.
Step 4: Create Your Logical Drive 3. Press 2 on the Main Menu screen to display the Define LD Menu (below). 4. Press the arrow keys to highlight an logical drive number you want to define and press Enter to select it. The Define LD Menu for the logical drive number you selected will next appear (below). 5. Choose the RAID Level you want.
FastTrak TX4310 Quick Start Guide 6. 7. Press the arrow keys to move to the next option. Option choices depend on the RAID Level you selected. • Initialize logical drive, zero the disk drives. RAID 0, 1, 5 or 10. • Stripe Block Size, the default 16KB is the only setting. Press the arrow keys to move to Disk Assignments. Press the spacebar to toggle between N and Y for each available drive. Y means this disk drive will be assigned to the logical drive.
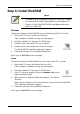
Step 6: Install WebPAM Step 6: Install WebPAM Notes • A complete set of installation instructions is found in Chapter 2 of the FastTrak TX4310 User Manual on the software CD. • Chapter 5 of the FastTrak TX4310 User Manual discusses how to use WebPAM. Windows Follow these steps to install WebPAM on your Windows-based PC or Server. 1. Boot up the PC/server and launch Windows. If the computer is already running, exit all programs. 2. Insert the software CD into your CD-ROM drive. 3.
FastTrak TX4310 Quick Start Guide Log-in to WebPAM Double-click on the WebPAM icon on your desktop (right). Or, 1. Launch your Browser. 2. In the Browser address field, type the IP address of the Host PC, as explained below. If you did not choose the External Security option during WebPAM installation, use the Regular connection. If you chose the External Security option during WebPAM installation, use the Secure connection. Regular Connection • WebPAM uses an HTTP connection . . . . . . . . . . . . .