PROMISE ARRAY MANAGEMENT (PAM) FOR FastTrak S150 SX4 and SX4000 series User Manual Version 4.
Promise Array Management Copyright © 2003, Promise Technology, Inc. All Rights Reserved. Copyright by Promise Technology, Inc. (Promise Technology). No part of this manual may be reproduced or transmitted in any form without the expressed, written permission of Promise Technology. Trademarks Promise, and the Promise logo are registered in U.S. Patent and Trademark Office. All other product names mentioned herein may be trademarks or registered trademarks of their respective companies.
Contents Chapter 1: Introduction ............................................................................................... 1 PAM Components ............................................................................................... 1 How They Work Together ................................................................................... 2 PAM Installation Options ..................................................................................... 3 Chapter 2: Installation.......................
Promise Array Management Chapter 5: RAID Monitoring and Maintenance with PAM ......................................... 43 Launch PAM...................................................................................................... 43 Local PAM......................................................................................................... 44 Log-in ......................................................................................................... 44 Log-out................................
Chapter 1: Introduction Promise Array Management (PAM) is a utility application designed specifically for monitoring and managing Promise Technology RAID products, such as the FastTrak SX4000 series and S150 SX4 RAID Controller cards. Promise includes BIOS-based RAID management utilities with each of its products. PAM, however, runs over a local area network and makes possible RAID monitoring and management from any computer on the network and even over Internet.
Promise Array Management How They Work Together The Promise Array Management (PAM) utility provides and easy way to set up, monitor, modify and repair your RAID. PAM works with the Promise FastTrak SX4000 series and S150 SX4 Controller card. PAM watches the RAID and when significant events happen, or it discovers a problem, the Message Agent sends a warning to the Message Server. The Message Server passes the warning along to all PCs running the Monitoring Utility.
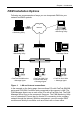
Chapter 1: Introduction PAM Installation Options Following are some examples of ways you can incorporate PAM into your network and RAID systems. Modem Internet Home-based PC + Monitoring Utility Laptop computer + Monitoring Utility Router & Firewall Network File Server + Message Server A networked PC + Monitoring Utility Company LAN PC + FastTrak SX4000 series + Message Agent Figure 1.
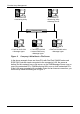
Promise Array Management A networked PC + Monitoring Utility A networked PC + Monitoring Utility + Message Server Company LAN PC + FastTrak S150 SX4 + Message Agent Figure 2. PC + FastTrak S150 SX4 + Internal RAID array + Message Agent PC + FastTrak SX4000 series + Message Agent Company LAN without a File Server In the above example, there are three PCs with FastTrak SX4000 series and S150 SX4 Controller cards connected to the company’s LAN, the same as before.
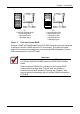
Chapter 1: Introduction PC + FastTrak SX4000 series + Monitoring Utility + Message Server + Message Agent Figure 3. PC + FastTrak S150 SX4 + Internal RAID array + Monitoring Utility + Message Server + Message Agent PCs with Internal RAID. Promise’s FastTrak SX4000 series and S150 SX4 Controller cards are designed to setup and control a RAID within the PC’s enclosure. They have the same need of monitoring and management as an external RAID subsystem. All three PAM components run on the PC itself.
Promise Array Management 6
Chapter 2: Installation To install Promise Array Management (PAM) is an uncomplicated procedure, once you understand your systems and how you want to use PAM. The purpose of this Chapter is to help you plan and carry out your installation of PAM. By way of review, PAM consists of three components: • Monitoring Utility • Message Server • Message Agent These were described in the previous chapter. Before proceeding with the installation, you must know which component goes where.
Promise Array Management Modem Internet Home-based PC + Monitoring Utility Laptop computer + Monitoring Utility Router & Firewall Network File Server + Message Server A networked PC + Monitoring Utility Company LAN PC + FastTrak SX4000 + Message Agent Figure 4. PC + FastTrak S150 SX4 + Internal RAID array + Message Agent PC + FastTrak S150 SX4 + Message Agent Networked RAID has many installation options.
Chapter 2: Installation Message Server The Message Server installs onto the RAID PC if your installation does not involve a network. If you want run PAM over a network, install the Message Server on one of your networked computers including a file server, a networked PC or the RAID PC. Only one installation of the Message Server is required for PAM to work over a network.
Promise Array Management Network Requirements If you plan to install PAM on a network be sure all the hosts and servers are connected and running. That is, each of the PCs, RAIDs and Servers must have a working network connection before you install PAM. In order for PAM to be configured over a network, you must know the IP (network) address of the RAID PC(s) in your system.
Chapter 2: Installation Figure 5. 7. Click Next or press Enter to continue. Figure 6. 8. PAM Setup Opening Screen. The License Agreement. When the License Agreement appears, click the Yes button to agree to the terms and continue the installation. If you click No, PAM Setup will exit.
Promise Array Management Figure 7. The Setup Type dialog box. 9. In the Setup Type dialog box, make your choice between Complete (Recommended) and Custom installation. Use the Custom installation to change install locations or to deselect individual components. 10. Click the Next button or press Enter to continue. Figure 8. Ready to Install dialog box. 11. When the Ready to Install dialog box appears, click Install or press Enter.
Chapter 2: Installation Figure 9. Add User Account dialog box. 12. When the Add User Account dialog box appears, you may accept the default name or enter a new one in the Name field. 13. Enter your password in the Password and Confirm Password fields. When you are done, click Next or press Enter to continue. Note If you are only installing the Message Server, this dialog box does not appear.
Promise Array Management Figure 10. Install Complete dialog box. 14. When the Install Complete dialog box appears, you have the option to • Create program shortcuts on your Desktop • Register WebPAM online Both of these options are recommended. 15. Click Finish or press Enter to finish the installation. This completes the PAM installation. Go on to Chapter 3, Initial Setup.
Chapter 3: Initial Setup After you have completed installation, you must setup your PAM Monitoring Utility to work with your RAID. Launch PAM Figure 11. Desktop icons (left) and Start Menu entries (right).
Promise Array Management Local PAM Log-in Launch Local PAM as described above. When the PAM user interface appears: Figure 12. Logging in to the Local Agent. 1. icon in Tree View. Select Login from Right click on the RAID Machine the popup menu (see above). The Login dialog box appears. Figure 13. Username and Password dialog box. 2. In the Login dialog box, type your Username and Password, and click OK. Initially, administrator is the only user.
Chapter 3: Initial Setup Remote PAM Log-in You must create a RAID Server in order to use Remote PAM. The RAID Server in PAM communicates with the Message Server on the network to connect your PC with the other PCs running FastTrak. Launch Remote PAM as described above. When the PAM user interface appears: Figure 14. Create a New Server. 1. The first time you run Remote PAM, right-click on the My Console icon and select New > Server from the popup menu. Or click the New Server icon in the Toolbar.
Promise Array Management Figure 16. List of RAID PCs on the network. 4. 5. Click on the + icon in front of the RAID Server to see the list of networked RAID PCs. From the list of networked RAID PCs, find the one you want to access, right-click on its RAID Machine menu. icon and select Login from the popup Figure 17. Login dialog box. 6. In the Login dialog box, type your Username and Password, and click OK. You are now logged into a RAID PC over your network.
Chapter 3: Initial Setup Logout of RAID PC Logout of the RAID Server effectively logs you out of all RAID PCs using that network connection. You can log out of one RAID PC while remaining connected to others on the icon of the PC you want to network. Right-click on the RAID Machine disconnect and select Logout from the popup menu. Remote PAM Future Log-ins The RAID Server remains under the My Console icon until deleted. It continues to work as long as the IP address is correct. Figure 18.
Promise Array Management PAM User Interface The Monitor window is the user interface for PAM. It appears immediately after login and displays monitoring and management functions. Figure 19. The PAM Monitor window has three views. The Monitor window has three views: Tree View ― Displays the elements of your RAID system. It works like Windows Explorer with hierarchical menus. You can expand individual items to see their components.
Chapter 3: Initial Setup Create a New User The Administrator is created by default. You must create additional users manually. To create a new User: 1. and select New > User from Right-click on the User Management icon the popup menu (below). A new User icon appears. Figure 20. User Information View. 2. icon to display the User Information View. The User Click on the User Information View displays a request for new user identification and access rights.
Promise Array Management Every User has least one of these three Rights and can change his/her own password. The Administrator can assign more or fewer rights to other Users but cannot change their passwords. 3. Type in a Username and Password in their respective fields. Check all the appropriate boxes to set access rights. Click the Commit button when you are done. The new user’s name appears in the Tree View (right). Create an Array 1.
Chapter 3: Initial Setup Figure 21. Create Array Settings. 3. 4. icon and go to the Create Array Settings in The Select the Create Array Information View. In the Create Array Settings box: • Type in a name for your array • Select the RAID Mode (Level) from the dropdown menu • Highlight the disk drives to add to the array • Select the options you want (see below) Quick Initialization – An option for all arrays. It deletes the “data map” from the disk drives when the array is created.
Promise Array Management 5. Click the Create button when you are done. Figure 22. New Array. The new array appears in Tree View. The next step is to partition and format the new array using the RAID PC's Operating System. See Appendix B in this Manual for more information. There is no need to restart your computer.
Chapter 3: Initial Setup Setup Email Alert Notification PAM alerts you to the problems and processes happening to your RAID through email and popup messages. These steps describe how to setup the email function. 1. Click on the RAID Machine Information View. icon. Information for the RAID PC appears in Figure 23. Event Log Setting portion of Information View. 2. 3. Be sure the Enable NT system event log checkbox is checked.
Promise Array Management Figure 25. Email Sender and Recipients. 9. Scroll down to the Email Sender and Recipients box. 10. In the Email ID of Alert Sender field, type in the email address of this computer. 11. This address will appear in the From field of the email alerts. Recipients may reply to this address, if it is valid. 12. Click the Change button to update your configuration.
Chapter 3: Initial Setup Specify Alert Notification Events PAM can be configured to report a variety of alerts, by email, popup message or both. This section describes how to tell PAM what to report and which method to use. 1. icon whose alert notification events you wish Click on the RAID System to modify. The Event Alert Setting box appears in Information View. Figure 27. Event Alert Setting box. 2. The Event Alert Setting box has dropdown menus to help you select Alert Events quickly.
Promise Array Management Following is a list of Events and their Severity: Information Events Warning Events Disk Plug In Bad Sector Log Updated Channel Reset Bad Sector Log Cleared Controller Create Array Array Rebuild Started Array Rebuild Completed Array Rebuild Aborted Array Synchronization Started Array Synchronization Completed Array Synchronization Aborted Array Expansion/Conversion Started Array Expansion/Conversion Completed Synchronization on Uninitialized Array Disk S.M.A.R.T.
Chapter 4: PAM User Interface This chapter describes PAM’s Graphic User Interface (GUI). You should understand that PAM is software running on top of the Promise RAID BIOS and other applications that came with your Promise RAID product. PAM adds a graphic user interface to make RAID management functions easier to understand and perform. Figure 29. The PAM Monitor window has three views.
Promise Array Management Tree View Local PAM The Monitor window is the user interface for PAM. It has three views: Tree View, Object View and Information View which were introduced in Chapter 3. The Tree View displays all of the elements of your RAID system. Use it to navigate to specific components.
Chapter 4: User Interface Remote PAM PAM Software RAID Server (PC with Message Server) RAID Machine (PC with FastTrak) RAID System (FastTrak Card) Controller Channel 1 Assigned Drive on Channel 3 Unassigned Drive on Channel 4 Array Drives Assigned to Array User Management Users Figure 31. An example of a RAID system in Tree View on Remote PAM. Normally, the Tree View is present. To close it, right-click on any object and select Hide Pane from the popup menu. To open it again, go to View menu and Outline.
Promise Array Management Tree View and Component Specific Menus In PAM, like most Windows applications, you can access the various commands and functions by opening dropdown menus and clicking on icons. Each time you click on a component in Tree View, PAM’s menu bar also displays that component’s dropdown menu. Below are some examples. Figure 32. Each item in Tree View has its own dropdown menu in the menu bar.
Chapter 4: User Interface Information View Information View, like Object View, changes its content depending on which item you select in Tree View. The difference is that you use Information View to obtain data, input settings and information. Figure 34. Information View showing the specifications of an Array. Status Bar The PAM Status Bar is the same as other Windows applications. It indicates such things as the selected RAID is rebuilding, and the current user is the Administrator (shown below).
Promise Array Management Pulldown Menus As indicated above, the left-most item of the Pulldown Menus changes according to which component is selected in the Tree View. Dynamic Menus By the term Dynamic Menus, we refer to menus appear only when a certain item is selected in Tree View. They are: Main, My Console, Server, RAID Machine, RAID System and Maintenance. The functions of each menu are described below. Main Menu When no item in Tree View is selected, the left-most menu item is Main.
Chapter 4: User Interface RAID Machine Menu When the RAID Machine functions include: • • • • • is selected, the RAID Machine menu appears. Its Login Logout Screen refresh Rename the RAID Machine icon Exit PAM RAID System Menu The RAID System menu appears with the RAID System functions include: • • • icon is selected. Its Screen refresh Rename the RAID System icon Exit PAM Maintenance Menu When other Tree View items are selected, the Maintenance menu appears.
Promise Array Management When the Array functions: • • • • • icon is selected, the Maintenance menu displays Controller Pause synchronization/rebuild Continue synchronization/rebuild Delete this array Refresh the screen Rename the Array icon View Menu The View menu displays or hides three items: • Toolbar • Status Bar • Tree View (Outline) Check to display or uncheck to hide each one as you prefer. Connection Menu (Remote PAM only) The Connection menu deals with server connections.
Chapter 4: User Interface Preference Menu The Preference menu allows you to start PAM automatically when your PC boots. Check to enable or uncheck to disable this feature. If you are using PAM for remote monitoring, running PAM automatically is a good idea. This way, your PC will be connected to the RAID and you will receive all the alerts messages you have specified.
Promise Array Management Toolbar The Toolbar is a series of buttons that are shortcuts to performing specific tasks. You will never see all buttons active as in the example below. Figure 36. The Toolbar. They become active when you click on specific system components in Tree View. Only the tool buttons pertaining to that component are active. Most of these functions require User Account Rights. These are specified when a User is added or modified.
Chapter 4: User Interface Popup Menus In addition to the commands in the dropdown menus, there is a corresponding set of commands you can access via popup menus. In a popup menu, you can use any of the commands that are in black. You will notice that some functions are grayed out, meaning that you cannot use them. Many functions require that you have User Account Rights to perform them.
Promise Array Management RAID System Icon The RAID System icon represents the FastTrak SX4000 series and S150 SX4 PCI cards (right).
Chapter 4: User Interface Array Icon Right-click on the Array • • • • • icon to access the following commands: Pause synchronization/rebuild Continue synchronization/rebuild Delete this array Refresh the screen Rename the Array icon User Management Icon Right-click on the User Management • • • icon to access the following commands: Create a New User Refresh the screen Rename the Controller icon User Icon Right-click the User icon • • • to access the following commands: Delete this User Refresh the
Promise Array Management 42
Chapter 5: RAID Monitoring and Maintenance with PAM This chapter describes using PAM to monitor and manage your RAID system. The chapter is divided into sections for major PAM functions: • • • Local PAM Remote PAM Manage Users • • • Alert Notification Controller Arrays Launch PAM Figure 37. Desktop icons (left) and Start Menu entries (right).
Promise Array Management Local PAM Log-in Launch Local PAM as described above. When the PAM user interface appears: Figure 38. Logging in to the Local Agent. 1. icon in Tree View. Select Login from Right click on the RAID Machine the popup menu (see above). The Login dialog box appears. Figure 39. Username and Password dialog box. 2. In the Login dialog box, type your Username and Password, and click OK. Initially, the Administrator is the only user.
Chapter 5: RAID Monitoring and Maintenance Remote PAM Log-in The RAID Server remains under the My Console icon until deleted. It continues to work as long as the IP address is correct. Figure 40. Connect to the Message Server. If PAM not connected to an existing RAID Server: Right-click on a RAID Server icon and select Connect from the popup menu. • Or right-click on the RAID Server icon and click the Connect icon in the Toolbar. The Login list of networked RAID PCs appears. • Figure 41.
Promise Array Management Create a RAID Server The Message Server relays data and commands between the Monitoring Utility on this computer and the Message Agent on the RAID PC. In order for your monitoring PC to communicate with the Message Server, you must create a RAID Server. Figure 42. Create a New Server. 1. The first time you run Remote PAM, right-click on the MyConsole icon and select New > Server from the popup menu. Or click the New Server icon in the Toolbar. A RAID Server icon appears.
Chapter 5: RAID Monitoring and Maintenance Delete a RAID Server If the IP address changes for the computer where the Message Server software is installed, an existing RAID Server with the old address will no longer work. 1. 2. 3. icon and select Delete Right-click on a RAID Server from the popup menu. Click OK in the confirmation dialog box. Create a new RAID Server as described above. Disconnect from a Message Server To disconnect from the network: • Right-click on a RAID Server menu.
Promise Array Management Future Log-ins The RAID Server remains under the MyConsole icon until deleted. It continues to work as long as the IP address is correct. Figure 44. Connect to the Message Server. To make a connection with an existing RAID Server: • Right-click on a RAID Server menu. icon and select Connect from the popup Or right-click on the RAID Server icon and click the Connect Toolbar. The Login list of networked RAID PCs appears as before.
Chapter 5: RAID Monitoring and Maintenance Message Server IP Address Change If the IP address changes for the computer where the Message Server software is installed, an existing RAID Server with the old address will no longer work. 1. 2. 3. Right-click on a RAID Server icon and select Delete from the popup menu. Click OK in the confirmation dialog box. Create a new RAID Server as described above.
Promise Array Management Manage Users Create a New User The Administrator is created by default. You must create additional users manually. 1. Right-click on the User Management icon select New > User from the popup icon appears. menu (right). A new User 2. Or select the User Management and click the Add User icon button on the Toolbar. Figure 45. User Information View. 3. Click on the User icon to display the User Information View.
Chapter 5: RAID Monitoring and Maintenance Type in a Username and Password in their respective fields. Check all the appropriate boxes to set access rights. Click the Commit button when you are done. The new user’s name appears in the Tree View (right). Delete a User 1. 2. In the Tree View, right-click on the icon of the User you wish to delete and select Delete from the popup menu (right). In the confirmation dialog box, click OK.
Promise Array Management Alert Notification PAM alerts you to the problems and processes happening to your RAID through email and popup messages. These steps describe how to setup the email function. 1. Click on the RAID Machine Information View. icon. Information for the RAID PC appears in Figure 46. Event Log Setting portion of Information View. 2. 3. Be sure the Enable NT system event log checkbox is checked.
Chapter 5: RAID Monitoring and Maintenance Figure 48. Email Sender and Recipients. 8. 9. Scroll down to the Email Sender and Recipients box. In the Email ID of Alert Sender field, type in the email address of this computer. This address will appear in the From field of the email alerts. Recipients may reply to this address, if it is valid. 10. Click the Change button to update your configuration.
Promise Array Management Delete a User from the Recipient List To remove a recipient from the Email Address List, do the following: 1. Click on the RAID Machine icon from which you wish to delete an email alert message recipient. The Current Recipients window appears in the Information View. Figure 50. Current Recipients window. 2. 3. Select the recipient you wish to delete Click the Remove button or press the Delete key to remove the address from the list.
Chapter 5: RAID Monitoring and Maintenance Specify Alert Notification Events PAM can be configured to report a variety of alerts, by email, popup message or both. This section describes how to tell PAM what to report and which method to use. 1. icon whose alert notification events you wish Click on the RAID System to modify. The Event Alert Setting box appears in Information View. Figure 51. Event Alert Setting box. 2.
Promise Array Management Following is a list of Events and their Severity: Information Events Warning Events Disk Plug In Bad Sector Log Updated Channel Reset Bad Sector Log Cleared Controller Create Array Array Rebuild Started Array Rebuild Completed Array Rebuild Aborted Array Synchronization Started Array Synchronization Completed Array Synchronization Aborted Array Expansion/Conversion Started Array Expansion/Conversion Completed Synchronization on Uninitialized Array Disk S.M.A.R.T.
Chapter 5: RAID Monitoring and Maintenance Controller The Controller deals with creating new Arrays, reading events from the memory buffer, setting cache and performance options. Array creation is covered in the Arrays section of this chapter. View Event Log The Controller’s Memory Buffer records all the events that happen on the RAID, classified as Errors, Warnings and Information. These are very useful for diagnosing and solving problems on your system.
Promise Array Management Controller Options The Controller has system information and settings several important features. Click on the Controller View. icon in Tree View to see the Options in Information If any of these features are grayed out, it means they are not available on your hard drives or that you are accessing the RAID from a remote location. You must make these settings at the RAID PC. To return to the default settings, click Reset. To Apply the changes you have made, click Apply.
Chapter 5: RAID Monitoring and Maintenance Controller Cache Allows you to toggle between two write modes for the FastTrak's cache: Write Through – Data is written to the cache and hard drive at the same time. This arrangement is safer. Check the box to select it Write Back – Data is written to the cache first and to the hard drive later. This arrangement increases performance at the risk of data loss if the power fails. Uncheck the box to select it.
Promise Array Management PCI Bus Utilization On High setting, FastTrak holds onto the PCI bus longer for data transfers to occur. On Low setting, FastTrak releases the PCI bus sooner for other PCI devices to use. Normally, no adjustment is required. However, some video capture cards may produce a glitch during playback of audio/video files. If this happens, try adjusting the slider.
Chapter 5: RAID Monitoring and Maintenance Arrays Create an Array 1. In Tree View, click the + to the left of the Controller icon to see the icon to see the Channels. Click the + to the left of each Channel icon. unassigned disk drives. Unassigned drives have this The available RAID selection depends on the number of disk drives available. The table below lists the Levels and drives required. See the Appendix A for a more detailed description.
Promise Array Management Figure 55. Create Array Settings. 3. 4. icon and go to the Create Array Settings in The Select the Create Array Information View. In the Create Array Settings box: • Type in a name for your array • Select the RAID Mode (Level) from the dropdown menu • Highlight the disk drives to add to the array • Select the options you want (see below) Quick Initialization – An option for all arrays. It deletes the “data map” from the disk drives when the array is created.
Chapter 5: RAID Monitoring and Maintenance 5. Click the Create button when you are done. Figure 56. New Array. The new array appears in Tree View. The next step is to partition and format the new array using the RAID PC's Operating System. See Appendix B in this Manual. There is no need to restart your computer. Figure 57. When an array is working correctly, it displays Functional status. When your array is first created, it will display Functional status.
Promise Array Management Synchronize an Array Promise uses the term synchronization to mean an automated process of checking and correcting data and parity. Unlike a Rebuild, Synchronization is a maintenance operation. Synchronization applies to RAIDs 1, 0+1 and 5. It takes place when an array is first created and then, optionally, on a regularly scheduled basis to maintain content integrity.
Chapter 5: RAID Monitoring and Maintenance On Demand Synchronization In addition to schedule Synchronization, you can direct FastTrak to begin the Synchronization process immediately. To access this feature: Figure 59. Start Synchronization. 1. Click on the Array icon and look in Information View. 2. Click the Start Button in the Synchronization box. 3. Click OK to the confirmation message. Tree View and Information View display the progress (below). Figure 60. Synchronization progress.
Promise Array Management Synchronization Settings This feature tells FastTrak how to deal with inconsistencies in mirrored or parity data encountered on the disk drives during Synchronization. Figure 61. Error Handling Policy for Synchronization. To access these settings, click on the Controller View. The options are: icon and look in Information Skip – Bypasses the data error and works around it. Fix – Corrects the data error. Abort – Halts Synchronization and sends an error message.
Chapter 5: RAID Monitoring and Maintenance Expand / Convert an Array Expansion and Conversion are two different operations but they often work together. Expansion means adding disk drives to an existing array. Conversion means changing an existing array from one RAID level to another. FastTrak S150 SX4 and SX4000 support this feature, however SX4000 lite does not support it. Expansion Expanding an array increases the array capacity without affecting data availability.
Promise Array Management Figure 63. Select a disk drive to add to the array. 3. In the Select Free Disk dialog box, click on the icon of any available disk drive to select it. Then click Next to continue. Figure 64. Do not select a RAID Level. 4. In the Select RAID Mode dialog box, do not select a RAID Mode. Just click Next to continue.
Chapter 5: RAID Monitoring and Maintenance Figure 65. Verify the Array name and click Finish. 5. In the Finish dialog box, verify the name of the array you are expanding. Then click Finish to begin the expansion process. Figure 66. Expansion progress. During the Expansion, the array will be available for use but it may run noticeably slower. If the popup messages are enabled, one will notify you when the Expansion is successfully completed. The array will return to Functional status.
Promise Array Management Conversion Converting changes its RAID Level, and in some cases increases the array capacity, without affecting data availability. Depending on the source and target RAID levels, you can add one or more free disk drives while performing the Convert function. Note • With most operating systems, expanding an array will require you to partition the added space with a new drive letter. In effect, you will end up with two arrays. • Plan to run your conversion during off hours.
Chapter 5: RAID Monitoring and Maintenance To convert an existing array: 1. Click on the Array icon in Tree View. Figure 67. Start Conversion. 2. Scroll down in Information View to show the Conversion/Expansion Wizard and click the Start button. Figure 68. Select a drive only if you are adding one. 3. In the Select Free Disk dialog box: • If you are adding a disk drive to your array, click on the icon of any available disk drive to select it. Then click Next to continue.
Promise Array Management Figure 69. Select the new RAID Level. 4. In the Select RAID Mode dialog box, click on the icon of the new RAID level to select it. Then click Next to continue. Figure 70. Verify the Array name and click Finish. 5. In the Finish dialog box, verify the name of the array you are converting. Then click Finish to begin the conversion process.
Chapter 5: RAID Monitoring and Maintenance Figure 71. Conversion progress. During the Conversion, the array will be available for use but it may run noticeably slower. If the popup messages are enabled, one will notify you when the Conversion is successfully completed. The array will return to Functional status.
Promise Array Management Array Critical When a disk drive fails on a fault-tolerant array (RAID 1, 0+1 and 5) for any reason, the Array goes Critical. The array can still read and write data but fault tolerance has been lost. An Array Critical icon displays in Tree View and the alarm (if enabled) beeps quickly to call your attention to the condition. Figure 72. An Array in Critical condition highlighted in Tree View (left) and shown in red in Information View (right).
Chapter 5: RAID Monitoring and Maintenance In the example above, there are three disk drives attached to the FastTrak controller and all three are assigned to a RAID 5 array. The three disk drives appear under the Controller but only two appear under the Array. The disk drive on Channel 2 does not appear under Array. This is the suspect drive. 4. To double-check the suspect drive, click on its icon under the Controller. Figure 74.
Promise Array Management Rebuild an Array To Rebuild to restore redundancy to a RAID 1, 0+1 or 5 after one of its drives has failed. Unlike Synchronization, a Rebuild is a repair operation. When a drive fails for any reason, the Array goes Critical. An Array Critical icon displays in Tree View and the RAID alarm beeps quickly to call your attention to the condition. Figure 75. An Array in Critical condition highlighted in Tree View (left) and shown in red in Information View (right).
Chapter 5: RAID Monitoring and Maintenance Manual Rebuild After you replace a failed disk drive, the replacement drive must be rebuilt in order to restore the Array. To initiate an array Rebuild manually: 1. In Tree View, select the Array icon of the array you want to rebuild. Figure 76. Start Rebuild Wizard. 2. In Information View, click on the Start button inside the Rebuild Wizard box. Figure 77. Rebuild Wizard disk drive selection window. 3.
Promise Array Management Figure 78. Rebuild Wizard Confirmation window. To confirm the rebuild choice, click Finish. Tree View and Information View display the progress (below). Figure 79. Rebuild progress. During the Rebuild process, the array will be available for use but it may run noticeably slower. If the beeper is enabled, it will beep slowly during this process. If the popup messages are enabled, one will notify you when the Rebuild is successfully completed.
Chapter 5: RAID Monitoring and Maintenance Rebuild Settings Beeper – Right-click on the Controller icon and select Beeper from the popup menu. A checkmark means the beeper is enabled. Figure 80. Rebuild Settings in Information View. icon and look into Information View. Check the Right-click on the Controller respective boxes to enable these features: Enable Hot Spare Disk – Enables a spare drive not assigned to the array to automatically replace a failed drive in the array.
Promise Array Management Error Handling This feature deals with a bad sector on a disk drive that the FastTrak Controller encounters during a Rebuild. The options are: Fix if possible – The Controller attempts to repair the disk error. Skip – Bypasses the disk error and works around it. Abort – Halts the Rebuild and sends an error message. Stop, Pause, Continue Promise recommends that you let your rebuild run to completion. If you need to pause the process: 1. 2.
Chapter 5: RAID Monitoring and Maintenance Array Offline When a disk drive fails on a non-fault-tolerant array (RAID 0) for any reason, the Array goes Offline. The array cannot read or write data. All of the data on the array will be lost unless the failed drive is restored to operation. A fault-tolerant array (RAID 1, 0+1 and 5) will go Offline if two disk drives fail. icon displays in Tree View and the alarm (if enabled) beeps An Array Offline quickly to call your attention to the condition. Figure 81.
Promise Array Management 82
Appendix A: RAID Concepts RAID is an acronym that stands for Redundant Array of Independent Disks. It is divided into different numbered Levels. The numbers of these Levels do not mean that one Level is higher or better than another. Each Level has its own advantages and shortcomings. PAM allows you to select the RAID Level when you create an Array. The available RAID Level selection depends on which Promise product you have and the number of disk drives available. The table below lists the options.
Promise Array Management Striping (RAID 0) Reads and writes sectors of data interleaved between multiple drives. When any disk member fails, it affects the entire array. Performance is better than a single drive since the workload is balanced between the array members. This array type is for high performance systems. Identical drives are recommended for performance as well as data storage efficiency. The disk array data capacity is equal to the number of drive members times the smallest member capacity.
Appendix A: RAID Concepts Mirroring (RAID 1) Writes duplicate data on to a pair of drives while reads are performed in parallel. RAID 1 is fault tolerant because each drive of a mirrored pair is installed on separate controller channels. If one of the mirrored drives suffers a mechanical failure (for example, spindle failure) or does not respond, the remaining drive will continue to function. This is called Fault Tolerance.
Promise Array Management Striping / Mirroring (RAID 0+1) A combination of RAID 0 and RAID 1 arrays. It can increase performance by reading and writing data in parallel while protecting data with duplication. A minimum of four drives are required. With a four-drive disk array, two pairs of drives are striped. Each pair mirrors the data on the other pair of striped drives. The data capacity is similar to a standard Mirroring array with half of total capacity dedicated for redundancy.
Appendix A: RAID Concepts About Dual Data Redundancy One unique (though rarely occurring) feature of RAID 0+1 is dual fault tolerance. In some cases, two drives can fail simultaneously and still maintain the integrity of data. There are six combinations in which two drives can fail. FastTrak SX4000 series and S150 SX4 protect the data array in four of those cases. Assume the drives are configured as follows: • • • CH indicates channels on the FastTrak Controller card.
Promise Array Management Block and Parity Striping (RAID 5) RAID 5 calculates parity in order to achieve redundancy rather than writing a second copy of the data, like RAID 1. Parity is distributed across the physical drives along with the data blocks. In each case, the parity data is stored on a different disk than its corresponding data block. RAID 5 makes efficient use of hard drives and is the most versatile RAID Level. It works well for file, database, application and web servers.
Appendix A: RAID Concepts JBOD - Single Drive An alternative to RAID, Just a Bunch of Disks (JBOD) capacity is equal to the sum of all drives in the group, even if the drives are of different sizes. JBOD appears in the User Interface as one or more individual drives. There are no performance or fault-tolerance features. When a disk fails, all data on the disk is lost. Other disks are unaffected. 1 2 3 4 Disk Drive Figure 87. JBOD manages drives Individually, unlike RAID.
Promise Array Management 90
Appendix B: Partition and Format In order for your Windows to recognize and work with your array, you must partition and format the array. These actions create a file structure within your array with which Windows can work. Note If you plan to boot your computer from this array, go to Windows and Device Driver Installation under the Installation section for instructions. The instructions here are for data arrays only. Figure 88. Right-click on the My Computer icon. 1. 2.
Promise Array Management Figure 89. The Disk Management Window and Disk Wizard. 3. 4. Click the Next button to start the Wizard. In the following windows, select Disk 1 to Initialize. Do not select any disks to Convert. Click the Finish button to Initialize the array. Figure 90. Initialized array ready for partition and format. 5. Right-click on the Unallocated portion of Disk 1 and select New Partition... from the popup menu. The New Partition Wizard appears.
Appendix B: Partition and Format Figure 91. The New Partition Wizard. 6. 7. 8. Click the Next button to start the wizard. In the following windows, do the following actions. Click Next to move to the next window.
Promise Array Management Figure 92. The newly formatted array as it appears under Disk Management. When formatting is complete, your array will appear as a hard drive in the Disk Management window (above) and the My Computer window (below). Figure 93. The newly formatted array under My Computer.
Appendix C: Networking Issues IP Address In order for PAM to be configured over a network, you must know the IP (network) address of every component. The Message Server uses IP addresses to communicate with the Message Agent on the RAID PCs and the Monitoring Utility on the network PCs. To find the IP network address: 1. 2. Go to Start > Programs > Accessories > Command Prompt. Type ipconfig/all and press Enter. The Windows IP Configuration displays (below). Figure 94.
Promise Array Management DHCP Issues Referring to the Figure 84 above, note that it says: Dhcp enabled. . . . . . . . : Yes This means that a DHCP server gave this IP address to this PC when the PC connected to the network. DHCP stands for Dynamic Host Configuration Protocol and refers to software that allows a file server to assign IP addresses to computers on the network. DHCP is very helpful in reducing the number of IP address a company or organization requires.
Appendix D: Technical Support Promise Technical Support provides several support options for Promise users to access information and updates. We encourage you to use one of our electronic services, which provide product information updates for the most efficient service and support.
Promise Array Management Pacific Rim Sales Office E-mail Support Fax Technical Support Phone Technical Support If you wish to write us for support: China Office E-mail Support Fax Technical Support Phone Technical Support If you wish to write us for support: support@promise.com.tw +886 3 578 23 90 Attention: Technical Support +886 3 578 23 95 (ext. 8870) 9:00-6:00pm Taiwan Time Promise Technology, Inc. Attn: Technical Support 2F, No. 30, Industry E. Rd.