
Network Hardware User Manual


Step 8: Creating Disk Arrays with WebPAM PROe
29
Step 8: Creating Disk Arrays with WebPAM PROe
Setting up disk arrays with WebPAM PROe consists of the following actions:
• Logging into WebPAM PROe (below)
• Selecting a Language (page 31)
• Creating a Disk Array (page 31)
• Logging out of WebPAM PROe (page 35)
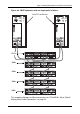
Logging into WebPAM PROe
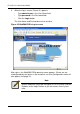
1. Launch your Browser.
2. In the Browser address field, type in the IP address of the VTrak subsystem.
Use the IP address you obtained in Step 7 (see page 27). Note that the IP
address shown below is only an example. The IP address you type into your
browser will be different.
Regular Connection
• WebPAM PROe uses an HTTP connection. . . . . . . . . . . . . . . .http://
• Enter the VTrak’s Management Port IP address . . . . 192.168.10.85
Together, your entry looks like this:
http://192.168.10.85
Secure Connection
• WebPAM PROe uses a secure HTTP connection. . . . . . . . . .https://
• Enter the VTrak’s Management Port IP address . . . . 192.168.10.85
Together, your entry looks like this:
https://192.168.10.85
Note
You can also use the CLU to create disk arrays and logical drives.
See Chapter 5 of the VTrak E-Class Product Manual for more
information.
Note
Whether you select a regular or a secure connection, your login to
WebPAM PROe and your user password are always secure.