PROLUX 2.0 BAGLESS BACKPACK VACUUM CLEANER MODEL: 2.
For your safety please read owners manual in its entirety before use. Congratulations on your purchase of your new Prolux 2.0 Bagless Backpack Vacuum! The Prolux 2.0 Bagless is the worlds ONLY bagless backpack vacuum. Large companies use backpack vacuums, because they literally cut your cleaning time in half (compared to a upright vacuum). Weighing only 9 lbs. with the Prolux 2.0 Bagless Technology it is 40% more efficient and powerful than other bagless vacuums with an amazing 70 CFM of power.
Table of contents Specifications ............................................................................................................................... 3 Safety Precautions ................................................................................................................... 4-5 Assembly Getting To Know Your Vacuum ............................................................................................................... 6 Using The Accessories & Tools .............................
IMPORTANT SAFETY INSTRUCTIONS When using an electrical appliance, basic precaution should always be followed, including the following: READ ALL INSTRUCTIONS IN THIS OPERATING MANUAL BEFORE USING THIS APPLIANCE. Keep the operating manual for reference. Include the operating manual if you pass the appliance to third parties. Violations of the operating instructions can lead to severe injuries as well as damages to the appliance.
19.This appliance is not intended for use by persons (including children) with reduced physical, sensory or Mental capabilities, or lack of experience and knowledge, unless they have been given supervision or instructions concerning the use of the appliance by a person responsible for their safety. Children should be supervised to ensure they do not play with the appliance. Do not vacuum or clean: - Hair and other parts of the body. They could be sucked in and cause injury.
GETTING TO KNOW YOUR BACK PACK VACUUM 1. Main motor unit 2. Flexible hose 3. Dust container 4. Shoulder straps 5. Exhaust HEPA filter 6. Air inlet Vortex filter 7. Carpet/Floor Brush 8. Crevice Tool 9. Upholstery/Pet Hair tool 10. Dusting Brush 11.
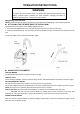
OPERATION INSTRUCTIONS WARNING To reduce the risk of electric shock, the power cord must be disconnected or the battery removed before removing the dust container, changing the filters or performing maintenance or troubling shooting checks Assembling your vacuum NOTE: Always remove the power plug from the wall outlet before assembling or removing accessories n ATTACHING THE FLEXIBLE HOSE TO THE VACUUM The flexible hose should be connect before strapping the unit 1.
1. Insert the handle (Fig. 3/1) into the upper end of the telescopic tube (Fig 3/2). 2. Attach the floor nozzle (Fig. 3/3) to the bottom end of the telescopic tube (Fig 3/4). NOTE: Shove all the way together and firmly twist to the right to connect pieces. 3. Adjust the length of the telescopic tube. to do this (Fig. 4/1). Press down the release latch on the tube Then pull the handle of the telescopic tube to extend it to your desired length (Fig. 3/1).
your back, causing damage or injury. 4. Turn the unit on/off by pressing the switch located near the base of unit. (Fig 9) Fig 8 Fig 8A Fig 8B Fig 9 HOW TO CHARGE THE BATTERY PACK When using the charger, basic precautions should always be followed, including the following: Battery and Charging Safety To reduce the risk of electric shock, fire, battery explosion, or injury: 1. Basic information and warning for the Battery and Charger are contained below.
. DO NOT charge the unit outdoors. 11. DO NOT attempt to repair, service, or modify the battery system or charger. Contact the service with any issues. 12. DO NOT short-circuit the battery or charger terminals with conductive items such as paper clips. This can deliver high current, resulting in heat and fire. 13. DO NOT crush, drop, incinerate or damage the battery pack. DO NOT use a battery pack that has been damaged in any way.
BATTERY PROTECTION FEATURE The 25.2-volt Lithium Polymer batteries are designed with features that protect the Lithium Polymer cells and maximize battery life. When the battery has reached its minimum voltage level the electronics will shut off the battery. Once the battery shuts off, it must be recharged. PREPARING BATTERY PACK FOR CHARGING 1. Turn off the power switch. Confirm the switch is on the off position. 2.
n HOW TO EMPTY THE DUST CONTAINER You will want to empty the dirt in the dust container as soon as it has reached the “MAX” mark indicated on the outside of the tank, or if the suction power has dropped. To empty the Dust Container, please follow the instructions below. 1. Switch the vacuum cleaner to the “Off” position and disconnect the plug from the wall outlet. 2. Release the dust container by pressing down the release button. (Fig 10) 3. Pull the dust container away from the vacuum cleaner. 4.
Clean and replace the exhaust HEPA filter 1. Open the exhaust cover by rotating in count clockwise. (Fig 13) 2. Put the exhaust HEPA out of the unit. (Fig 13) 3. Clean the filter, using warm water and allow air-drying completely, and then assembling the filter back into the unit. Or, if the filter is too dirty or in an unusable condition, replace the filter with a new one. Fig 13 Cleaning the Housing WARNING: Always switch off the appliance and disconnect it from the outlet before cleaning it.
Fault Possible Cause(s) Solution The vacuum will not turn on. The battery is not charged. Make sure the battery is fully charged by plugging the battery into the charger, then plug the charger into your wall outlet and keep the battery plugged into the charger until the charger light turns Green. The battery is not fully inserted Make sure to insert the battery into into the vacuum.
FIVE (5) YEAR LIMITED WARRANTY (90 days on the motor and body if used commercially) Prolux warranties this product’s motor free from defects in material and workmanship for a period of five (5) years on the motor, and three (3) years on the body of the vacuum, free from manufacturer defects in material and workmanship from the original date of purchase, when utilized for normal household use. (90 days on the motor and body if used commercially) • 90 days on battery & charger.
Product Warranty Registration Please follow the link below to register your Prolux product. http://www.proluxcleaners.com/webforms/index/index/id/2/?___store=default To find more information on this product, including warranty info and to contact Prolux Customer Service. Please follow the link below: http://www.proluxcleaners.com/vacuum-cleaners/backpack-vacuums/prolux-2-0-bag-lessbackpack-vacuum.