
Use and Care Manual

- 10 -
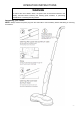
n USING THE CLEANING PADS
To remove the cleaning pads/cloths from the buffer unit, simply peel the pad away from the Velcro
surface of the buffer. To attach the pads/cloths, take the pad and press the Velcro side of the pad
onto the Velcro surface of the buffer and apply firm pressure to ensure the Velcro surfaces are
completely meshed together.
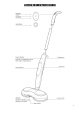
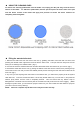
n Filling the water/solution tank
1. Remove the water tank from the back of the unit, by grabbing the sides of the tank with one hand, and
pressing the release button right above the tank with the other hand. Then pull the tank away from the unit
while you are holding in the release button. (Fig 1)
2. Unscrew the lid of the water/solution tank and fill it with Water and/or floor cleaner of your choice. (Fig 1)
3. Reinsert the water tank into the unit, by placing the bottom of the tank into the unit first, then pressing the top
of the tank into the unit until you hear and audible (CLICK) sound ensuring the tank has been locked into the
main unit. (Fig 1)
4. Any time you use anything other than water in the solution tank, you will want to properly rinse the system
clean after use. To do this, fill the tank about ¼ of the way full with water only. Turn the unit on, and press the
solution spray button until the tank is completely drained. This will ensure that any leftover soap or
detergent/wax is cleaned from the internal parts of the buffer and will prevent the unit from clogging. (When
flushing the system clean, you can hold the sprayer nozzle over your sink to allow the clean water to spray into
your sink to avoid a messy cleanup)
NOTE: Failure to complete step #4 above will void your Prolux warranty.