PROLUX 2.0 COMMERCIAL BAGLESS BACKPACK VACUUM CLEANER MODEL: 2.
For your safety please read owners manual in its entirety before use. Congratulations on your purchase of your new Prolux 2.0 Bagless Backpack Vacuum! The Prolux 2.0 Bagless is the worlds ONLY bagless backpack vacuum. Large companies use backpack vacuums, because they literally cut your cleaning time in half (compared to an upright vacuum). Weighing only 9 lbs. with the Prolux 2.0 Bagless Technology it is 40% more efficient and powerful than other bagless vacuums with an amazing 125 CFM of power.
Table of contents Specifications ............................................................................................................................... 3 Optional Accessories ............................................................................................................. 4 Safety Precautions ................................................................................................................... 5-6 Assembly Getting To Know Your Vacuum ........................................
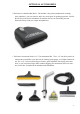
OPTIONAL ACCESSORIES • The Prolux 2.0 StairPro Mini Head – The StairPro is the perfect attachment for cleaning stairs, upholstery, your cars interior, and it also works great for picking up pet hair. Just like the full size power nozzle attachment, the StairPro also uses an electrically powered brush-roll to deep clean your carpets and upholstery. • The Prolux Commercial Grade 1-1/2” Tool Attachment Kit – The 1-1/2” tool kit is perfect for someone how would like to use their 2.
IMPORTANT SAFETY INSTRUCTIONS When using an electrical appliance, basic precaution should always be followed, including the following: READ ALL INSTRUCTIONS IN THIS OPERATING MANUAL BEFORE USING THIS APPLIANCE. Keep the operating manual for reference. Include the operating manual if you pass the appliance to third parties. Violations of the operating instructions can lead to severe injuries as well as damages to the appliance.
19.This appliance is not intended for use by persons (including children) with reduced physical, sensory or Mental capabilities, or lack of experience and knowledge, unless they have been given supervision or instructions concerning the use of the appliance by a person responsible for their safety. Children should be supervised to ensure they do not play with the appliance. Do not vacuum or clean: - Hair and other parts of the body. They could be sucked in and cause injury.
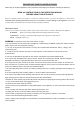
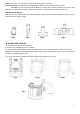
GETTING TO KNOW YOUR BACK PACK VACUUM -7-
1. Main motor unit 2. Flexible electric power hose 3. Dust container 4. Shoulder straps 5. Exhaust HEPA filter 6. Air inlet Vortex filter 7. Carpet/Floor Brush 8. Crevice Tool 9. Upholstery/Pet Hair tool 10. Dusting Brush 11. Electric Telescopic wand 12. Self-Cleaning Filter Cone 13.Deluxe electric power nozzle 14. Additional Tool Storage 15.
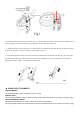
2. Insert the handle of the electric power hose (Fig. 3/1) into the upper end of the electric telescopic wand. Be sure to align the 2 prong electrical connections as you press the two pieces together. (Fig 3/2). 3. Attach the electric power nozzle (Fig. 3/3) to the bottom end of the telescopic tube. Be sure to align the 2 prong electrical connections as you press the two pieces together. (Fig 3/4). 4. Adjust the length of the telescopic tube. Press down the release latch on the tube to do this (Fig. 4/1).
NOTE: This tool is not a grooming tool and should not be used on animals. Caution: DO NOT use the Pet Hair Removal Brush on delicate or woven fabrics that may snag. DO NOT use the Pet Hair Removal Brush on wooden floors as this accessory may cause mild scratching or scarring of the surface. Always test a surface in a area that cannot be seen before use. CARPET/FLOOR BRUSH Step on the Floor to Carpet selector to adjust the height of the brushes.
n HOW TO EMPTY THE DUST CONTAINER You will want to empty the dirt in the dust container as soon as it has reached the “MAX” mark indicated on the outside of the tank, or if the suction power has dropped. To empty the Dust Container, please follow the instructions below. 1. Switch the vacuum cleaner to the “Off” position and disconnect the plug from the wall outlet. 2. Release the dust container by pressing down the release button. (Fig 10) 3. Pull the dust container away from the vacuum cleaner. 4.
Clean and replace the exhaust HEPA filter 1. Open the exhaust cover by rotating in count clockwise. (Fig 13) 2. Put the exhaust HEPA out of the unit. (Fig 13) 3. Clean the filter, using warm water and allow air-drying completely, and then assembling the filter back into the unit. Or, if the filter is too dirty or in an unusable condition, replace the filter with a new one. Fig 13 Cleaning the Housing WARNING: Always switch off the appliance and disconnect it from the outlet before cleaning it.
Troubleshooting WARNING: Never use a defective appliance. Always switch off the appliance and disconnect it from the outlet or remove the battery before you start to troubleshoot. Fault Possible Cause(s) Solution The vacuum will not turn on. The plug is not connected to the Insert the plug into an electrical electrical wall outlet and flip the “on/off” wall outlet or the appliance is not switched to the switch to the “on” position. See “on” position. section “Vacuum Cleaning.
f. For models with reset button, firmly press reset button on electrical power nozzle. g. On the hose is an on/off switch. Make sure that it is turned to on. h. On the Power Nozzle there is an on/off button; make sure that is turned on as well. If you plug the power nozzle directly into the hose and it turns on (but won’t turn on with main wand attached,) then you know the main wand is defective or a connection needs adjusting (see last problem below).
PROLUX retailer you bought the unit from first. Unauthorized warranty claims may be sent back. Authorized Warranty claims: PROLUX shall be responsible for all parts and labor and the customer shall be responsible for all shipping charges to and from the PROLUX service center. Prolux is constantly striving to improve our products. Therefore, the specifications contained herein are subject to change without notice. Product Warranty Registration Please follow the link below to register your Prolux product.