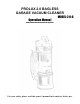
PROLUX 2.0 BAGLESS GARAGE VACUUM CLEANER Operation Manual MODEL: 2.0-G Read all instructions before using this appliance For your safety please read the owner's manual in its entirety before use.
Congratulations on purchasing your very own Prolux 2.0 Bagless Garage Vacuum! The Prolux 2.0 comes with a 5-year motor warranty, and thanks to its state-of-the-art Motor Bypass Technology, you won’t have to worry about overheating due to a clogged hose. With its simple-to-use design, and easily attachable cleaning accessories, the Prolux 2.
Table of contents Specifications 3 Safety Precautions 4 Installation 7 Mounting Your Vacuum to the Wall 7 Assembly 8 Getting To Know Your Vacuum 8 Using The Accessories & Tools 9 Maintenance Emptying The Dust/Dirt Container 11 Changing/Cleaning The Intake Vortex Filter 11 Changing/Cleaning The HEPA Exhaust Filter 12 Cleaning The Housing 12 Troubleshooting 13 Warranty 14
Specifications ● Powerful 1400 Watt, 12 amp motor ● Amazing 125 Cubic Feet per Minute of Airflow! ● 95 Inches of Water Lift ● Motor Bypass valve, which adds years of life to the Motor ● 5 Year motor Warranty and 3 Year body Warranty. (90 days on the motor and body if used commercially) ● 3-Stage filtration: ○ HEPA H13 Filter, which keeps the air clean with 99.95% efficiency ○ Patented Prolux Cyclonic Filtration Technology © ○ Micron Filter ● 35ft hose ● 25ft cord ● 1.5L dust bin capacity.
IMPORTANT SAFETY INSTRUCTIONS READ ALL INSTRUCTIONS IN THIS OPERATING MANUAL BEFORE USING THIS APPLIANCE. When using an electrical appliance, basic precautions should always be followed, including the following: Keep the operating manual for reference. Include the operating manual if you pass the appliance to third parties. Violations of the operating instructions can lead to severe injuries as well as damage to the appliance.
Do not vacuum or clean: - Hair and other parts of the body. They could be sucked in and cause injury. - Pieces of Clothing (e, g, shoe laces, scarves, etc.). They could be sucked in and cause injury. - Water and other liquids, especially moisture from carpet cleaning agents. Moisture inside the appliance can lead to short-circuiting. - Toner dust (from laser printers. copying-machines. etc.). There is danger of fire or explosion. - Hot ash, burning cigarettes or matches. This could cause a fire.
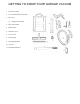
GETTING TO KNOW YOUR GARAGE VACUUM 1. Cloth Tool Caddy 2. Two (2) Black Extension Wands 3. Floor Tool a) Squeegee Attachment 4. Mini Turbo Brush 5. Duster Brush 6. Extraction Tool 7. Crevice Tool 8. Hose Hanger 9. Mounting Hardware 10. 35’ Hose 11.
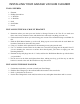
INSTALLING YOUR GARAGE VACUUM CLEANER TOOLS NEEDED: 1. 2. 3. 4. 5. 6. 7. Hammer Phillips Screwdriver ⅛” Drill Bit ⅜” Drill Bit Drill Stud Finder Pencil INSTALLING THE WALL MOUNT BRACKET 1. Determine where you want your new Prolux 2.0 Garage Vacuum to be. Test fit it to make sure there won’t be any clearance issues, and that the hose will reach everything you want it to. 2. Find a stud nearest to where you want to hang your vacuum. We recommend using a stud finder for this. 3.
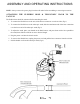
ASSEMBLY AND OPERATING INSTRUCTIONS NOTE: Always remove the power plug from the wall outlet before assembling or removing accessories. ATTACHING THE FLEXIBLE HOSE & TELESCOPIC WAND TO THE VACUUM The flexible hose should be connected before attaching the wand. 1. To connect the flexible hose to the unit, slide the hose connector over the air inlet (Fig 1). 2.
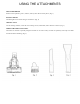
USING THE ATTACHMENTS MINI TURBO BRUSH Perfect tool for upholstery, stairs, vehicles, and any other hard to reach places. (Fig. 1) DUSTING BRUSH The Dusting Brush is used for all types of furniture. (Fig. 2) CREVICE TOOL Use for cleaning radiators, cracks & crevices along corners, baseboards, and in-between cushions. (Fig. 3) WIDE PATH EXTRACTION TOOL The Prolux 2.0 includes a specially designed tool that can be used to easily vacuum car upholstery and carpet. The ideal tool for automotive detailing. (Fig.
CONNECTING THE ATTACHMENTS TO YOUR WAND Connecting the tools to your telescopic wand is quick and easy. The tools use a Friction Fit Connection, which means you push the tool onto the wand (or adapter if applicable) and twist in either direction. (Fig.
HOW TO EMPTY THE DUST CONTAINER The dust container must be emptied as soon as it reaches the “MAX” mark indicated on the outside of the tank, or if the suction power has dropped. To empty the Dust Container, please follow the instructions below: 1. Switch the vacuum cleaner to the “Off” position and disconnect the plug from the wall outlet. 2. Release the dust container by pressing down the release button. (Fig 10) 3. Pull the dust container away from the vacuum cleaner. 4.
NOTE: The Prolux Self-Cleaning Vortex filter only needs to be cleaned when the entire surface of the filter becomes dirty. Due to its highly efficient design the Self-Cleaning Vortex filter is three times more efficient than standard filters and will have the same amount of airflow whether it’s dirty or clean. The entire surface of the filter will have to be covered in debris before the performance of the vacuum is affected, and the filter needs to be cleaned.
Troubleshooting WARNING: Never use a defective appliance. Always switch off the appliance and disconnect it from the outlet or remove the battery before you start to troubleshoot. Fault Possible Cause(s) Solution The vacuum will not turn on. The plug is not connected to the electrical wall outlet or the appliance is not switched to the “on” position. Electrical wall socket does not carry current. Insert the plug into an electrical wall outlet and flip the “on/off” switch to the “on” position.
FIVE (5) YEAR LIMITED WARRANTY (90 days on the motor and body if used commercially) Prolux warranties this product’s motor free from defects in material and workmanship for a period of five (5) years on the motor, and three (3) years on the body of the vacuum, free from manufacturer defects in material and workmanship from the original date of purchase, when utilized for normal household use (90 days on the motor and body if used commercially).
Product Warranty Registration Please follow the link below to register your Prolux product: https://proluxcleaners.com/pages/warranty For more information on this product, including warranty info and to contact Prolux Customer Service, follow the link below: https://proluxcleaners.