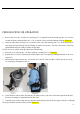
Where Quality & Power Meet 10 Quart Backpack Vacuum OWNER’S MANUAL
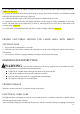
IMPORTANT SAFETY INSTRUCTIONS When using an electrical appliance, basic precautions should always be followed, including the following: READ ALL INSTRUCTIONS BEFORE USING. ! WARNING - to reduce the risk of fire, electric shock, or injury: 1. Do not leave the appliance unattended when plugged in. Unplug from outlet when not in use and before servicing. 2. Do not use outdoors or on wet surfaces. 3. Do not try to vacuum liquid with this vacuum. This vacuum is for DRY USE only. 4.
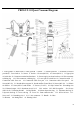
PROLUX 10 Quart Vacuum Diagram 1. Filter guard A 2. HEPA Filter 3. Filter guard B 4. Motor 5. Thermo-protector 6. Extension Cord (not provided) 7. Cover latch A 7a. Screws 8. Switch 9. Screws(M3*25) 10. Screws(M3*15) 11. Upper part of switch box 12. Connector terminal and insulator 13. Power supply cords and cord sets 14. Wire connector soldering log 14.1. Wire connector soldering log 15. Lower part of switch box 16. Connection cable 17. Connection cable fixer nut 18. Connection cable fixer part 1 19.
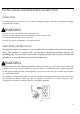
INSTALLATION AND OPERATIING INSTRUCTION INSPECTION Carefully unpack and inspect your new vacuum for shipping damage. Each unit is tested and thoroughly inspected before shipping. ! WARNING DO NOT vacuum with a frayed, worn, or damaged cord. DO NOT vacuum liquids or expose the backpack vacuum to rain or water. DO NOT vacuum hazardous or toxic materials. DO NOT use to pick up flammable or hazardous material GROUNDING INSTRUCTIONS This appliance must be grounded.
MOTOR The Prolux 10-quart back pack vacuum uses the industry’s best motor, the Amtek motor. Amtek 119534-00 vacuum motors must never be used in an application in which wet or moist conditions are involved, where dry chemicals or other volatile materials are present, or where airflow may be restricted or blocked. Such motors are designed to permit the vacuumed air to pass over the electrical wiring to cool it.
PREPARATION FOR OPERATION 1. Remove the cover (No. 34) and cover seal ring (No. 33) and pull out the cloth dust bag (No. 31). Check to see that the filter guards and filter (No. 1, No. 2 and No.3) have not shifted during shipping. (Figure A) 2. Install an inner paper dust bag (No. 32) inside of the outer cloth dust bag (No. 31). At the beginning of each shift, the bags should be checked. Empty or replace as necessary. The unit comes with 5 extra bags and additional bags are readily available for purchase.
8. Fix the switch box (No.11 and No.15) under the sewn strap and knot the other strap around the switch box. (Figure F & Figure G). 9. Loosen the waist belt latch and chest belt latch. In an open area, lift the vacuum by one shoulder strap and slide your free arm into the other strap. (Figure D) 10. Adjust the shoulder straps to allow the waist belt to be buckled around your waist. 11. Fasten the waist belt and chest belt snugly and make sure the weight is resting comfortably on your hips.
hand and elbow. CARING FOR YOUR VACUUM 1. Every time you finish vacuuming, shake out the cloth and paper dust bags (No.31 and No.32). 2. Each week, rinse, dry and return the foam (NO.21) at the bottom of the appliance below the motor. 3. After each shift, wipe the inside and outside of the vacuum with a household cleaning agent. FILTER MAINTENANCE 1. Check the paper dust bag (No.32) each time you start and finish vacuuming.
Warranty Information Your Prolux 10 Quart Back Pack Vacuum is protected by the 3-year Residential Manufacturer motor warranty (1 Year Commercial Manufacturer motor warranty) and a 1-year bumper to bumper warranty. Warranty does not cover filters which will need to be replaced from time to time depending on use. Should your unit need service or warranty work please contact the authorized dealer that you purchased the unit from for warranty instructions.