PROLUX 2.0 COMMERCIAL BAGLESS BACKPACK VACUUM CLEANER MODEL: 2.
For your safety please read owners manual in its entirety before use. Congratulations on your purchase of your new Prolux 2.0 Bagless Backpack Vacuum! The Prolux 2.0 Bagless is the worlds ONLY bagless backpack vacuum. Large companies use backpack vacuums, because they literally cut your cleaning time in half (compared to a upright vacuum). Weighing only 9 lbs. with the Prolux 2.0 Bagless Technology it is 40% more efficient and powerful than other bagless vacuums with an amazing 140 CFM of power.
Table of contents Specifications ............................................................................................................................... 3 Optional Accessories ............................................................................................................. 4 Safety Precautions ................................................................................................................... 4-6 Assembly Getting To Know Your Vacuum ........................................
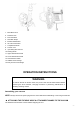
OPTIONAL ACCESSORIES • The Prolux 2.0 Power Nozzle attachment – This Power Nozzle attachment is great for anyone who is using their 2.0 in an area where the majority of the flooring is carpet, or floor rugs. With its electrically powered spinning brush-roll, this is the perfect attachment to deep clean any carpeted surface.
1. Do not leave the vacuum cleaner when plugged in. Unplug from outlet when not in use, and before Servicing. 2. Use only as described in this manual. Use only the recommended attachments, battery, charger, and replacement parts. 3. To reduce the risk of electric shock, do not use outdoors, on wet surfaces, and do not use for wet pickup/cleanup. 4. Use only as described in this manual. Use only the manufactures recommend attachments. 5. Do not use with damaged cord or plug.
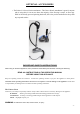
Never stick objects into the appliance's openings -- it could cause the appliance to overheat. Cord Connection The vacuum and battery charger run on electricity, that means there is always danger of electric shock, so please observe the following; - Never touch the plug with wet hands. - Always pull directly with the plug. If you want to disconnect the appliance from the outlet. Never pull on the cord, as it might break.
1. Main Motor Unit 2. Flexible Hose 3. Dust Container 4. Shoulder Straps 5. Exhaust HEPA Filter 6. Air Inlet Vortex Filter 7. Carpet/Floor Brush 8. Crevice Tool 9. Upholstery/Pet Hair tool 10. Dusting Brush 11. Upper Attachment Wand 12. Lower Attachment Wand 13. On/Off Power Switch 14. Additional tool storage 15.
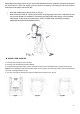
1. To connect the flexible hose to the unit slide the hose connector over the air inlet. (Fig 1) 2. To connect the flexible hose the attachment wands, slide the attachment end of the hose connection over the upper attachment wand. (Fig 2) Then take the upper attachment wand and insert it into the lower attachment wand. (Fig 3) 2. Plug the power cord into the electric outlet. 3. To remove the flexible hose, unplug the power cord and pull out the hose connector from the air inlet. 4.
DO NOT use the Pet Hair Removal Brush on wooden floors as this accessory may cause mild scratching or scarring of the surface. Always test a surface in an area that cannot be seen before use. CARPET/FLOOR BRUSH The Prolux 2.0 includes a specially designed floor tool that can be used on any surface without switching attachments. Easily transition between high pile carpets, low pile carpets and any hard floor surface, with the Carpet/Floor Brush.
backwards vacuuming motion as you would with standard vacuum cleaners. However because of the new Prolux 2.0 floor tool design, you can vacuum an area by vacuuming in half circle motions and vacuum the same area 2x as fast. • • Start with holding the wand as seen in (Fig A). Now twist at the waist in a side-to-side motion creating large “half circles” with the floor tool as you walk forward or backward.
Fig 9 n HOW TO EMPTY THE DUST CONTAINER You will want to empty the dirt in the dust container as soon as it has reached the “MAX” mark indicated on the outside of the tank, or if the suction power has dropped. To empty the Dust Container, please follow the instructions below. 1. Switch the vacuum cleaner to the “Off” position and disconnect the plug from the wall outlet. 2. Release the dust container by pressing down the release button. (Fig 10) 3. Pull the dust container away from the vacuum cleaner.
more efficient than standard filters and will have the same amount of airflow whether it’s dirty or clean. The entire surface of the filter will have to be covered in debris before the performance of the vacuum is affected, and the filter needs to be cleaned. Clean and replace the exhaust HEPA filter 1. Open the exhaust cover by rotating in count clockwise. (Fig 13) 2. Put the exhaust HEPA out of the unit. (Fig 13) 3.
Off and Retracting Power Cord.” ATTENTION: Do not use Alcohol, cleaning or scouring agents to clean your machine, as these may damage the appliance. Clean the outside of the housing using only a slightly damp washcloth. Troubleshooting WARNING: Never use a defective appliance. Always switch off the appliance and disconnect it from the outlet or remove the battery before you start to troubleshoot. Fault Possible Cause(s) Solution The vacuum will not turn on.
of three (3) years on the motor, and three (3) years on the body of the vacuum, free from manufacturer defects in material and workmanship from the original date of purchase, when utilized for normal household use. Subject to the following conditions, exclusions, and exceptions: What is Not Covered by the Prolux Warranty - Warranty Exclusions. This limited warranty does not extend to and expressly excludes: 1.
backpack-vacuum.html Environmental tips Once any electronic product is no longer functional, it should be disposed of in such a way as to cause minimum environmental impact, in accordance with the regulations of your local authority. In most cases you can take such products to your local recycling station.