
Operation Manual

Downloaded from www.vandenborre.be
tainer at the community waste disposal fa-
cilities.
Environmental tips
• In the dryer, laundry becomes fluffy and
soft. Fabric softeners are not therefore
needed when washing.
• Your dryer will function most economical-
ly if you:
– always keep the ventilation slots on the
base of the dryer unobstructed;
– use the loading volumes specified in
the programme overview;
– ensure you have good ventilation in the
installation room;
– clean the filter after each drying cycle;
– spin the laundry well before drying.
Energy consumption depends on spin-
ning speed set in washing machine.
Higher spinning speed - lower energy
consumption.
Installation
Appliance positioning
• It is recommended that, for your conven-
ience, the machine is positioned close to
your washing machine.
• The tumble dryer must be installed in a
clean place, where dirt does not build up.
• Air must be able to circulate freely all
round the appliance. Do not obstruct the
front ventilation grille or the air intake
grilles at the back of the machine.
• To keep vibration and noise to a mini-
mum when the dryer is in use, it should
be placed on a firm, level surface.
• Once in its permanent operating position,
check that the dryer is absolutely level
with the aid of a spirit level. If it is not,
raise or lower the feet until it is.
• The feet must never be removed. Do not
restrict the floor clearance through deeply
carpets, strips of wood or similar. This
might cause heat built-up which would
interfere with the operation of the appli-
ance.
Important! The hot air emitted by the
tumble dryer can reach temperatures of up
to 60°C. The appliance must therefore not
be installed on floors which are not resistant
to high temperatures.
When operating the tumble dryer, the room
temperature must not be lower than +5°C
and higher than +35°C, as it may affect the
performance of the appliance.
Warning! Should the appliance be
moved, it must be transported
vertically.
Warning! The appliance must not be
installed behind the lockable door, a
sliding door or a door with a hinge on
the tumble dryer door is restricted.
Ensure min. 5cm free space around the ap-
pliance.
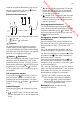
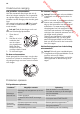
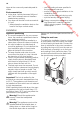
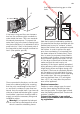
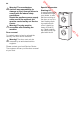
Fitting the vent hose
To simplify the installation, there is a choice
of vent outlets: one at the back, the others
in the left and right-hand side. Connect the
hose to whichever is the more convenient
by pulling the ring nut (A) from the vent out-
let at the back, screwing it on to the hose
and pushing it firmly back into place. The
unused vents should now be sealed with
the special snap covers provided.
A
18