nl ow D d de oa m fro e .b Minipicadora Mini Hachoir Mini-Hakker Mini Sekacek na potraviny Minimixer Mini Tritatutto Mini Chopper re or nb de an .
nl ow D w Do not unplug from the mains by pulling on the mains lead, grasp the plug to remove it. m fro IMPORTANT SAFETY INSTRUCTIONS d de oa EN or nb de an .v w w This appliance is not intended for use by persons (including children) with reduced physical, sensory or mental capabilities, or lack of experience and knowledge, unless they have been given supervision or instruction concerning use of the appliance by a person responsible for their safety.
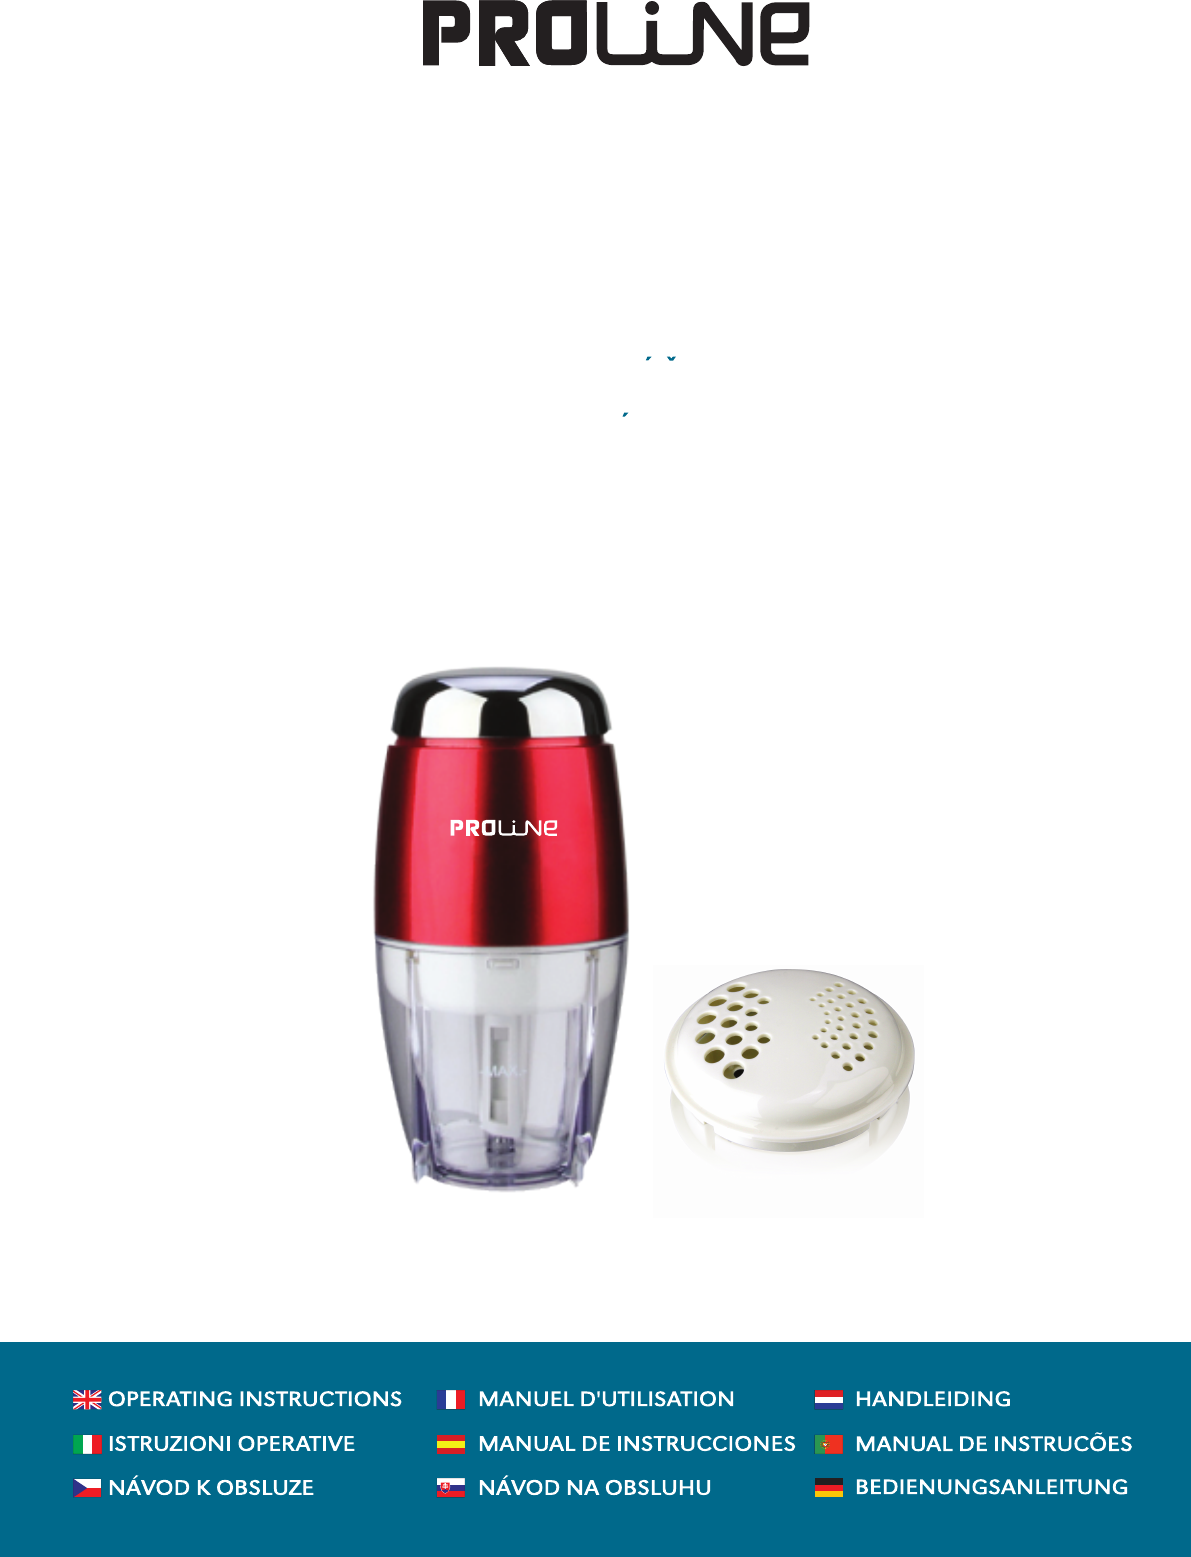
d de oa OVERVIEW nl ow D EN m fro e .b re or nb de an .v w w w UNPACKING Carefully unpack your chopper, as blades are very sharp. Inspect the chopper for any signs of damage, paying particular attention to the mains cable. If any damage is found, do not use it. USING YOUR MINI CHOPPER 1. Remove the power unit and lid from the receptacle and place the receptacle on a flat, stable and dry surface. y To remove the lid, press tabs at both sides of the lid toward the centre then pull out the lid.
d de oa 2. Place the blade attachment onto the pin in the middle of the receptacle. nl ow D EN m fro Make sure the ingredients are chopped or sliced into small pieces before processing. e .b re y or nb de an .v w w w 3. Fill the receptacle with ingredients. Do not exceed the MAX. line. 4. Place the lid onto the receptacle until a click is heard. The chopper will not work unless the lid has been properly fitted. 5. Place the power unit on the receptacle with lid. 6.
nl ow D d de oa EN CLEANING fro Always unplug the chopper from the mains supply before cleaning. m w Remove the power unit, the lid and the blade attachment. 2. Clean the lid, the blade attachment and the sprinkle attachment in warm soapy water and dry thoroughly. Extreme care shall be taken when cleaning the blades which are very sharp. 3. Clean the power unit with a damp cloth. NOTE: Never immerse the motor unit or its lead in water.
nl ow D Les instructions doivent comporter en substance les indications suivantes: or nb de an .v w y w Ne débranchez jamais l’appareil en tirant sur le fil, tirez toujours sur la prise mâle.
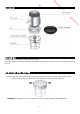
d de oa DESCRIPTION nl ow D FR m fro or nb de an .v w w w Bouton d’allumage Bloc moteur e .b re Grille d’aspersion Couvercle Ensemble lames Réceptacle DÉBALLAGE Soyez vigilant en déballant votre hachoir : la lame est très coupante. Vérifiez que le hachoir est en bon état, en prêtant particulièrement attention au câble d’alimentation. Si vous constatez la moindre détérioration, n’utilisez pas le hachoir. UTILISATION DU HACHOIR 1.
nl ow D 2. Emboîtez l’ensemble lames sur la tige située au milieu du réceptacle. d de oa FR m fro Les ingrédients doivent être tranchés ou découpés en petits morceaux avant d’aller dans le hachoir. couvercle n’est pas bien en place. 5. Placez le bloc moteur par-dessus le couvercle. 6. Branchez le hachoir sur une prise secteur. 7. Allumez le hachoir en maintenant enfoncé le bouton d’allumage. Les ingrédients mous ou liquides peuvent être traités sur une courte durée.
nl ow D d de oa FR NETTOYAGE m fro Débranchez toujours le hachoir de la prise secteur avant de le nettoyer. w Démontez le bloc moteur, le couvercle et l’ensemble lames. 2. Nettoyez le couvercle, l’ensemble lames et la grille d’aspersion dans de l’eau chaude savonneuse, puis or nb de an .v w w 1. séchez-les soigneusement. Les lames sont très coupantes : Soyez extrêmement vigilant lorsque vous les nettoyez. Le bloc moteur se nettoie au moyen d’un chiffon mouillé.
nl ow D m Ontkoppel niet van het stopcontact door aan het elektriciteitsnoer te trekken. Neem de stekker vast om te ontkoppelen. y or nb de an .
d de oa OVERZICHT nl ow D NL m fro or nb de an .v w w w Stroomtoets Motorgedeelte e .b re Strooistuk Deksel Mesblad Houder UITPAKKEN Wees voorzichtig wanneer U uw hakmachine uitpakt aangezien de messen heel scherp zijn. Inspecteer de hakmachine op tekenen van schade en let vooral op het netsnoer. Gebruik het toestel niet indien U schade vaststelt. UW MINI HAKMACHINE GEBRUIKEN 1. Verwijder het motorgedeelte en deksel van de houder en plaats de houder op een plat, stabiel en droog oppervlak.
nl ow D 2. Plaats het mesblad op de pin in het midden van de houder. d de oa NL m fro Zorg ervoor dat de ingrediënten gehakt zijn of in kleine stukjes zijn gesneden vooraleer te verwerken. 4. Plaats het deksel op de houder tot U een klik hoort. De hakker zal niet werken tenzij het deksel correct is geplaatst. 5. Plaats het motorgedeelte op de houder met deksel. 6. Sluit de hakmachine aan op het stopcontact. 7. Houd de stroomtoets ingedrukt.
nl ow D d de oa NL SCHOONMAKEN m fro Trek de stekker altijd uit het stopcontact vooraleer schoon te maken. w Verwijder het motorgedeelte, het deksel en het mesblad. 2. Reinig het deksel, het mesblad en het strooistuk in warm zeepwater en droog grondig. Wees extra voorzichtig or nb de an .v w w 1. wanneer U de zeer scherpe messen schoonmaakt. 3. Maak het motorgedeelte schoon met een vochtige doek. komt aangezien dit het toestel kan beschadigen.
nl ow D w Neodpojujte ze zásuvky taháním za přívodní kabel, ale uchopením za zástrčku. m fro DŮLEŽITÉ BEZPEČNOSTNÍ POKYNY d de oa CZ or nb de an .v w w Tento přístroj není určen k používání osobami (včetně dětí) se sníženými fyzickými, vjemovými nebo duševními schopnostmi, osobami s nedostatečnými zkušenostmi a vědomostmi, pokud nejsou pod dozorem nebo poučeny o používání přístroje osobou zodpovědnou za jejich bezpečnost. Nedovolte dětem hrát si se spotřebičem nebo v jeho blízkosti.
d de oa PŘEHLED nl ow D CZ m fro or nb de an .v w w w Tlačítko Zap./Vyp. Hnací jednotka e .b re Upevnění kropenky Víčko Upevnění sekacích nožů Nádoba VYBALENÍ Mixér rozbalte velmi opatrně, neboť nože jsou velmi ostré. Zkontrolujte, zda na nožích nejsou stopy po poškození. Zvláštní pozornost věnujte přívodnímu kabelu. Pokud zjistíte jakékoli poškození, nepoužívejte jej. POUŽITÍ VAŠEHO MINI MIXÉRU 1. Sejměte z nádoby hnací jednotku a víčko a umístěte nádobu na rovný, stabilní a suchý povrch.
nl ow D d de oa CZ UPOZORNĚNÍ: Sekací nože jsou velmi ostré. Při manipulaci s upevněním nožů buďte velice opatrní. m fro 3. Naplňte nádobu přísadami. Nepřekračujte vyznačené maximum (MAX.). Před zpracováním se ujistěte, že přísady jsou nasekány nebo nakrájeny na malé kousky. 4. Nasaďte víčko na nádobu, ozve se cvaknutí. Mixér nebude pracovat, pokud není víčko správně nasazené. 5. Nasaďte hnací jednotku na nádobu s víčkem. 6. Zapojte mixér do zásuvky. 7. Stiskněte a podržte tlačítko Vyp./Zap.
m fro Před čištěním vždy odpojte mixér ze zásuvky. d de oa ČIŠTĚNÍ nl ow D CZ w Sejměte hnací jednotku, víčko a upevnění nožů. 2. Víčko, upevnění nožů a upevnění kropenky omyjte v teplé mýdlové vodě a důkladně osuště. Buďte mimořádně opatrní při čistění nožů, které jsou velmi ostré. 3. Hnací jednotku očistěte vlhkým hadříkem. může dojít k poškození. TECHNICKÉ ÚDAJE Napětí: 220 – 230 V stříd.
d de oa m fro DÔLEŽITÉ BEZPEČNOSTNÉ POKYNY nl ow D SK Nikdy nevyťahujte zástrčku zo zásuvky ťahaním za sieťovú šnúru, pre vytiahnutie pevne uchopte zástrčku. or nb de an .
d de oa m fro PREHĽAD nl ow D SK or nb de an .v w w w Tlačidlo napájania Napájacia jednotka e .b re Príslušenstvo na posypávanie Veko Nástavec so sekacími čepeľami Nádoba VYBALENIE Vaše zariadenie rozbaľte opatrne, pretože čepele nožov sú veľmi ostré. Skontrolujte, či sa na zariadení nenachádzajú známky poškodenia, zvýšenú pozornosť venujte sieťovej šnúre. Ak nájdete akékoľvek poškodenie, zariadenie nepoužívajte. POUŽÍVANIE MINI KRÁJAČA 1.
nl ow D d de oa SK VAROVANIE: Krájacie čepele sú veľmi ostré. Počas manipulácie s čepeľami dávajte veľký pozor. m fro 2. Umiestnite nástavec s čepeľami na osku v strede nádoby. 4. Umiestnite veko na nádobu tak, aby ste počuli cvaknutie. Krájač nebude fungovať, ak veko nebude správne umiestnené. 5. Umiestnite napájaciu jednotku na nádobu s vekom. 6. Zapojte zariadenie do elektrickej siete. 7. Podržte stlačené napájacie tlačidlo. Vlhké alebo jemné suroviny môžete spracovať za krátky čas.
nl ow D d de oa SK fro ČISTENIE m Pred čistením sa uistite, že je zariadenie odpojené od elektrickej siete. or nb de an .v w w w 1. Vyberte napájaciu jednotku, veko a nástavec s čepeľami. 2. Veko, nástavec s čepeľami a príslušenstvo na posypávanie čistite v teplej mydlovej vode a dôkladne ich vysušte. Pri čistení čepelí musíte byť extrémne opatrní, čepele sú veľmi ostré. Napájaciu jednotku vyčistite pomocou navlhčenej handričky. neponárajte zariadenie s motorom ani sieťovú šnúru do vody.
nl ow D m fro IMPORTANTI INFORMAZIONI SULLA SICUREZZA d de oa I Non scollegare dalla corrente tirando il cavo, afferrare la spina per rimuoverla. y L’uso di questo apparecchio non è destinato a persone (compresi bambini) con ridotte capacità fisiche, sensoriali o or nb de an .v w w w y mentali, o mancanza di esperienza e conoscenza, a meno che non siano sotto la supervisione o seguano le istruzioni sull'uso dell'apparecchio fornite da una persona responsabile della loro sicurezza.
d de oa VEDUTA D'INSIEME nl ow D I m fro or nb de an .v w w w Tasto accensione Unità motore Accessorio lame Contenitore SCONFEZIONAMENTO Spacchettare con cura il tritatutto, perché le lame sono molto affilate. Controllare il tritatutto per eventuali danni, prestando particolare attenzione al cavo. Se è presente un danno, non usarlo. USARE IL MINI TRITATUTTO 1. Rimuovere l’unità motore e il coperchio dal contenitore e posizionare il contenitore su una superficie piana, stabile e asciutta.
nl ow D 2. Posizionare l’accessorio con le lame nel piolo posto al centro del contenitore. d de oa I m fro coperchio non sia inserito correttamente. 5. Posizionare l’unità motore sul contenitore con il coperchio. 6. Collegare il tritatutto alla corrente. 7. Tenere premuto il tasto accensione. Ingredienti bagnati o morbidi possono essere lavorati per breve tempo. Non far funzionare il tritatutto continuamente per più di 1 minuto. Far raffreddare per 5 minuti prima di usarlo nuovamente. 8.
nl ow D d de oa I Rimuovere l’unità motore, il coperchio e l’accessorio lame. 2. Pulire il coperchio, l’accessorio lame e l'accessorio per cospargere in acqua calda e sapone e asciugare bene. Prestare massima attenzione quando si puliscono le lame che sono molto affilate. w Pulire l’unità motore con un panno umido. or nb de an .v w w 3. m fro 1. NOTA: Non immergere mai l’’unità motore o il cavo in acqua. Non far entrare acqua nell’unità motore perché può danneggiarsi. e .
nl ow D m fro INSTRUCCIONES DE SEGURIDAD IMPORTANTES d de oa ES No desconecte de la red tirando del cable de corriente, sujete el enchufe para extraerlo. y Este aparato no ha sido diseñado para se utilizado por personas (incluyendo niños) con capacidades físicas, or nb de an .v w w w y sensoriales o mentales reducidas o con falta de experiencia y conocimiento, a menos que estén supervisados o hayan sido instruidos sobre el uso del aparato por la persona responsable de su seguridad.
d de oa PERSPECTIVA nl ow D ES m fro or nb de an .v w w w Interruptor general Unidad principal e .b re Accesorio para espolvorear Tapadera Accesorio de cuchillas de corte Rec i piente DESEMBALAJE Desempaquete la picadora con cuidado, ya que las cuchillas son muy afiladas. Compruebe la picadora para detectar cualquier daño, prestando especial atención al cable eléctrico. Si encuentra algún daño, no la utilice. UTILIZAR SU MINI PICADORA 1.
nl ow D d de oa ES ADVERTENCIA: Las cuchillas de corte son muy afiladas. Tenga cuidado cuando maneje el accesorio de m fro cuchillas. e .b re or nb de an .v w w w 2. Coloque el accesorio de cuchillas sobre el perno situado en el medio del recipiente. 3. Llene el recipiente con los ingredientes. No exceda de la línea de nivel MAX. Antes de procesar, asegúrese que los ingredientes han sido troceados o cortados en piezas pequeñas. 4.
nl ow D d de oa ES LIMPIEZA m fro Antes de limpiar la picadora desenchúfela siempre de la toma de corriente. w Retire la unidad principal, la tapadera y el accesorio de cuchillas. 2. Limpie la tapadera y los accesorios de cuchillas y para espolvorear con agua jabonosa templada, y séquelos por completo. Tenga mucho cuidado cuando limpie las cuchillas ya que son muy afiladas. 3. Limpie la unidad principal con un paño húmedo. NOTA: Nunca sumerja la unidad de motor o su cable en agua.