PRODUCT REF In d uc tion c ook er Tab le à in d uc tion In d uc tie k ook plaat P laq ua elé tric a Aq uec ed or OPERATING INSTRUCTIONS MANUEL D'UTILISATION MANUAL DE INSTRUCCIONES MANUAL DE INSTRUCÕES HANDLEIDING Downloaded from www.vandenborre.
EN TABLE OF CONTENTS IMPORTANT SAFEGUARDS .................................................................. 1 AD DITIONAL SAFEGUARDS ............................................................. 2 Product Introduction ............................................................................... 3 Designations of parts ............................................................................. 3 Performance Parameters .......................................................................
EN 13. WARNING To prevent electric shock, unplug before cleaning. 14. This appliance a polarised plug (one blade is wider than the other). To reduce the risk of electric shock, this plug is intended to fit into a polarised outlet only one way. If the plug does not fit fully into the outlet, reverse the plug. If it still does not fit, contact a qualified electrician, Do not attempt to modify the plug in any way. 15.
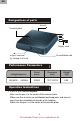
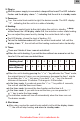
EN Designations of parts Airvent Ceramic plate Supply cord adjus t heat level b y turning t he knob Air ventilation slot Performance Parameters voltage/frequency Rated power Dimension (mm) Weight (kg) 220-240V~ 50/60Hz 2000W 310*310*65 2.55 Operation Instructions 1. Place a pan on the hotplate. Make sure the pan is in the center of the ceramic plate. Make sure the air vents are not blocked and keep pans and utensils away from the immediate surrounds of the hotplate.
EN 2. Plug in After the power supply is connected, a beep will be heard The LED indicator flashes and the display shows "-", indicating that the unit is in standby mode. 3. Power on: Turn the control knob switch to right, the buzzer sounds. The LED display “0”, indicating that the unit is in a state of standby. 4. Heating: Turning the control knob to the right, when the unit is in standby, a beep will be heard, the LED display shows 0-9 , the induction cooker starts heating.
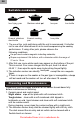
EN Suitable cookware Iron frying pan Stainless steel pot Iron pan Enamel stainless steel kettle Enamel cooking pan Iron pIate Iron kettle 1. The use of the pots sold along with the unit is recommend. It is better not to use other alternatives so as to avoid compromising the cooking performance. If using other pots, please observe the following conditions: the pot must contain magnetic inducting materials; Shape requirement: flat bottom, with a diameter within the range of 12 cm to 18 cm. 2.
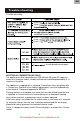
EN Trouble shooting Trouble shooting Check Check compatible. Check a qualified service agent. Check if Check if Check if timer has reached "0" an authorised service agent. ELECTRICAL CONNECTION (UK ONLY) The appliance must be connected to a 220-240 volts 50 cycle AC supply by means of a three pin socket, suitably earthed and should be protected by a 13 amp fuse in the plug. The appliance is supplied with a standard 13-amp 3-pin mains plug fitted with a 13 amp fuse.
EN How to wire a 13 amp plug. Important The wires in the mains lead on this appliance are coloured in accordance with the following code: Blue – Neutral Brown – Live As the colours may not correspond with the markings identifying the terminals in your plug proceed as follows. The blue wire must be connected to the terminal marked N. The brown wire must be connected to the terminal marked L. IMPORTANT DISPOSAL INSTRUCTIONS As a responsible retailer we care about the environment.
FR Sommaire INSTRUCTIONS IMPORTANTES PRÉCAUTIONS SUPPLÉMENTAIRES Présentation de l'appareil Désignation des pièces Spécifications techniques Instructions d'utilisation Batterie de cuisine adaptée Nettoyage et entretien Dépannage Branchement électrique INSTRUCTIONS DE SÉCURITÉ IMPORTANTES Si le cordon d'alimentation est défectueux, adressez-vous au constructeur, à son centre de service ou à une personne qualifiée pour le remplacer et vous éviter tout risque d'électrocution.
FR 13. AVERTISSEMENT : débranchez l'appareil du secteur avant de le nettoyer pour ne pas vous exposer à un risque d'électrocution. 14. Cet appareil est équipé d'une prise polarisée (une broche est plus large que les autres) qui ne peut s'adapter que sur une prise secteur également polarisée. Si aucune de vos prises secteur ne correspond, demandez à un technicien qualifié de vous en installer une. N'essayez pas de modifier la prise de votre appareil. 15.
FR Désignation des pièces Prise d'air Plaque en céramique Cordon d'alimentation Tournez le bouton pour ajuster la température de la plaque Ouverture d'aération Spécifications techniques Tension/Fréquence Puissance Dimensions (mm) Poids (kg) Instructions d'utilisation 1. Posez un récipient approprié sur la plaque de cuisson. Vérifiez qu'il se trouve au centre de la plaque en céramique.
FR 2. Branchement électrique Branchez le cordon d'alimentation dans une prise secteur. Un bip retentit, la LED clignote et l'écran affiche "-". La plaque de cuisson est maintenant en mode veille. 3. Mise en route Tournez le bouton vers la droite. Une sonnerie retentit et la LED affiche "0". La plaque de cuisson est prête à chauffer. 4. Cuisson Tournez le bouton davantage vers la droite. Un bip retentit et la LED affiche une valeur entre 0 et 9. La plaque de cuisson commence à chauffer.
FR Batterie de cuisine adaptée Poêle à frire en acier Faitout en acier inoxydable Sauteuse en fer Bouilloire en fer Bouilloire émaillée Casserole émaillée Plat en fer en acier inoxydable 1. Utilisez de préférence les récipients de cuisson vendus avec votre plaque. Tout autre récipient risque de diminuer les bonnes performances de votre appareil.
FR Guide de dépannage Guide de dépannage Problème L'appareil est branché sur le secteur mais le témoin de marche/arrêt (ON/OFF) ne s'allume pas. Cause possible Vérifiez que la prise est correctement branchée sur le secteur. Vérifiez que le commutateur de marche/arrêt, la prise secteur, le fusible et le cordon d'alimentation fonctionnent correctement. Le témoin de marche/arrêt (ON/OFF) s'allume mais la plaque ne chauffe pas. Vérifiez que le matériau du récipient convient pour une cuisson par induction.
FR IMPORTANTES INSTRUCTIONS DE MISE AU REBUT En tant que revendeur, nous nous préoccupons de l'environnement. Aidez-nous en observant toutes les instructions et réglementations de mise au rebut de vos appareils et emballages. Nous devons tous œuvrer pour la protection des ressources naturelles et la conservation de notre environnement. Déposez vos appareils électroniques et vos emballages auprès des installations de recyclage prévues.
NL INHOUDSOPGAVE BELANGRIJKE VEILIGHEIDSVOORZORGEN BIJKOMENDE VEILIGHEIDSVOORZORGEN Inleiding tot het apparaat Benaming van de onderdelen Parameters van de performance Gebruiksaanwijzing Geschikt kookgerei Onderhoud en schoonmaak Problemen oplossen Bijzondere verklaring BELANGRIJKE VEILIGHEIDSVOORZORGEN Een beschadigd netsnoer mag uitsluitend door de fabrikant, een erkende reparatieservice of een gekwalificeerde technicus worden vervangen door een snoer van hetzelfde type en voltage om gevaren te voorkom
NL 13. WAARSCHUWING: om elektrische schokken te voorkomen moet men de stekker uittrekken voordat men dit apparaat gaat schoonmaken. 14. Dit apparaat is voorzien van een gepolariseerde stekker (waarvan één pin breder is dan de andere). Om een gevaar van elektrische schokken te voorkomen past deze stekker slechts op één manier in het stopcontact. Wanneer de stekker niet volledig in een stopcontact bij u thuis kan worden gestopt, dient u contact op te nemen met een gekwalificeerde technicus.
NL Benaming van de onderdelen Luchtuitlaat Keramische plaat Netsnoer Draai de knop voor de warmteregeling Air ventilator slot Sleuf voor luchtventilatie Parameters van de performance Voltage/frequentie Nominaal vermogen Afmetingen (mm) Gewicht (kg) Gebruiksaanwijzing 1. Zet een pan op de kookplaat. Zorg ervoor dat de pan zich in het midden van de kookplaat bevindt. Zorg ervoor dat de luchtuitlaten niet geblokkeerd worden en houd pannen en kookgerei uit de onmiddellijke nabijheid van de kookplaat.
NL 2. Stop de stekker in een stopcontact. U hoort een pieptoon nadat de stroomvoeding is aangesloten. De LED-indicator knippert en “-“ verschijnt op de display, aangevend dat het apparaat zich in de modus stand-by bevindt. 3. Schakel de stroom in: Schakel de schakelaarknop naar rechts zodat u een zoemgeluid hoort. “0” verschijnt op de LED-display, aangevend dat het apparaat zich in de modus stand-by bevindt. 4. Verhitten: Draai in stand-by de regelknop naar rechts, zodat u een pieptoon hoort.
NL Geschikt kookgerei IJzeren braadpan Roestvrij stalen kookpot IJzeren pan IJzeren waterketel Geëmailleerde roestvrij Geëmailleerde IJzeren plaat stalen waterketel kookpan 1. Het gebruik van pannen die samen met het apparaat worden verkocht is aanbevolen. Het is beter geen andere kookpannen te gebruiken, omdat u dan niet zeker bent van het resultaat. Gelieve de volgende omstandigheden in acht te nemen wanneer u andere kookpannen gebruikt: de pan dient magnetische inductiestoffen te bevatten.
NL Problemen oplossen Problemen oplossen Probleem Nadat het apparaat op de netvoeding is aangesloten gaat het indicatorlampje “AAN/UIT” niet branden. Mogelijke oorzaak Controleer of de stekker stevig in het stopcontact is gestopt. Controleer of de schakelaar, het stopcontact, de zekering en het netsnoer in goede staat zijn. Het indicatorlampje “AAN/UIT” brandt maar de kookplaat warmt niet op. Controleer of het materiaal van de pan geschikt is.
NL BELANGRIJKE INSTRUCTIES BETREFFENDE HET WEGWERPEN VAN DIT APPARAAT Als een verantwoordelijke verkoper geven wij om het milieu. Daarom willen wij u aansporen de correcte afvalbehandelingsmethode te volgen voor het wegwerpen van dit apparaat en de verpakkingsmaterialen. Dit helpt bij het besparen van natuurlijke grondstoffen en verzekert dat het product wordt gerecycleerd op een manier die de gezondheid en het milieu beschermt.
ES LISTA DE CONTENIDO IMPORTANTES PRECAUCIONES DE SEGURIDAD PRECAUCIONES ADICIONALES Introducción del Producto Designación de las parte Parámetros de Funcionamiento Instrucciones de Funcionamiento Recipientes de cocción adecuados Limpieza y Mantenimiento Declaración Especial IMPORTANTES PRECAUCIONES DE SEGURIDAD Si el cable eléctrico resulta dañado deberá ser sustituido por el fabricante, el servicio técnico o persona con formación similar, utilizando un cable del mismo tipo y características para evitar
ES 13. ADVERTENCIA Para evitar una descarga eléctrica, desenchufe el cable eléctrico antes de limpiar la placa. 14. Este aparato incluye una clavija polarizada (una punta es más ancha que las otras). Para evitar una descarga eléctrica, esta clavija encajará en la toma en una sola dirección. Si no puede enchufar la clavija por completo, invierta la posición de la misma. Si todavía no puede enchufarla, póngase en contacto con un electricista cualificado. No intente modificar la clavija. 15.
ES Designación de las partes Ventilación Placa cerámica Cable de alimentación Gire el botón para ajustar la potencia del fuego Ranura de ventilación Parámetros de funcionamiento Voltaje/Frecuencia Potencia nominal Dimensiones (mm) Peso (kg) Instrucciones de Funcionamiento 1. Coloque una sartén sobre la placa de inducción. Compruebe que la olla está en el centro de la placa de inducción.
ES 2. Conectar Después de conectar el cable eléctrico, escuchará un pitido. El indicador LED parpadeará y en el visualizador verá “-“, que indica que el aparato está en el modo de espera. 3. Encender: Gire el botón de control hacia la derecha, oirá una señal sonora. En el visualizador LED verá “0”, indicando que el aparato está en espera. 4.
ES Recipientes de cocción adecuados Sartén de hierro Olla de acero inoxidable Tetera esmaltada de acero inoxidable Olla esmaltada Olla de hierro Tetera de hierro Placa de hierro 1. Recomendamos usar las ollas adquiridas junto con la placa. Es preferible no utilizar otros utensilios alternativos para evitar problemas en la cocción.
ES Posibles causas Problema Después de conectar la alimentación, la luz indicadora de “ON/OFF” (“ENCENDER/ APAGAR”) no se enciende. Compruebe que la clavija está correctamente enchufada. Compruebe que el interruptor, la clavija, el fusible y el cable eléctrico están en buenas condiciones. La luz indicadora de “ON/OFF” (“ENCENDER/APAGAR”) se enciende, pero la placa no se calienta. Compruebe que el material de la olla es compatible.
ES INSTRUCCIONES IMPORTANTES DE ELIMINACIÓN Como minoristas responsables, nos preocupamos por el medio ambiente. Como tales le instamos a que siga el procedimiento correcto de eliminación de su producto, baterías y materiales de embalaje. Esto ayudará a conservar los recursos naturales y a asegurar que se reciclen de una manera que proteja la salud y el medio ambiente. Debe deshacerse de este producto y de su embalaje siguiendo las leyes y reglamentos locales.
PT ÍNDICE INSTRUÇÕES DE SEGURANÇA IMPORTANTES INSTRUÇÕES DE SEGURANÇA ADICIONAIS Introdução ao Produto Designação dos componentes Parâmetros do desempenho Instruções de funcionamento Utensílios de cozinha adequados Limpeza e manutenção Resolução de problemas Declaração Especial INSTRUÇÕES DE SEGURANÇA IMPORTANTES Se o cabo eléctrico ficar danificado, deve ser substituído pelo fabricante, pelo técnico de assistência ou por pessoa de equivalente qualificação, por outro cabo do mesmo tipo e classificação, pa
PT 13. AVISO: Para evitar choques eléctricos, desligue a ficha da tomada de corrente antes da limpeza. 14. Este aparelho possui uma ficha polarizada (um pino é mais largo que o outro). Para reduzir o risco de choque eléctrico, esta ficha destina-se a ser utilizada numa tomada de corrente de uma posição única. Se a ficha não encaixar completamente na tomada, inverta a ficha. Se, ainda assim, não encaixar, contacte um electricista qualificado. Não tente, de forma alguma, modificar a ficha. 15.
PT Designação dos Componentes Ventilação do Ar Placa Cerâmica Cabo Eléctrico Ajuste o nível de aquecimento rodando o manípulo Ranhura de Ventilação do Ar Parâmetros do Desempenho Voltagem/Frequência Potência atribuída Dimensões (mm) Peso (kg) Instruções de funcionamento 1. Coloque um recipiente na placa de aquecimento. Certifique-se de que o recipiente fica no centro da placa cerâmica.
PT 2. Ligar à corrente Depois de a fonte de alimentação estar ligada, será ouvido um sinal sonoro. O indicador LED fica intermitente e “ – “ é exibido no visor, indicando que a unidade se encontra no modo de espera. 3. Ligar: Rode o manípulo de controlo para a direita e é emitido um sinal sonoro. O LED exibe “0”, indicando que a unidade se encontra no estado de espera. 4.
PT Utensílios de cozinha adequados Frigideira em Ferro Tacho em Aço Inoxidável Caçarola em ferro Chaleira em ferro Chaleira em aço Panela Esmaltada Travessa em ferro inoxidável esmaltado 1. É recomendada a utilização dos recipientes vendidos juntamente com a unidade. É melhor opção não utilizar outras alternativas para evitar comprometer o desempenho da unidade.
PT Resolução de problemas Resolução de problemas Problema Depois de a corrente ligada, o indicador luminoso “ON/OFF” (“LIGAR/DESLIGAR”) não acende. Causa possível Verifique se a ficha está devidamente inserida. Verifique se o manípulo, a tomada, o fusível e o cabo eléctrico se encontram em boas condições. O indicador luminoso “ON/OFF” (“LIGAR/DESLIGAR”) acende-se, mas não se inicia o aquecimento. Verifique se os materiais dos recipientes são compatíveis.
PT INSTRUCCIONES IMPORTANTES DE ELIMINACIÓN Como minoristas responsables, nos preocupamos por el medio ambiente. Como tales le instamos a que siga el procedimiento correcto de eliminación de su producto, baterías y materiales de embalaje. Esto ayudará a conservar los recursos naturales y a asegurar que se reciclen de una manera que proteja la salud y el medio ambiente. Debe deshacerse de este producto y de su embalaje siguiendo las leyes y reglamentos locales.