
User guide

2. Press “ TEST” button then Master unit and Remote unit
both #1~19 and “Shield” LEDs will indicate tested result.
Testing result will keep 12 seconds then all LEDs are off
except “POWER”LED for saving power.
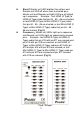
3. LED indicates test result as below:
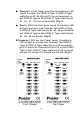
Straight:Master unit and Remote unit both testing
pin #1~19 and “Shield” LEDs are all lighted up. (Fig
6.)
Open:Master unit and Remote unit both no
connected pins LEDs are off. (Fig 7.)
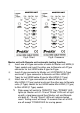
Short:Master unit testing short pin LEDs brighter
than others. Remote unit shorted pins LEDs are off.
(Fig 8.)
Crossover:It can’t be tested on this mode.
Master unit with Remote unit slow continuity scan testing
function:
1. Press “ TEST“ button during LED indicate automatic
testing result or Press twice “ TEST“ button before LED off
for perform automatic testing, it will continually scan
#1~#19 pin and shield conductor. Master unit and Remote
unit both #1~19 and Shield LEDs will light up in sequence
very slow and sustained repeated automatic scan
2. LED indicate testing result as below:
Straight:Master unit and Remote unit both testing
pins #1~19 and Shield LEDs are all lighted up in
sequence. (Fig 6.)
Open: Master unit and Remote unit both LEDs are
off when scan to no connected pins, others LEDs are
all lighted up in sequence. Example : Test HDMI (A
Type) to HDMI (A Type) cable that pin #2、#5、#8、
#11 are not connected, or test HDMI (A Type) to
Mini-HDMI (C Type) cable that pin #1、#4、#7、#10 are
not connected, or test Mini-HDMI (C Type) to
Mini-HDMI (C Type) cable that pin #1、#4、#7、#10 are
not connected. (Fig 7.)
8