
User`s guide


www.projectiondesign.com
english
65
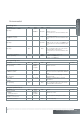
Table of fi gures
Figure 5-1. MIPS system overview 15
Figure 5-2. Rack mount plate 16
Figure 5-3. Rack mounted 16
Figure 6-4. Overview of ProNet.site 18
Figure 6-5. MIPS Calibrator, Device View. 19
Figure 6-6. File menu, Device View. 20
Figure 6-7. The Device Tree in the Device Pool. 20
Figure 6-8. Toolbars, shown with and without help texts. 21
Figure 6-9. Clearing calibration 22
Figure 6-10. Application and Network settings. 22
Figure 6-11. MIPS software upgrade window. 23
Figure 6-12. EDID Administration. 24
Figure 6-13. Switching views from Calibrator view to Device view and back. 24
Figure 6-14. Calibration toolbar, without and with help texts. 25
Figure 6-15. MIPS Navigator 25
Figure 6-16. Top toolbar window navigation 26
Figure 6-17. Calibration Panel Toolbar, without and with help texts. 26
Figure 6-18. Set colors control box 27
Figure 7-19. Warping algorithm setup 30
Figure 7-20. Scaling filters 31
Figure 7-21. Working with the perspective transform 32
Figure 7-22. Working with the Mesh Smythe algorithm 33
Figure 7-23. Mesh Bezier with 1x1 grid 34
Figure 7-24. Working with Mesh Bezier, simple mapping 35
Figure 8-25. Basic edge blending. 38
Figure 8-26. Adding a blend zone. 39
Figure 8-27. Add blend zone window. 40
Figure 8-28. Working with advanced edge blending. 40
Figure 8-29. Adjusting the blend drop off curve. 41
Figure 9-30. Adding test patterns 43
Figure 9-31. Test Image Setup window 43
Figure 9-32. Circle test patterns 44
Figure 9-33. Grid (Pixel) test pattern 45
Figure 9-34. Grid (Angle) test pattern 46
Figure 9-35. Disabling the warp grid 46
Figure 10-36. Start BLM tool. 47
Figure 10-37. Adding Black Level Management lines. 48
Figure 10-38. Multiple Black Level Management lines added. 48
Figure 10-39. Connecting the first and last Black Level Management points. 49
Figure 10-40. Adjusting black level. 50
Figure 11-41. Starting the clip tool 51
Figure 11-42. Adding the first line in a clip area. 52
Figure 11-43. Adding multiple side in a clip area. 53
Figure 11-44. Clipping area complete. 54
Figure 12-45. Save current calibration to the MIPS unit 57
Figure 12-46. Backup up calibration data. 58
Figure 12-47. Selecting folder for backup 58