
Manual


15
Four Panels in Series & Parallel, 24V Installation
You will also need:
• 24V Solar Controller
• Suitable cable. (see Table 3 for recommended cable sizes)
• Correct rated fuse or circuit breaker
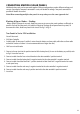
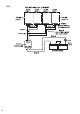
1. Connect a fuse or circuit breaker to the positive terminal of the battery, (As near to the battery as possible)
refer to Fig. 10. Leave the fuse out.
2. Connect a cable from the fuse or circuit breaker to the solar controllers’ positive terminal.
3. Connect a cable from the battery’s negative terminal to the solar controller’s negative terminal.
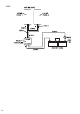
4. Connect blocking diode to solar Panel 2 and 4. Be sure to connect the end of the diode with the white band to
the extra post and the unmarked end to the positive (+) terminal. Note: The SPP60, SPP80, SPP120 & SPP135
do not have an extra post and will have to be connected directly to the cable. See Fig. 11.
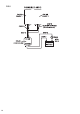
5. Connect the cable from Solar Panel No.1’s positive terminal to Solar Panel No.2’s negative terminal to create
a solar panel array.
6. Connect the cable from Solar Panel No.3’s positive terminal to Solar Panel No.4’s negative terminal to create
a second solar panel array.
7. Connect cables from all of the solar array’s negative terminals to the solar controller’s negative terminal.
8. Connect cables from all of the solar array’s positive terminals to the solar controller’s positive terminal.
9. Insert fuse.
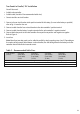
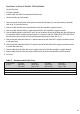
Table 3 – Recommended Cable Sizes
Cable distance Solar Panel Solar Panel Solar Panel Solar Panel
(meters) SPP80-MC4 SPP120-MC4 SPP135-MC4 SPP150-MC4
(24V, 9.16A) (24V, 13.72A) (24V, 15.44A) (24V, 17.16A)
3m 4mm 5mm 5mm 6mm
6m 6mm 8mm
2
or 8 B&S 8mm
2
or 8 B&S 8mm
2
or 8 B&S
9m 8mm
2
or 8 B&S 8mm
2
or 8 B&S 8mm
2
or 8 B&S 8mm
2
or 8 B&S