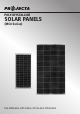
POLYCRYSTALLINE SOLAR PANELS (MC4 Series) P/No SPP80-MC4, SPP120-MC4, SPP135-MC4, SPP150-MC4
WARNING • For installations with lead acid batteries, avoid sparks or flames near the batteries and always use proper eye protection. • Given sufficient light, solar panels always generate energy even when they are disconnected. Accidental ‘shorting’ of the terminals or wiring can result in sparks causing personal injury or a fire hazard. It is recommended that the front face of the panel(s) are covered with a soft cloth to block incoming light during installation and wiring.
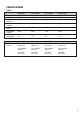
SPECIFICATIONS Table 1 TYPE RATED POWER OPEN CIRCUIT VOLTAGES SHORT CIRCUIT CURRENT PEAK POWER VOLTAGE PEAK POWER CURRENT TEST CONDITIONS BATTERY SIZES (1 Panel) SPP80-MC4 Polycrystalline 80W 21.5V SPP120-MC4 Polycrystalline 120W 21.5V SPP135-MC4 Polycrystalline 135W 21.5V SPP150-MC4 Polycrystalline 150W 21.5V 5.04A 7.55A 8.5A 9.44A 17.5V 17.5V 17.5V 17.5V 4.58A 6.86A 7.72A 8.
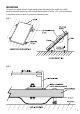
INSTALLATION PLACEMENT Locate the panel in a position where it is exposed to the sun for the majority of the day. For best results use a northern orientation. Make sure that the front side (dark side) of the solar panel faces the sun. Although the panel will function in the horizontal position, for best performance tilt the panel towards the sun especially during the winter months in the southern states.
MOUNTING The panels are supplied with four or eight mounting holes (depending on the model). Use suitable fasteners and mount the panel to a flat surface or mounting frame as per fig. 1, 2 & 3. Ensure the battens or frame does not twist or bend the solar panel’s aluminium frame.
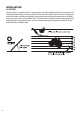
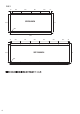
FIG 3 50 250 250 250 250 SPP80-MC4 467 50 511 Ø6 1100 35 250 250 250 250 SPP120-MC4 467 Ø6 1570 6 250 250 35 511
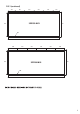
FIG 3 (continued) 180 250 250 250 250 180 SPP135-MC4 621 665 Ø6 1360 245 250 250 250 SPP150-MC4 621 250 245 665 Ø6 1490 7
CHARGE CONTROL Solar panels are most commonly used to charge lead acid batteries. Projecta solar panels are designed to charge 12 VDC batteries. 24VDC batteries can be charged using 2 panels wired in series and using a 24VDC solar charge controller. For battery charging it is recommended that you use a Solar Charge controller to prevent the battery from being overcharged (damaged) and prevent the battery from discharging (loosing power) into the solar panel at night.
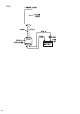
CONNECTING SOLAR PANEL TO BATTERY Projecta products are covered by a 12 month warranty. Failure to follow the operating instructions may damage the product and will void warranty. Please read these operating instructions carefully before use. For a warranty claim please return unit to the place of purchase with your sales receipt as proof of purchase date. Single Panel, 12V Installation You will also need: • Suitable solar controller • Suitable cable.
FIG 4 10
CONNECTING MULTIPLE SOLAR PANELS Additional solar panels can be connected together. Different configurations produce different voltages and currents. For example: Two panels connected in series, will double the voltage. Two panels connected in parallel will double the current.
FIG 5 12
Two Panels in Parallel, 12V Installation You will also need: • Suitable solar controller • Suitable cable (See table 2 for recommended cable sizes) • Correct rated fuse or circuit breaker 1. Connect a fuse or circuit breaker to the positive terminal of the battery, (As near to the battery as possible) refer to Fig. 8. Leave the fuse out. 2. Connect a cable from the fuse or circuit breaker to the solar controllers’ positive terminal. 3.
FIG 6 14
Four Panels in Series & Parallel, 24V Installation You will also need: • 24V Solar Controller • Suitable cable. (see Table 3 for recommended cable sizes) • Correct rated fuse or circuit breaker 1. Connect a fuse or circuit breaker to the positive terminal of the battery, (As near to the battery as possible) refer to Fig. 10. Leave the fuse out. 2. Connect a cable from the fuse or circuit breaker to the solar controllers’ positive terminal. 3.
FIG 7 16
MAINTENANCE Periodically inspect the electrical connections and panel mounting bolts. Make sure they are all tight and free from corrosion. If necessary clean the surface of the solar panels with a soft dump cloth. Mild detergent can also be used. Any dirt or residue on the glass may effect performance. FREQUENTLY ASKED QUESTIONS Q. Can the solar panel be mounted on a flat roof or wall? A. Yes.
Q. Will the solar panel charge my flat battery & how long will it take? A. The SPP80-MC4, SPP120-MC4, SPP135-MC4 & SPP150-MC4 will charge a battery. See table below for recommended charge times.
NOTES 19
WARRANTY STATEMENT APPLICABLE ONLY TO PRODUCT SOLD IN AUSTRALIA Brown & Watson International Pty Ltd of 1500 Ferntree Gully Road, Knoxfield, Vic.