
User Manual


4
• Confirm that power connections are tightened to avoid excessive heat caused from
loose connection.
• Use insulated tools and avoid placing metal objects near the batteries.
• Explosive gases may be present during charging. Be certain there is sufficient
ventilation to release the gases.
• Avoid direct sunlight and do not install in locations where water can enter the
controller.
• Loose power connections and/or corroded wires may result in resistive connections
that melt wire insulation, burn surrounding materials, or even cause fire. Ensure tight
connections and use cable clamps to secure cables and prevent them from swaying in
mobile applications.
• Only charge the batteries that comply with the parameters of controller.
• Battery connection may be wired to one battery or a bank of batteries. The following
instructions refer to a singular battery, but it is implied that the battery connection can
be made to either one battery or a group of batteries in a battery bank.
• Use the following cable & fuses for installation:
SC320: 4.5mm
2
cable, 30A Fuse
SC330: 4.5mm
2
cable, 50A Fuse
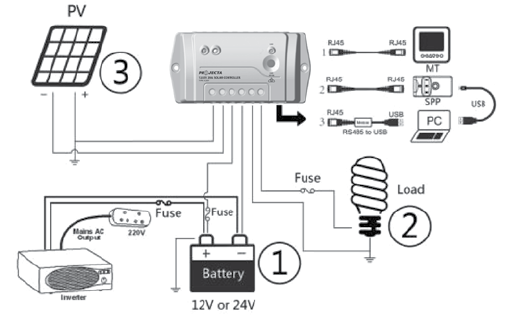
WIRING DIAGRAM
1. Connect components to the charge controller in the sequence as shown in the picture
below “+”Red and “-“Black. Always power the battery first.
2. After power from the battery, check the battery indicator on the controller, it will be
green. If it’s not green, please refer to the ‘Protection’ section of the manual.
3. The battery fuse should be installed as close to battery as possible. The suggested
distance is within 150mm.