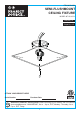
ITEM #0394609 SEMI-FLUSHMOUNT CEILING FIXTURE MODEL #FJ10-163-1 Français p. 8 Español p. 15 ATTACH YOUR RECEIPT HERE Serial Number Purchase Date Questions, problems, missing parts? Before returning to your retailer, call our customer service department at 1-866-389-8827, 8 a.m. - 6 p.m., EST, Monday - Thursday, 8 a.m. 5 p.m., EST, Friday.
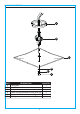
PACKAGE CONTENTS A B C D E F PART A B C D E F DESCRIPTION QUANTITY 1 Ceiling plate 1 Lamp holder 1 Glass shade 2 Rubber ring (preassembled to Lamp holder (B)) 1 Nut (preassembled to Lamp holder (B)) 1 Finial (preassembled to Lamp holder (B)) 2
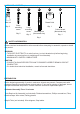
HARDWARE CONTENTS (shown actual size) AA DD CC BB Wire nut Qty. 3 EE FF Closed finial Short mounting screw Qty. 2 Long mounting screw Qty. 2 Qty. 1 Mounting bar (Not actual size) Cotton thread (Not actual size) Qty. 1 Qty. 1 SAFETY INFORMATION Please read and understand this entire manual before attempting to assemble, operate or install the product.
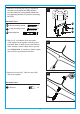
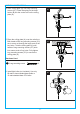
ASSEMBLY INSTRUCTIONS 1. Attach the mounting bar (DD) by tightening the short mounting screws (BB) securely into the outlet box (not included). Attach the long mounting screws (CC) into the mounting bar (DD). 1 Hardware Used BB Short mounting screw x2 CC Long mounting screw x2 DD Mounting bar x1 DD BB CC 2. Strip 3/4 in. of insulation from wire ends. Twist stripped ends together with pliers (not included), black to black (power) and white to white (neutral). Attach copper wire to ground wire.
ASSEMBLY INSTRUCTIONS 4. Place ceiling plate (A) onto long mounting screws (CC). Place the spring on the lamp holder (B) into the center hole on the ceiling plate (A). 4 A B 5. Place the ceiling plate (A) over the outlet box. Both heads of the long mounting screws (CC) are to come out through the large ends of the key holes. Twist the ceiling plate (A) until heads of long mounting screws (CC) slide into narrow ends of key holes. Fully tighten long mounting screws (CC) to secure the ceiling plate (A).
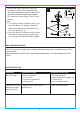
ASSEMBLY INSTRUCTIONS 7. Remove the finial (F) and nut (E) as well as rubber ring (D) from the lamp holder (B). Then pass the threaded nipple of lamp holder (B) with the chain through the glass shade (C), and secure rubber ring (D), nut (E), and finial (F). • Note: 1. To use the pull chain, install the finial (F) as instructed above. If a longer pull chain is desired, also attach the cotton thread (FF) to the pull chain (Fig. A). 2.
WARRANTY The manufacturer warrants all of its lighting fixtures against defects in materials and workmanship for one (1) year from the date of purchase. If within this period the product is found to be defective in material or workmanship, the product must be returned, with a copy of the original sales receipt as proof of purchase in the original carton, to the place of purchase. The manufacturer will, at its option, repair, replace or refund the original purchase price to the consumer.