
Installation Guide


3
PREPARATION
Please read and understand this entire manual before attempting to assemble, operate or install the
product.
WARNING
• The product should be installed by a locally licensed plumber.
• Please do not use plumber’s putty on plastic components. Use silicone caulk if sealant is required.
•Wheninstallingtheexiblehose,pleasenotethereshouldbenotorsionordeformation.
Do not fold it into a V or L shape, and do not use it if there is any cracks or damage.
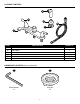
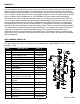
Before beginning assembly of product, make sure all parts are present. Compare parts with package
contents list and hardware contents list. If any part is missing or damaged, do not attempt to
assemble the product.
Estimated Assembly Time: 12 minutes
Tools Required for Assembly (not included): Adjustable wrench, silicone sealant.
Helpful Tools (not included): Channel-lock pliers, safety goggles.
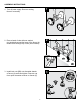
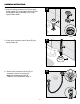
• Prior to beginning installation, turn off the cold and hot water lines and turn on the old faucet to
release build-up pressure.
•Wheninstallingyournewfaucet,rsthand-tightenconnectornuts.Thenuseonewrenchtoholdthe
ttingandasecondwrenchtotightenthenutanadditional1/4turn.Connectionsthataretootight
will reduce the integrity of the system.
SAFETY INFORMATION