
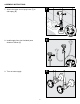
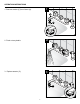
Installation Guide


9
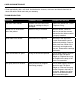
CARE AND MAINTENANCE
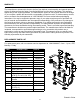
TROUBLESHOOTING
• Clean periodically with a soft cloth. Avoid abrasive cleaners, steel wool and harsh chemicals as
thesewilldullthenishandvoidyourwarranty.
PROBLEM POSSIBLE CAUSE CORRECTIVE ACTION
Leak from under handle. Retainer nut has come loose.
O-ring on cartridge is dirty or
damaged.
Tighten the retainer nut. Clean
or replace O-ring.
Aerator has an inconsistent
waterowpattern.
Aeratorisdirtyormistted. Remove aerator, check for
debris in the aerator screens,
andconrmtherubberwasher
is properly installed.
Water leaks from aerator. Seats need to be replaced. Determine if the drip is hot
or cold. Disassemble correct
handle and cartridge. Remove
rubber seat from inside of the
faucet body and replace with
new one. Reassemble cartridge
and handle.
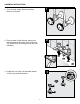
Leaks around base of spout. O-ring set should be replaced. Turn off water supply. Remove
spout trim cap. Pull spout
straight up. Replace the o-ring
set located on the body of the
faucet. Re-assemble.
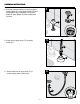
Side spray does not function. Spray diverter has stopped
functioning properly.
Turn off water supply. Remove
spout trim cap. Pull spout
straight up. Remove the spray
diverter located in the body of
the faucet. Replace the spray
diverter in the same position
and re-assemble spout.