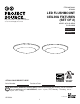
ITEM #0749833 0749834 LED FLUSHMOUNT CEILING FIXTURES (SET OF 2) Project Source® is a registered trademark of LF, LLC. All Rights Reserved. MODEL #CLL56-2BNK CLL56-2WW Français p. 9 Español p. 17 For Wet Location ATTACH YOUR RECEIPT HERE E479007 Serial Number Purchase Date Questions, problems, missing parts? Before returning to your retailer, call our customer service department at 1-866-389-8827, 8 a.m. - 6 p.m., EST, Monday - Thursday, 8 a.m. 5 p.m., EST, Friday. Lowes.
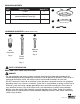
PACKAGE CONTENTS PART DESCRIPTION QUANTITY A Fixture 2 B Shade (preassembled to Fixture (A)) 2 C Mounting Strap 2 A B C HARDWARE CONTENTS (shown actual size) AA BB Machine Screw Wire Connector Qty. 6 CC Qty. 4 Fixture Screw Qty. 4 SAFETY INFORMATION READ AND SAVE THESE INSTRUCTIONS. DANGER • For your protection and safety, carefully read and understand the information provided in this manual completely before attempting to assemble, install or operate this product.
SAFETY INFORMATION • DO NOT connect the bare or green insulation fixture ground wire to the black (HOT) current-carrying wire or the white (NEUTRAL) house wire. Connection of the bare or green fixture ground wire to the black or white house wires may cause metal parts of the fixture to carry electrical currents. Under this condition, anyone coming in contact with the fixture will receive electrical shock, which could cause serious injury or death.
PREPARATION Before beginning assembly of product, make sure all parts are present. Compare parts with package contents list and hardware contents list. If any part is missing or damaged, do not attempt to assemble the product.
ASSEMBLY INSTRUCTIONS 3. Turn shade (B) to the left (counterclockwise) to remove from fixture (A). 3 A B 4. To mount the fixture directly to an outlet box (not included), insert fixture screws (BB) two full turns into screw holes in the outlet box. 4 Outlet Box NOTE: If the holes in the fixture do not align with holes in the existing outlet box, proceed to Step 5a to install the fixture with the mounting strap (C). Hardware Used BB Fixture Screw BB x2 5a.
ASSEMBLY INSTRUCTIONS 5b. Attach mounting strap (C) to outlet box (not included) using existing washers and outlet box screws or the machine screws (CC). NOTE: If the outlet box screws required for your outlet box are of a different size than the machine screws (CC), consult a licensed electrician before proceeding. Tighten machine screws (CC) to secure mounting strap (C). 5b CAUTION: Make sure the outlet box can support 35 lbs. hanging weight.
ASSEMBLY INSTRUCTIONS 7. Wrap electrical tape (not included) around each individual wire connector (AA) down to the wire. 7 Outlet Box AA WARNING: Make sure no bare wire or wire strands are visible after making connections. AA Carefully arrange excess wiring and wire connectors (AA) within outlet box. AA 8. Align keyslot holes on fixture (A) with fixture screws (BB) and push up. Secure fixture (A) to mounting strap (C) by tightening the fixture screws (BB).
CARE AND MAINTENANCE • Shut off main power supply. Wipe with soft cloth or use window cleaner. Do not use an abrasive cleaner. TROUBLESHOOTING WARNING: Before beginning work, shut off the power supply to avoid electrical shock. PROBLEM POSSIBLE CAUSE CORRECTIVE ACTION Light does not come on initially or no longer comes on. 1. Power is OFF. 2. Faulty connection. 3. LED component is not working properly. 1. Make sure power supply is ON. 2. Check wiring and all connections. 3. Contact Customer Service.
ARTÍCULO #0749833 0749834 Project Source® is a registered trademark of LF, LLC. All Rights Reserved. LÁMPARAS LED DE TECHO DE MONTAJE AL RAS (JUEGO DE 2) MODELO #CLL56-2BNK CLL56-2WW Para lugares mojados ADJUNTE SU RECIBO AQUÍ Número de serie Fecha de compra E479007 ¿Preguntas, problemas, piezas faltantes? Antes de volver a la tienda, llame a nuestro Departamento de Servicio al Cliente al 1-866-389-8827, de lunes a jueves de 8 a.m. a 6 p.m., y los viernes de 8 a.m. a 5 p.m., hora estándar del Este.
CONTENIDO DEL PAQUETE PIEZA DESCRIPCIÓN CANTIDAD A Lámpara 2 B Pantalla (preensamblada a la lámpara (A)) 2 C Placa de montaje 2 A B C ADITAMENTOS (se muestran en tamaño real) AA Tornillo para metal Conector de cables Cant. 6 CC BB Cant. 4 Tornillo de la lámpara Cant. 4 INFORMACIÓN DE SEGURIDAD LEA Y GUARDE ESTAS INSTRUCCIONES.
INFORMACIÓN DE SEGURIDAD • NO conecte el conductor de puesta a tierra de aislamiento desnudo o verde de la lámpara al conductor negro (DE CORRIENTE) que lleva la corriente o al conductor blanco neutro de la casa. Conectar el conductor de tierra desnudo o verde de la lámpara al conductor negro o blanco interior puede provocar que las piezas metálicas de la lámpara conduzcan corriente eléctrica.
PREPARACIÓN Antes de comenzar a ensamblar el producto, asegúrese de tener todas las piezas. Compare las piezas con la lista del contenido del paquete y la lista de aditamentos. No intente ensamblar el producto si falta alguna pieza o si estas están dañadas.
INSTRUCCIONES DE ENSAMBLAJE 3. Gire la pantalla (B) hacia la izquierda (en sentido contrario de las manecillas del reloj) para retirarla de la lámpara (A). 3 A B 4. Para montar la lámpara directamente en la caja de salida (no se incluye), inserte los tornillos de la lámpara (BB) dos vueltas completas en los orificios de los tornillos de la caja de salida.
INSTRUCCIONES DE ENSAMBLAJE 5b. Fije la placa de montaje (C) a la caja de salida (no se incluye) con las arandelas existentes y los tornillos de la caja de salida o los tornillos para metal (CC). NOTA: Si el tamaño de los tornillos de la caja de salida requeridos para su caja es diferente al de los tornillos para metal (CC), consulte a un electricista certificado antes de proceder. Apriete los tornillos para metal (CC) para fijar la placa de montaje (C).
INSTRUCCIONES DE ENSAMBLAJE 7. Cubra con cinta aislante (no se incluye) cada conector de cables (AA) individual hacia abajo del cable. 7 Caja de salida AA ADVERTENCIA: Asegúrese de que no haya conductores desnudos ni filamentos de conductores visibles después de hacer las conexiones. AA Arregle cuidadosamente el exceso de cableado y los conectores de cable (AA) hacia el interior de la caja de salida. AA 8 8.
CUIDADO Y MANTENIMIENTO • Corte el suministro principal de electricidad. Limpie con un paño suave o utilice un limpiador de ventanas. No use un limpiador abrasivo. SOLUCIÓN DE PROBLEMAS ADVERTENCIA: antes de comenzar cualquier trabajo, desconecte el suministro de electricidad para evitar descargas eléctricas. PROBLEMA CAUSA POSIBLE ACCIÓN CORRECTIVA La luz no se enciende inicialmente o ya no se enciende. 1. No hay alimentación. 2. La conexión es incorrecta. 3.