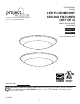
ITEM #0749833 0749834 LED FLUSHMOUNT CEILING FIXTURES (SET OF 2) Project Source® is a registered trademark of LF, LLC. All Rights Reserved. MODEL #CLL56-2BNK CLL56-2WW Français p. 9 Español p. 17 ATTACH YOUR RECEIPT HERE For Wet Location E479007 Purchase Date Questions, problems, missing parts? Before returning to your retailer, call our customer service department at 1-866-389-8827, 8 a.m. - 6 p.m., EST, Monday - Thursday, 8 a.m. 5 p.m., EST, Friday.
TABLE OF CONTENTS Package Contents ............................................................................................................... 2 Hardware Contents .......................................................................................................................... 2 Safety Information ............................................................................................................... 3 Preparation ...........................................................................
SAFETY INFORMATION READ AND SAVE THESE INSTRUCTIONS. DANGER • For your protection and safety, carefully read and understand the information provided in this manual completely before attempting to assemble, install or operate this product. Failure to do so could lead to electrical shock, fire or other injuries that could be hazardous or even fatal. • DO NOT connect this fixture to an electrical system that does not provide a means for equipment grounding.
SAFETY INFORMATION CAUTION • TURN OFF ELECTRICITY at main fuse box (or circuit breaker box) before beginning installation by removing the fuse (or switching the circuit breaker off). • If you are not sure the lighting system has a grounding means, DO NOT attempt to install this fixture. Contact a qualified, licensed electrician for information regarding the proper grounding methods as required by the local electrical code in your area.
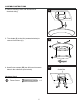
ASSEMBLY INSTRUCTIONS 2. Remove existing fixture and disconnect all electrical wiring. 2 Outlet Box 3. Turn shade (B) to the left (counterclockwise) to remove from fixture (A). 3 A B 4. Insert fixture screws (BB) two full turns into screw holes in the outlet box (non include).
ASSEMBLY INSTRUCTIONS 5. Prepare wires by stripping 3/4 in. of insulation from wire ends using wire strippers (not included). Connect WHITE wire from fixture (A) to WHITE wire from outlet box using existing wire connector or wire connector (AA). Connect BLACK wire from fixture (A) to BLACK wire from outlet box using existing wire connector or wire connector (AA). Connect BARE/GREEN ground wire from outlet box to GREEN ground wire from fixture (A) with wire connector (AA).
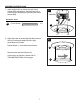
ASSEMBLY INSTRUCTIONS 7. Align keyslot holes on fixture (A) with fixture screws (BB) and push up. Secure fixture (A) to outlet box (not included) by tightening the fixture screws (BB). 7 Outlet Box Hardware Used BB BB Fixture Screw x2 8. Align three tabs on shade (B) with three slots on fixture (A) and twist shade (B) to the right (clockwise) until it stops. Repeat Steps 3 - 8 to install second fixture. A 8 A Restore power and test fixtures (A).
CARE AND MAINTENANCE • Shut off main power supply. Wipe with soft cloth or use window cleaner. Do not use an abrasive cleaner. TROUBLESHOOTING WARNING: Before beginning work, shut off the power supply to avoid electrical shock. PROBLEM POSSIBLE CAUSE CORRECTIVE ACTION Light does not come on initially or no longer comes on. 1. Power is OFF. 2. Faulty connection. 3. LED component is not working properly. 1. Make sure power supply is ON. 2. Check wiring and all connections. 3. Contact Customer Service.