
Installation Guide

6
Lowes.com
®
ASSEMBLY INSTRUCTIONS
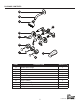
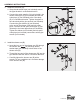
5. Install the tub spout (J):
a. Wrap thread sealant tape (not included) around the
pipe thread of the tub spout outlet pipe.
b. Thread the tub spout (J) onto the threaded
connection and twist clockwise until the spout
becomes
with the wall.
5
J
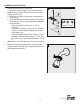
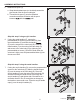
Skip this step if using the metal handles.
7. If using the acrylic handles (G), remove the preassembled
screws on the valve body (D), slide the handle flanges
(E) over the stems on the valve body (D). Place the
acrylic handles (G) onto the ends of the valve body (D)
and insert the acrylic handle screws (H) through the
acrylic handles (G) and tighten with a screwdriver in a
clockwise direction. Do not overtighten as damage to
the handle or stem could occur. Place the acrylic handle
caps (I) over the acrylic handles (G).
7
D
H
G
I
E
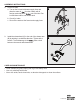
Skip this step if using acrylic handles.
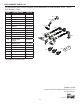
6. If using the metal handles (F), remove the
preassembled set screws (1) and indexes (2) from
the metal handles (F) and slide the handle
(E) over the stems on the valve body (D). Place the
metal handles (F) on the ends of the valve body (D)
and secure to the valve body (D) by tightening the
preassembled set screw (1) into the handle. After the
set screw is tight, press the preassembled index (2) into
the set screw hole.
6
F
D
1
2
E