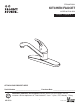
ITEM #0756561 KITCHEN FAUCET MODEL#67210-0501 Français / Español p. 7 AquaSource® is a registered trademark of LF, LLC. All Rights Reserved. ATTACH YOUR RECEIPT HERE Serial Number ____________________________ Purchase Date _________________________ Questions, problems, missing parts? Before returning to your retailer, call our customer service department at 1-866-389-8827, 8 a.m. - 8 p.m., EST, Monday - Friday. AB15533 1 Lowes.
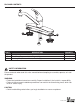
PACKAGE CONTENTS A C PART A B C B DESCRIPTION QUANTITY 1 1 2 Faucet Base Plate (Preassembled to Faucet (A)) Mounting Nut (Preassembled to Faucet (A)) SAFETY INFORMATION Please read and understand this entire manual before attempting to assemble, operate, or install the product. WARNING • Follow the installation instructions carefully. Proper installation is the installer’s responsibility.
PREPARATION Before beginning the assembly of this product, make sure all parts are present. Compare parts with the package contents list. If any part is missing or damaged, do not attempt to assemble the product. Contact customer service for replacement parts.
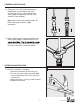
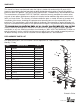
ASSEMBLY INSTRUCTIONS 3 3. Connect a 1/2 in. IPS faucet connector or coupling nuts (not included) with 3/8 in. O.D. ball-nose risers (not included) to the water supplies underneath the sink using wrenches (not included). Note: Refer to the local plumbing codes for permissible types of water supply connectors. 4. Before tightening the faucet connector to the water supply, apply a second wrench to the 4 tube from moving or twisting when tightening the faucet connector. Do not overtighten.
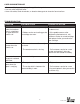
CARE AND MAINTENANCE • Clean carefully by gently wiping with a grit-free damp cloth. • Use only mild soap with water. • Never use acids, harsh chemicals, or abrasive detergents to clean the faucet surface. TROUBLESHOOTING PROBLEM POSSIBLE CAUSE CORRECTIVE ACTION There is a leak from under the handle or there is a leak from the spout when the faucet is off. 1. The bonnet nut is not tight enough. 1. Remove the handle and retighten the bonnet nut. There is a leak from aerator when the faucet is on. 1.
WARRANTY This faucet has been manufactured under the highest standard of workmanship. All parts of this faucet are warranted to be free from leaks or drips during domestic use for as long as the original purchaser owns this product. THIS EXCLUDES INDUSTRIAL, COMMERCIAL, OR BUSINESS USE. The manufacturer will replace FREE OF CHARGE, under the warranty conditions the entire unit or any part (at our option) which proves defective in material and/or workmanship under normal installation, use and service.
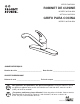
ARTICLE #0756561 ROBINET DE CUISINE MODÈLE #67210-0501 ARTÍCULO #0756561 GRIFO PARA COCINA MODELO #67210-0501 AquaSource® is a registered trademark of LF, LLC. All Rights Reserved.
CONTENU DE L’EMBALLAGE / CONTENIDO DEL PAQUETE A C PIÈCE PIEZA B DESCRIPTION DESCRIPCIÓN QUANTITÉ CANTIDAD A B Robinet / Grifo Plaque de base (préassemblée au robinet [A]) Placa de base (Preensamblado al grifo (A)) 1 1 C Écrou de montage (préassemblé au robinet [A]) Tuerca de montaje (preensamblado al grifo (A)) 2 8 Lowes.
CONSIGNES DE SÉCURITÉ / INFORMACIÓN DE SEGURIDAD Assurez-vous de lire et de comprendre l’intégralité de ce manuel avant de tenter d’assembler, d’installer ou d’utiliser le produit. Lea y comprenda completamente este manual antes de intentar ensamblar, usar o instalar el producto. AVERTISSEMENT / ADVERTENCIA • Suivez attentivement les instructions pour l’installation. Il incombe à l’installateur d’effectuer une installation adéquate.
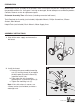
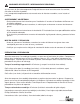
INSTRUCTIONS POUR L’ASSEMBLAGE / INSTRUCCIONES DE ENSAMBLAJE 1 1. Fermez l’alimentation en eau. Retirez le vieux robinet. 1. Cierre el suministro de agua. Retire el grifo antiguo. 2. Installation du robinet : a. Retirez les écrous de montage (C) préassemblés du robinet (A) et placez la plaque de base (B) et le robinet (A) sur le lavabo. b. Placez-vous sous l'évier pour visser les écrous de montage (C) au robinet (A). c. Serrez les écrous de montage (C).
INSTRUCTIONS POUR L’ASSEMBLAGE / INSTRUCCIONES DE ENSAMBLAJE 3 3. Fixez des raccords de robinet IPS de 1/2 po ou des écrous d'accouplement (non inclus) munis de colonnes montantes à bout sphérique d'un diamètre extérieur de 3/8 po (non incluses) aux conduites d'alimentation à l'aide de clés (non incluses). Remarque : Consultez les codes de plomberie locaux pour connaître les types de conduite à utiliser pour l'alimentation en eau. 3.
MODE D’EMPLOI / INSTRUCCIONES DE FUNCIONAMIENTO 1 1. Une fois l’installation terminée : a. Retirez l’aérateur du robinet (A). b. Ouvrez l'alimentation en eau et laissez l’eau chaude et l’eau froide s’écouler pendant au moins une minute chacune. c. Pendant que l’eau coule, vérifiez s’il y a des fuites. d. Remettez l'aérateur en place. A 1. Cuando la instalación esté completa: a. Retire el aireador del grifo (A). b.
DÉPANNAGE / SOLUCIÓN DE PROBLEMAS PROBLÈME PROBLEMA CAUSE POSSIBLE CAUSA POSIBLE MESURE CORRECTIVE ACCIÓN CORRECTIVA La poignée fuit ou le bec fuit lorsque le robinet est fermé. 1. L’écrou de chapeau n’est pas assez serré. 2. La rondelle en caoutchouc et le joint d’étanchéité de la cartouche sont usés. 1. Retirez la poignée et resserrez l’écrou de chapeau. 2.
DÉPANNAGE / SOLUCIÓN DE PROBLEMAS PROBLÈME PROBLEMA CAUSE POSSIBLE CAUSA POSIBLE MESURE CORRECTIVE ACCIÓN CORRECTIVA Le bec fuit lorsqu’on le fait osciller. 1. Le capuchon s’est desserré. 2. Le joint torique entre le bec et le corps est usé. 1. Serrez le capuchon. 2. Communiquez avec le service à la clientèle pour obtenir un nouveau joint torique afin de remplacer l’ancien. Hay una filtración desde la boquilla cuando esta se desplaza. 1. La tapa está suelta. 1. Apriete la tapa. 2.
LISTE DES PIÈCES DE RECHANGE / LISTA DE PIEZAS DE REPUESTO Pour obtenir des pièces de rechange, communiquez avec notre service à la clientèle au 1 866 3898827, entre 8 h et 20 h (HNE), du lundi au vendredi. Para obtener piezas de repuesto, llame a nuestro Departamento de Servicio al Cliente al 1-866-389-8827, de lunes a viernes de 8 a.m. a 8 p.m., hora estándar del Este.