
Installation Guide


4
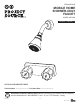
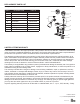
ASSEMBLY INSTRUCTIONS
1
4
3
1
2
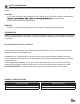
1. Turn off water at the supply valve at the main water supply,
disconnect the supply lines, and remove old shower head and
faucet body.
Clean and dry surface area where new shower will be mounted.
2. Drill Holes
Drill three 1 in. diameter holes spaced at 2 in. centers in the
shower wall surround 45 in. to 48 in. above the oor line.
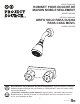
3. Position Unit
Spread a small amount of tub and tile caulk (not included) on the
surface of the bottom plate facing the wall on faucet body (A).
Position faucet body (A) through holes of wall.
Align faucet from back side of mounting surface and secure by hand
tightening mounting nuts (AA). THE BOTTOM PLATE MUST BE
USED.
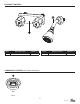
4. Install Shower Head Assembly (B)
Wrap shower arm end with two right hand wraps of PTFE tape
(not included) and screw shower head assembly (B) onto shower
supply line. Tighten ange onto exposed threads.
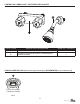
5. Connect Water Supply Lines
(5.1) Use 1/2 in. IPS faucet supply lines or (5.2) use coupling nuts
(not supplied) with (5.3) ball-nose risers (not included).
Turn water supply or shut-off valve back on and check for leaks. If
leaks occur, gently tighten the faucet connections.
3
5
2
B
A
5.1
5.3
5.2
AA
Lowes.com