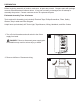
ITEM #0112109/0112067/0283109 2 PK. FLUSHMOUNT CEILING FIXTURE MODEL #40018/40019/40020 Française p. 10 Español p. 19 ATTACH YOUR RECEIPT HERE Serial Number Purchase Date Questions, problems, missing parts? Before returning to your retailer, call our customer service department at 1-866-389-8827, 8 a.m. - 6 p.m., EST, Monday - Thursday, 8 a.m. 5 p.m., EST, Friday.
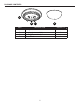
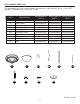
PACKAGE CONTENTS A B PART A B C D C D DESCRIPTION Ceiling Plate Coupling (preassembled) Socket (preassembled) Glass Shade 2 QUANTITY 2 2 4 2
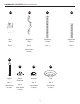
HARDWARE CONTENTS (shown actual size) AA BB CC DD Wire Nut Mounting Strip Mounting Screw Outlet Box Screw Qty. 6 Qty. 2 Qty. 4 Qty. 4 (Not shown to size) EE Nipple Qty. 2 (Not shown to size) FF GG HH Glass Grommet Hex Nut Cap Qty. 2 Qty. 2 (Not shown to size) (Not shown to size) Qty.
SAFETY INFORMATION Please read and understand this entire manual before attempting to assemble, operate or install the product. 1. Make sure that all electrical connections comply with local codes, ordinances, the National Electrical Code and ANSI/NFPA 70-199. Hire a qualified electrician or consult a do-it-yourself wiring handbook if you are unfamiliar with installing electrical wiring. 2. WARNING: Risk of fire -- most dwellings built before 1985 have supply wire rated for 60°F.
PREPARATION Before beginning assembly of product, make sure all parts are present. Compare parts with package contents list and hardware contents above. If any part is missing or damaged, do not attempt to assembly the product. Contact customer service for replacement parts.
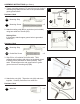
ASSEMBLY INSTRUCTIONS (per fixture) 1. Tighten mounting screws (CC) two full turns into holes in mounting strip (BB) from the side of the preassembled green ground screw. 1 BB Hardware Used BB Mounting Strip x 1 CC Mounting Screw CC Green Ground Screw x2 2. Attach mounting strip (BB) to outlet box (not included) using two outlet box screws (DD). 2 DD Helping Hint: If necessary, attach copper ground wire to grounded outlet box.
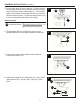
ASSEMBLY INSTRUCTIONS (per fixture) 5. Place ceiling plate (A) over outlet box. Position heads of the mounting screws (CC) to protrude through the large ends of key holes on the ceiling plate (A). Twist ceiling plate (A) until heads of mounting screws (CC) slide into narrow end of key holes. Tighten mounting screws (CC) to secure ceiling plate (A) firmly to the ceiling. 5 CC A Hardware Used CC Mounting Screw x2 6.
CARE AND MAINTENANCE It is recommended the fixtures be wiped down weekly using a soft, dry, or damp cloth. DO NOT use any abrasives such as car wax, polishes, glass cleaners or chemicals, as this will scratch/remove/damage the protective coating, allowing moisture and pollutants to come in contact with the finish, which will result in discoloration and pitting. FAILURE TO FOLLOW THE ABOVE CARE INSTRUCTIONS WILL VOID THE WARRANTY OF THE FIXTURE. TROUBLESHOOTING PROBLEM Bulb won’t light.
REPLACEMENT PARTS LIST For replacement parts, call customer service department at 1-866-389-8827, 8 a.m. - 6 p.m., EST, Monday - Thursday, 8 a.m. - 5 p.m., EST, Friday.