ITEM #0672110 ITEM #0672111 HIGH-ARC KITCHEN FAUCET WITH OPTIONAL SIDE SPRAY MODEL #21-K822-PS MODEL #21-K822-PS-SS Français / Español p. 11 ATTACH YOUR RECEIPT HERE Serial Number________________ Purchase Date_______________ Questions, problems, missing parts? Before returning to your retailer, call our customer service department at 1-866-389-8827, 8 a.m. - 8 p.m., EST, Monday - Friday. AB15478 08-24-2015 1 Lowes.
PRODUCT SPECIFICATIONS SPECIFICATIONS Max. flow rate: 1.8 GPM (6,81 LPM) at 60 PSI ASME A112.18.1/CSA B125 NSF 61-9 21-K822-PS – Chrome finish 21-K822-PS-SS – Stainless steel finish SPECIFICATIONS Ceramic cartridges Manufactured to include no more than 0.25% weighted average lead content on wetted surfaces Total weight of item: 2.048 lbs.
SAFETY INFORMATION Please read and understand this entire manual before attempting to assemble, operate or install the product. CAUTION • If you solder the joints during installation of the faucet, the seats, cartridges and washers must be removed before using a flame or the warranty will be voided on these parts. • Cover the sink drain to avoid losing parts. WARNING • Protect your eyes with safety glasses when cutting or soldering water supply lines.
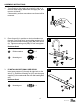
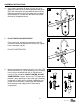
ASSEMBLY INSTRUCTIONS 1. Turn off water at the supply valve under the sink or at the main water supply, disconnect the supply line, and remove old faucet. Clean and dry surface area where new faucet will be mounted. 2. Place faucet (A) in position on sink so handles turn forward. From under sink, insert rubber washers (AA) first and then thread mounting nuts (BB) onto faucet (A). Tighten mounting nuts (BB). Do not overtighten. 1 2 A Hardware Used AA Rubber washer x2 BB Mounting nut x2 AA BB 3.
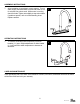
ASSEMBLY INSTRUCTIONS 4. Insert spray assembly (B) down through the spray support (C) and sink (4.1). Attach spray assembly hose (B) to the connection (4.2) beneath the faucet (A) by tightening the swivel nut (4.3) by hand, then use pliers (not included) for 1/4 extra turn. Be careful not to twist the hose or overtighten the nut. 4 A C 4.1 4.3 4.2 B 5. IF NOT INSTALLING SIDE SPRAY 5 From under sink, thread hose connection cap (D) onto hose connection beneath the faucet (A).
ASSEMBLY INSTRUCTIONS 7. After installation is completed, remove aerator. Turn on water supply and allow both hot and cold water to run for at least one minute each. While water is running, check for leaks. Tighten nuts slightly to stop minor leaks. If problems persist, refer to troubleshooting chart. Replace aerator. 7 OPERATING INSTRUCTIONS 1. To create a moderate water temperature, turn both handles (1.1) open. Slight adjustments of either handle (1.
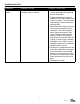
TROUBLESHOOTING PROBLEM Leaks underneath handle. POSSIBLE CAUSE Bonnet has come loose or O-ring on cartridge is dirty or twisted. CORRECTIVE ACTION 1. M ove the handle to the OFF position. Loosen the handle set-screw and remove the handle. 2. Tighten the bonnet by turning it clockwise. Move the cartridge stem to the on position. The leak should stop draining out from around the cartridge stem. 3. S hut off the water supply. Remove the bonnet by turning it counterclockwise.
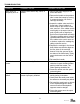
TROUBLESHOOTING PROBLEM POSSIBLE CAUSE CORRECTIVE ACTION Water does not completely shut off. Rubber valve seat is dirty, stuck, or broken. 1. S hut off the water supply to the faucet that leaks. 2. Remove the handle on the problem side. Loosen the bonnet by turning it counterclockwise. Lift out the cartridge assembly. 3. Inspect the rubber valve seat in the faucet body. If there is debris or brass scrap on the surface of the seat, remove it.
LIMITED LIFETIME WARRANTY The distributor warrants to the original consumer purchaser this product to be free from defects in material and workmanship under normal use in residential applications. At its option, the Company will provide repair parts or replace defective product when the product is used in accordance with the manufacturer’s specifications. The distributor provides a limited 5-year warranty on the finish of this product to the original purchaser.
REPLACEMENT PARTS LIST For replacement parts, call our customer service department at 1-866-389-8827, 8 a.m. - 8 p.m., EST, Monday - Friday.
ARTICLE #0672110 et #0672111 ROBINET DE CUISINE À GRANDE ARCHE AVEC DOUCHETTE FACULTATIVE MODÈLE #21-K822-PS et #21-K822-PS-SS ARTÍCULO #0672110 y #0672111 GRIFO PARA COCINA DE ARCO ALTO CON ROCIADOR LATERAL OPCIONAL MODELO #21-K822-PS y #21-K822-PS-SS Des questions, des problèmes, des pièces manquantes? Avant de retourner l’article au détaillant, appelez notre service à la clientèle au 1 866 389-8827, entre 8 h et 20 h (HNE), du lundi au vendredi.
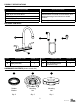
CONTENU DE L’EMBALLAGE / CONTENIDO DEL PAQUETE C B A D PIÈCE / PIEZA A B C D DESCRIPTION / DESCRIPCIÓN Corps / Cuerpo Ensemble de douchette / Ensamble de rociador Support de douchette / Soporte de rociador Pré-assemblé tuyau capuchon de connexion / Pre-ensamblado manguera caperuza de conexión QUANTITÉ / CANTIDAD 1 1 2 2 QUINCAILLERIE INCLUSE (illustrée à la grandeur réelle) / ADITAMENTOS (tamaño real) AA BB CC Rondelle en caoutchouc Arandela de goma x2 Rondelle de montage Tuerca de montaje x2 R
CONSIGNES DE SÉCURITÉ / INFORMACIÓN DE SEGURIDAD Assurez-vous de lire et de comprendre l’intégralité de ce manuel avant de tenter d’assembler, d’installer ou d’utiliser le produit. Lea y comprenda completamente este manual antes de intentar ensamblar, usar o instalar el producto. MISE EN GARDE • Si vous avez l’intention de souder les joints pendant l’installation du robinet, retirez d’abord les sièges, les cartouches et les rondelles; sans quoi, la garantie ne couvrira plus ces pièces.
INSTRUCTIONS POUR L’ASSEMBLAGE / INSTRUCCIONES DE ENSAMBLAJE 1. Coupez l’eau à partir de la conduite d’alimentation sous le lavabo ou à partir de la conduite d’eau principale, puis débranchez la tuyauterie et retirez le robinet en place. Nettoyez et séchez la surface où le nouveau robinet sera installé. Cierre la válvula de suministro de agua que se encuentra debajo del lavamanos o el suministro de agua principal, desconecte la tubería de suministro y retire el grifo viejo.
INSTRUCTIONS POUR L’ASSEMBLAGE / INSTRUCCIONES DE ENSAMBLAJE 3. INSTALLATION DE LA DOUCHETTE FACULTATIVE Insérez le support de douchette (C) dans l’orifice situé à l’extrémité droite de l’évier (3.1). Vissez l’écrou de montage (BB) sur le support de douchette (C) en vous positionnant sous l’évier et serrez à la main seulement. 3 C SI DESEA INSTALAR EL ROCIADOR LATERAL OPCIONAL Inserte el soporte del rociador (C) por el agujero en la extrema derecha del fregadero (3.1).
INSTRUCTIONS POUR L’ASSEMBLAGE / INSTRUCCIONES DE ENSAMBLAJE 6. Raccordez les conduites d’alimentation en eau aux tiges du robinet (6.2). Utilisez des raccords de robinet IPS de 1/2 po (6.1) (non inclus) ou des écrous d’accouplement (6.4) (non inclus) avec une colonne montante à bout sphérique à diamètre extérieur de 3/8 po (6.3) (non incluse). SERREZ À LA MAIN. ÉVITEZ DE SERRER EXCESSIVEMENT.
MODE D’EMPLOI / INSTRUCCIONES DE FUNCIONAMIENTO 1. Pour obtenir de l’eau tiède, tournez les deux poignées (1.1). Le fait de tourner légèrement l’une ou l’autre des poignées (1.1) augmente ou diminue la température de l’eau. 1 Para obtener una temperatura de agua moderada, abra ambas manijas (1.1). Si hace pequeños ajustes en cualquiera de las manijas (1.1), la temperatura del agua aumentará o disminuirá. 1.1 ENTRETIEN / CUIDADO Y MANTENIMIENTO Nettoyez régulièrement le robinet avec un linge doux.
DÉPANNAGE / SOLUCIÓN DE PROBLEMAS PROBLÈME PROBLEMA CAUSE POSSIBLE CAUSA POSIBLE MESURE CORRECTIVE ACCIÓN CORRECTIVA La poignée fuit. Hay goteras debajo de la manija. Le chapeau s’est desserré ou le joint 1. Tournez la poignée à la position d’arrêt. torique sur la cartouche est sale ou Dévissez les vis de la poignée et retirez la tordu. poignée. 1. M ueva la manija a la posición de apagado.
DÉPANNAGE / SOLUCIÓN DE PROBLEMAS PROBLÈME PROBLEMA CAUSE POSSIBLE CAUSA POSIBLE MESURE CORRECTIVE ACCIÓN CORRECTIVA L’alimentation en eau ne peut être coupée complètement. El paso de agua no se cierra completamente. Le siège de valve en caoutchouc est sale, bloqué ou brisé. El alojamiento de la válvula de goma está sucio, atascado o roto. 1. F ermez l’alimentation en eau froide. S’il n’y a plus de fuite, le problème est de ce côté. S’il y a fuite, le problème provient de la conduite d’eau chaude.
DÉPANNAGE / SOLUCIÓN DE PROBLEMAS PROBLÈME PROBLEMA CAUSE POSSIBLE CAUSA POSIBLE MESURE CORRECTIVE ACCIÓN CORRECTIVA 4. V uelva a colocar el cartucho en el cuerpo del grifo. Asegúrese de que los bordes de ambos lados del bonete del cartucho encajen en las ranuras de ambos lados del cuerpo del grifo. Atornille con firmeza el bonete en el cuerpo del grifo. 5. Le robinet fuit autour de l’aérateur. 5. E l grifo tiene fugas alrededor del aireador. Le robinet fuit autour de l’aérateur.
GARANTIE À VIE LIMITÉE / GARANTÍA LIMITADA DE POR VIDA Le distributeur garantit à l’acheteur ou au consommateur initial que ce produit sera exempt de tout défaut de matériaux ou de fabrication dans des conditions d’utilisation résidentielle normales. Le distributeur choisira de fournir des pièces de rechange ou de remplacer le produit défectueux si ce dernier a été utilisé selon les directives du fabricant. Le distributeur offre à l’acheteur initial une garantie limitée de 5 ans sur le fini de ce produit.
LISTE DES PIÈCES DE RECHANGE / LISTA DE PIEZAS DE REPUESTO Pour obtenir des pièces de rechange, communiquez avec le service à la clientèle au 1 866 389-8827, entre 8 h et 20 h (HNE), du lundi au vendredi. Para obtener piezas de repuesto, llame a nuestro Departamento de Servicio al Cliente al 1-866-389-8827, de lunes a viernes de 8 a.m. a 8 p.m., hora estándar del Este.