
Installation Guide


6
Lowes.com
ASSEMBLY INSTRUCTIONS
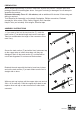
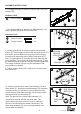
8. Identify ground side of supply connector (B) and track
section (F). Insert supply connector (B) into track section (F)
and twist to secure. Make sure the ground side of supply
connector (B) aligns with ground side of track section (F).
Note: The ground side of connector (B) is the side with the
two metal tabs. The ground side of the track section (F) has
an indented groove on the face and two internal copper bars.
The supply connector (B) can only be assembled if the
ground sides are aligned.
9. Tighten support screws (D). Install cover (C) and secure
with screws (E).
B
C
E
D
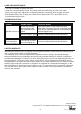
10. Identify ground side on track head assembly (G) and
track section (F). Insert track head assembly (G) connector
into track section (F) and twist to secure. Make sure the
ground side on track head assembly (G) connector aligns
with ground side of track section (F).
Note: The ground side of track head assembly (G)
connector is the side with the two metal tabs. The
ground side of the track section (F) has an indented
groove on the face and two internal copper bars. The
track head assembly (G) can only be assembled if the
ground sides are aligned.
GROUND
TAB
GROUND
SIDE GROOVE
IDENTATION
GROUND TAB
GROUND
GROOVE
IDENTATION
8
9
10
6
7
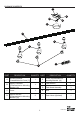
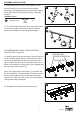
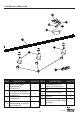
6. For installing fixture on studs in ceiling or wall, use wood
screws (DD).
DD
F
Wood Screws
x 2
DD
Hardware Used
7. For installing fixture on drywall in a wall application, use
plastic anchors (EE) and wood screws (DD).
DD
F
Plastic Anchors
x 2
EE
Wood Screws
x 2
DD
EE
Hardware Used
F
F
G