PIcon II Console Controller Installation Guide and User Reference Manual
1106 Great Falls Court, Suite G Knightdale, NC 27545 www.pie-corp.
PICON II CONSOLE CONTROLLER User Reference Manual CONTENTS GENERAL INFORMATION & WARRANTY . . . . . . . . . . . . . . . . . . . . . . . . . . . . . . . . . . . 1 General Information . . . . . . . . . . . . . . . . . . . . . . . . . . . . . . . . . . . . . . . . . . . . . 1 PIcon II Manufacturer's Warranty . . . . . . . . . . . . . . . . . . . . . . . . . . . . . . . . . . . . . 3 INSTALLATION . . . . . . . . . . . . . . . . . . . . . . . . . . . . . . . . . . . . . . . . . . . . . . . . . . . . . .
RPT 8 — Polled Totals RPT 9 — Shift 1 Totals By Pump (for previous shift) RPT 10 — Shift 2 Totals By Pump (for 2 shifts previous) RPT 11 — Shift 3 Totals By Pump (for 3 shifts previous) Print Reports . . . . . . . . . . . . . . . . . . . . . . . . . . . . . . . . . . . . . . . . . . . . . . . . . . 24 Operator Mode OPR 2/Manager Mode M 3 — Print Reports . . . . . . . . . .
PATENTS Progressive International Products are manufactured or sold under one or more of the following U.S. patents. 5,790,410 5,663,887 5,361,216 5,831,861 5,557,529 5,270,943 5,694,326 5,394,336 5,108,742 HISTORY OF DOCUMENT REVISIONS Rev. 1.0 Initial Release The most recent release of the PIcon II Installation Guide and User Reference Manual is always available at pie-corp.com in .pdf format. COPYRIGHT Copyright © 2013 Progressive International Electronics, Inc. All rights reserved.
PIcon II General Information & Warranty GENERAL INFORMATION & WARRANTY General Information The PIcon II is an economical, full-featured console designed to provide control of up to 16 fueling positions. While most consoles can only control one type of fuel dispenser, the PIcon II may be configured to run any major brand electronic or mechanical dispenser.
PIcon II General Information & Warranty C Built-in hardware clock to time stamp all reports. C Compact size allowing convenient counter-top positioning while utilizing a minimum amount of valuable counter space. C Standard printer interface for use with most low-cost parallel printers. C Ease of installation — console wires directly into dispenser distribution boxes or PI DBoxes.
PIcon II General Information & Warranty PIcon II Manufacturer's Warranty Progressive International Electronics, Inc. (SELLER) warrants to the Purchaser of the PIcon II fuel control equipment manufactured by Seller against defects in material or workmanship for one (1) year from date of shipment. Seller will replace or repair defective parts or replace and issue credits to the Purchaser's account in accordance with the following Conditions of Warranty. CONDITIONS OF WARRANTY 1.
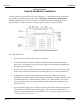
PIcon II Installation INSTALLATION General Installation Guidelines The basic PIcon II system consists of several components — the PIcon II console, interconnect box, PI DBox and parallel printer cable. Refer to Diagram: PIcon II Port and Keyboard Layout, which shows the various connections of the PIcon II system, including the port for optional printer. If further assistance is required, please contact your PIcon II dealer. To install the PIcon II: 1.
PIcon II Installation Quick Startup This quick startup procedure lists the order and minimal programming steps for operation of the PIcon II. For more detailed explanations or for programming of optional modes, refer to the Programming Section of this manual. 1. Program Mode PGM 1 — Pump Type Note: Pump Type must be selected before other programming can be completed. 2. Program Mode PGM 2 — Dispenser Setup Information 3.
PIcon II Operation OPERATION Introduction In Operation Section, all functions available to the operator of the PIcon II are outlined. Table: Key Functions on the following page provides brief descriptions of key functions. Also, refer to Diagram: PIcon II Port and Keyboard Layout, below, for general locations of various keys, indicators and display.
PIcon II Operation Active Keys PUMP KEYS Select dispenser number AUTHORIZE Authorize selected dispenser Resume stopped dispenser CASH PAID Pay out the sale in cash CREDIT PAID Pay out the sale in credit VOLUME Display the volume of the sale PPU Display the price per unit of sale A/B Toggle between the A & B sales PUMP STOP Stop an authorized dispenser Stop all dispensers (hold 5 seconds) PRINT Print a receipt CHANGE Show the change of a prepay sale Press twice to show the prepay amount
PIcon II Operation Display and Status Indicators The LCD display provides the operator with all sale information for the dispenser selected. It also provides data such as time/date and shift totals reports when using the select functions. Listed below in Table: Display Data are the various fields of data which may appear in the display area, along with a brief description of each field. Display Description Pump # Indicates the current/active dispenser #/fueling position.
PIcon II Operation The LEDs below each of the pump numbers are the status indicators for that particular dispenser/fueling position. The green LED on the top indicates Call/In Use. The red LED on the bottom indicates Collect/Stopped. Table: LED Indicators, below, shows the various states these LEDs represent for each dispenser/fueling position.
PIcon II Operation Sales Authorization must be made for a sale as either a Postpay, Preset Postpay, or Prepay sale. Table: Sales Procedure, below, describes the sequence for completing each type of authorized sale. Note: An actual key action is indicated by <____>. Sale Type Procedure Postpay To authorize a dispenser for a Postpay/Fillup operation, press the appropriate key and then press the red < AUTHO RIZE> key. To pay out the sale on the console, press the key.
PIcon II Operation Special Select Functions Listed below are the five special operator Select Functions, along with the key sequences required to execute them. Each key sequence begins with the operator pressing the
PIcon II Operation Show Current Shift Totals — When prompted for Function pressing the key will begin to show current shift totals by first displaying the current volume shift totals for product. To view current cash shift totals, press the key. Current credit shift totals may be viewed by pressing the key. Press to view current volume totals again. To display current shift totals for additional product(s), continue to press the key.
PIcon II Operation Perform Shift Change — Before a shift change can be executed, totals from the shift must be viewed or printed in their entirety, using the Special Select Functions or . To execute a shift change, simply press the key at the Function prompt. When this has been accomplished, the PIcon II changes the Current Shift Total to zero. The last shift total is then stored as Shift 1. At any time, there are four stored shift reports.
PIcon II Operation Operator Access To access PIcon II program and report features, a sequence utilizing a valid PIN Code must first be entered. Access is divided into two categories — Manager and Operator. The manager, using a Manager PIN Code, has access to Reports and Manager Modes. Reports functions (Modes OPR 1 and OPR 2) are available to both the operator and the manager. Access to Reports functions is accomplished through the entry of a valid Operator PIN Code. First, press the key.
PIcon II Manager MANAGER Manager Access Before initializing Manager Mode, restricted programming must be completed. To access PIcon II Reports and Programming features, a sequence utilizing a valid PIN Code must first be entered. Access is divided into two categories — Manager and Operator. The manager, using a Manager PIN Code, has access to Reports and Manager Modes. Reports functions (Modes OPR 1 and OPR 2) are also available to the operator, who uses an Operator PIN Code.
PIcon II Manager Manager Mode MGR 1 — Program Product Price To enter this mode from the mode number prompt, MGR 0, enter <1> on the keypad and press . Prices may be set for the following: Cash PPU — To set the Cash PPU for a product, enter the desired PPU on the numeric keypad and press the key. The three decimal places are assumed. Credit PPU — To set the Credit PPU for a product, enter the desired PPU on the numeric keypad and press the key.
PIcon II Manager Manager Mode MGR 5 — Set Date and Time MGR 5 allows the setting of time, date and year. To enter MGR 5 from the MGR 0 mode number prompt, press <5> and press . Date and time may now be set. Time — The time previously set in the PIcon II will be displayed. To change the hour, enter the hours on the numeric keypad in 24 hour format. New hours will appear in the display as it is entered. Press . The cursor will proceed to minutes.
PIcon II Manager Manager Mode MGR 6 — Beeper Settings Mode MGR 6 is used to select beeper volume, as well as single or continuous beeps for Handle, Collect and Drive-Away. (Note: The console defaults to a single beep unless set otherwise.) To enter MGR 6 from MGR 0, the mode number prompt, enter <6> on the numeric keypad and press . Beeper Volume — The first selection of MGR 6 is for Beeper Volume. Using the key, toggle among High/Low/Off. Pressing cycles to the next selection.
PIcon II Manager To exit MGR 6, press the key. MGR 0, the mode entry prompt, will appear on the display. To return to operator mode, press the key again. Manager Mode MGR 7 — Program Operator/Manager PIN Codes Warning: Care should be observed when using this mode. If the PIN Code is altered, be sure to make note of the new PIN Code and save in a safe location. Operator PIN Codes — The display will show the existing Operator PIN Code under Operator PIN.
PIcon II Manager By Pump — default is Yes Resettable — default is No Non-resettable — default is No Polled (read from dispenser) — default is Yes Grand Resettable — default is Yes Grand Non-reset. — default is Yes To exit MGR 8, press the key. MGR 0, the mode entry prompt, will appear on the display. To return to operator mode, press the key again. Manager Mode MGR 9 — Set Auto Receipts MGR 9 automatically prints a sales receipt if in full service.
PIcon II Manager Manager Mode MGR 10 — Set Default MOP MGR 10 sets the PIcon II into a default Method of Payment (MOP) mode of None/Cash/Credit. At the end of each transaction, the PIcon II returns to the selected default MOP. To exit MGR 10, press the key. MGR 0, the mode entry prompt, will appear on the display. To return to operator mode, press the key again. Rev 1.
PIcon II Reports REPORTS Read Reports The purpose of Read Reports is to select and display totals reports for viewing. This function is available to both manager and operator, but is accessed differently, as described below. Operator Mode OPR 1/Manager Mode MGR 2 — Read Reports Operator Mode OPR 1 is accessed from the OPR 0 mode number prompt, by entering <1> on the keypad. Then press . Manager Mode MGR 2 is accessed from MGR 0 mode number prompt, by entering <2> on the keypad. Then press .
PIcon II Reports Select the report number and enter it on the PIcon II keypad, then press . The beginning data for the report is shown in the display. Use the following keys to scroll through the report.
PIcon II Reports Print Reports The purpose of Print Reports is to generate and print totals reports if a printer is attached to the PIcon II, as well as to program the print header. If no printer is attached, “Paper Out” will appear on the PIcon II display. This function is available to both manager and operator, but is accessed differently, as described below.
PIcon II Reports PRN 11 — Shift 3 Totals By Pump (for 3 shifts previous) PRN 12 — Print Program Settings PRN 13 — Print Error Queue PRN 14 — Program Print Header Select the report number of the report to be printed and enter it on the PIcon II keypad, then press . The chosen report will be printed and the display will return to PRN 0. To exit OPR 2/MGR 3, press the key. MGR 0, the mode entry prompt, will appear on the display. To return to operator mode, press the key again.
PIcon II Reports Print Header Character Codes 01 = end of header 10 = new line 0 48 F 70 U 85 j 106 y 121 - 45 < 96 1 49 G 71 V 86 k 107 z 122 .
PIcon II Programming PROGRAMMING To avoid accidental mistakes and clearing of previous programming, Program Modes may only be accessed by using Restricted PIN Code. For basic startup, press
PIcon II Programming Program Mode PGM 1 — Pump Type At the Program Mode prompt, PGM 0, press <1>, then press to choose dispenser. Scroll through dispenser brands by pressing
PIcon II Programming Hose Selection — After the dispenser number is chosen, Hose 1 is indicated on the display. From this point, the following parameters may be set for Hose 1. If programming a multiproduct dispenser, parameters must be set for all hoses. Product — Press the key to scroll to the desired product for the current hose displayed. During this step, pressing the key will clear the product number for reentry.
PIcon II Programming Product Name — the display now prompts for information about Product #1. To assign a product name, such as Unleaded, Regular or Plus to this product, press the key until the product name is presented in the display. The product name already assigned may be viewed by pressing the
PIcon II Programming Program Mode PGM 5 — Set Dollar or Cash/Credit (PIcon II default — C/R) PGM Mode 5 is used to select either Cash/Credit or Dollar to be shown on reports and receipts. To enter this mode from the PGM 0 mode number prompt, press <5> on the numeric keypad and then press . Use the key to toggle between Cash/Credit and Dollar. To exit PGM 5, press the key. PGM 0, the mode entry prompt, will appear on the display.
PIcon II Programming Program Mode PGM 7 — Handle for Authorization (PIcon II default — Yes) PGM 7 determines whether the PIcon II must acknowledge the handle request before authorization is sent to the pump. To enter this mode from the PGM 0 mode number prompt, press <7> on the numeric keypad and then press . Use the key to toggle between Yes and No. To exit Program Mode 7, press the key. PGM 0, the mode entry prompt, will appear on the display.
PIcon II Programming To exit Program Mode 8, press the key. PGM 0, the mode entry prompt, will appear on the display. To return to operator mode, press the key again. Program Mode PGM 9 — Set Language (PIcon II default – English) PGM 9 is used to select the language to appear on display and printed reports. To enter this mode from the PGM 0 mode number prompt, press <9> on the numeric keypad and then press . Use the key to toggle among supported languages.
PIcon II Programming Program Mode PGM 11 — ATG Activation (PIcon II default — No) Program Mode 11 enables or disables the connection between the PIcon II and an auto tank guage (ATG), if one is available. When enabled, sales information will be transferred to the ATG in EMC/BIR G-site format. To enter this mode from the PGM 0 mode number prompt, press <11> on the numeric keypad and then press . Use the key to toggle between Yes and No. To exit Program Mode 11, press the key.
PIcon II Programming When global settings have been configured (or if global settings are not available), press to begin configuration of individual fueling positions. Using the key, toggle among the choices for each option Press to advance to the next option. When the first position is configured, press to configure the next dispenser. Continue until all dispensers are configured. To exit Program Mode 60, press the key.
PIcon II Diagnostics DIAGNOSTICS PIcon II Internal Diagnostics Refer to our web site, www.pie-corp.com for more comprehensive diagnostics. The PIcon II has on-board diagnostics which are helpful in solving problems encountered in the field.
PIcon II Diagnostics After connecting to the diagnostics port and starting the terminal emulation program, power up the PIcon II. A menu will appear, displaying the various diagnostic functions available. To select a function, type the letter shown in the menu. Some features will prompt for additional information. Press the escape key to return to the previous menu level. Diagnostic procedures are described below.
PIcon II Diagnostics • Locate top diagnostic window displayed on terminal • Select D, Section Diagnostics • Select P, Printer Diagnostics • Select D, Download the Print Header. • At the prompt, download may be aborted by pressing Escape key or continued by entering any other key. • If continuing download, C’s will continue to appear onscreen until the file to be downloaded is selected. To select the print header file, go to Hyperterm’s toolbar and select Transfer, then Send File.
PIcon II Diagnostics PIcon II Code Update Contact PIE for upgrade files, which can be loaded via PIE’s STM32 Update Loader. This utility is available on our website: www.pie-corp.com. Before beginning this procedure, close Hyperterm. Proceed with Code Update as follows: • Connect the A to B USB cord between the computer and the PIcon II. • Power down the PIcon II. • Locate the small round hole beneath the power connection on back of the PIcon II.