User Manual Oven PHP5325X
Progress CONTENTS Safety information Safety instructions Product description Control panel Before first use Daily use Clock functions Automatic programmes 2 3 6 7 9 10 12 13 Using the accessories Additional functions Hints and tips Care and cleaning Troubleshooting Technical information Energy efficiency 15 15 17 31 33 35 35 Subject to change without notice. SAFETY INFORMATION Before the installation and use of the appliance, carefully read the supplied instructions.
Progress 3 General Safety • • • • • • • • • • Only a qualified person must install this appliance and replace the cable. Internally the appliance becomes hot when in operation. Do not touch the heating elements that are in the appliance. Always use oven gloves to remove or put in accessories or ovenware. Before maintenance cut the power supply. Ensure that the appliance is switched off before replacing the lamp to avoid the possibility of electric shock.
Progress Electrical connection WARNING! Risk of fire and electrical shock. • All electrical connections should be made by a qualified electrician. • The appliance must be earthed. • Make sure that the electrical information on the rating plate agrees with the power supply. If not, contact an electrician. • Always use a correctly installed shockproof socket. • Do not use multi-plug adapters and extension cables. • Make sure not to cause damage to the mains plug and to the mains cable.
Progress 5 • Use a deep pan for moist cakes. Fruit juices cause stains that can be permanent. • This appliance is for cooking purposes only. It must not be used for other purposes, for example room heating. • Always cook with the oven door closed. Care and cleaning WARNING! Risk of injury, fire, or damage to the appliance. • Before maintenance, deactivate the appliance and disconnect the mains plug from the mains socket. • Make sure the appliance is cold. There is the risk that the glass panels can break.
Progress • Before replacing the lamp, disconnect the appliance from the power supply. • Only use lamps with the same specifications. Disposal • Disconnect the appliance from the mains supply. • Cut off the mains cable and discard it. • Remove the door catch to prevent children and pets to get closed in the appliance. WARNING! Risk of injury or suffocation.
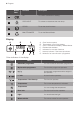
Progress 7 For cakes and biscuits. To bake and roast or as a pan to collect fat. Combi pan CONTROL PANEL Electronic programmer 1 2 3 4 5 6 7 8 9 10 11 Use the sensor fields to operate the appliance. 1 2 Sensor Field Function Description - DISPLAY Shows the current settings of the appliance. ON / OFF To activate and deactivate the appliance. OPTIONS To set an oven function, a cleaning function or an automatic programme (only when the appliance is activated).
Progress Sensor Field 8 9 10 11 Function Description OK To confirm a selection or setting. OVEN LIGHT To activate or deactivate the oven lamp. CLOCK To set the clock functions. MINUTE MINDER To set the Minute Minder. Display A B G C F E D A. B. C. D. E. F. G.
Progress 9 Heat up indicator If you activate an oven function, the bars come on in the display. The bars show that the temperature in the appliance increases or decreases. When the appliance is at the set temperature, the bars go off the display. Knobs for the cooking zones You can operate the hob with the knobs for the cooking zones. Refer to the hob user manual. You must read the Safety chapters in the hob user manual. Retractable knobs To use the appliance, press the control knob.
Progress After the software version goes off, the display shows h and 12:00. 1. Touch or to set the hours. 2. Touch . or to set the minutes. 3. Touch or . 4. Touch The Temperature / Time display shows the new time. Changing the time You can change the time of day only when the appliance is off. Touch . flashes in the display. To set the new time of day, refer to "Setting the time". DAILY USE • the manual mode • automatic programmes WARNING! Refer to Safety chapters.
Progress 11 Oven function Application Defrost To defrost frozen food. Bottom Heat To bake cakes with crispy bottom and to preserve food. ECO Roasting The ECO functions let you optimize the energy consumption during cooking. It is necessary to set the cooking time first. To get more information about the recommended settings, refer to the cooking tables with the equivalent function. Pyrolysis To activate the automatic pyrolytic cleaning of the oven. This function burns off residual dirt in the oven.
Progress CLOCK FUNCTIONS Clock functions table Clock function Application COUNT UP TIMER To set the count up, which shows how long the appliance operates. This function has no effect on the operation of the appliance. TIME OF DAY To show the time of day. To change the time of day, refer to "Setting the time". DURATION To set how long the appliance operates. END To set when the appliance deactivates.
Progress 13 Setting the SET+GO You can use the SET+GO function only when the DURATION is set. 1. Set an oven function (or a programme) and temperature (refer to "Setting the oven function" and "Changing the temperature"). 2. Set the DURATION (refer to "Setting the DURATION"). 3. Touch again and again until flashes in the display. 4. Touch to set the SET+GO function. The display shows and with an indicator. This indicator shows which clock function is activated. 5.
Progress Programme number Programme name 6 CHICKEN, WHOLE 7 WHOLE FISH 8 PIZZA 9 QUICHE LORRAINE 10 LEMON SPONGE CAKE 11 CHEESE CAKE 12 ROLLS 13 FARMER BREAD 14 DOUGH PROVING 15 POTATO GRATIN 16 LASAGNE 17 CANNELLONI 18 CONVENIENCE CAKE 19 CONVENIENCE PIZZA 20 CONVENIENCE POTATO TYPES Automatic programmes 1. Activate the appliance. . 2. Touch The display shows and the number of the automatic programme. 3. Touch or to choose the automatic programme.
Progress 15 USING THE ACCESSORIES WARNING! Refer to Safety chapters. Inserting the accessories Wire shelf and the deep pan together: Push the deep pan between the guide bars of the shelf support and the wire shelf on the guide bars above. Wire shelf: Push the shelf between the guide bars of the shelf support and make sure that the feet point down. Deep pan: • All accessories have small indentations at the top of the right and left side to increase safety. The indentations are also anti-tip devices.
Progress When the function operates, you can change the time and temperature. • To deactivate the function touch . The appliance deactivates your favourite programme. Using the Child Lock The Child Lock prevents an accidental operation of the appliance. If the Pyrolysis function operates, the door is locked. A message comes on in the display when you touch a sensor field. 1. To activate the function deactivate the appliance with . Do not set an oven function. 2.
Progress 17 3. Touch . or 4. Touch the setting. 5. Touch . Brightness of the display to change the value of There are two modes of display brightness: Temperature (°C) Switch-off time (h) 30 - 115 12.5 120 - 195 8.5 200 - 245 5.5 • Night brightness - when the appliance is deactivated, the brightness of the display is lower between 10 PM and 6 AM. • Day brightness: – when the appliance is activated.
Progress Heat setting Application Time (min) Hints 1-2 To solidify fluffy omelettes and baked eggs. 10 - 40 Cook with a lid on. 2-3 To simmer rice and milk-based dishes, and to heat up readycooked meals. 25 - 50 Add a minimum of two times as much liquid as rice. Stir milk dishes halfway through. 3-4 To steam vegetables, fish and meat. 20 - 45 Add some tablespoons of a liquid. 4-5 To steam potatoes. 20 - 60 Use a maximum of 1/4 l water for 750 g of potatoes.
Progress 19 Baking results Possible cause Remedy The cake sinks and becomes soggy, lumpy or streaky. The oven temperature is too high. The next time you bake, set a slightly lower oven temperature. The cake sinks and becomes soggy, lumpy or streaky. The baking time is too short. Set a longer baking time. You cannot decrease baking times by setting higher temperatures. The cake sinks and becomes soggy, lumpy or streaky. There is too much liquid in the mixture. Use less liquid.
Progress Food Function Temperature (°C) Time (min) Shelf position Flan base sponge mixture True Fan Cooking 150 - 170 20 - 25 2 Apple pie / Apple pie (2 tins Ø20 cm, diagonally off set) True Fan Cooking 160 60 - 90 2 Apple pie / Apple pie (2 tins Ø20 cm, diagonally off set) Conventional Cooking 180 70 - 90 1 Cheesecake Conventional Cooking 170 - 190 60 - 90 1 1) Preheat the oven.
Progress 21 Food Function Temperature (°C) Time (min) Shelf position Fruit flans (made with yeast dough / sponge mix- True Fan Cooking 150 35 - 55 3 Conventional Cooking 170 35 - 55 3 Fruit flans made with short pastry True Fan Cooking 160 - 170 40 - 80 3 Yeast cakes with delicate toppings (e.g.
Progress Food Function Temperature (°C) Time (min) Shelf position Biscuits made with yeast dough True Fan Cooking 150 - 160 20 - 40 3 Puff pastries True Fan Cooking 170 - 1801) 20 - 30 3 Rolls True Fan Cooking 1601) 10 - 25 3 Rolls Conventional Cooking 190 - 2101) 10 - 25 3 Small cakes / Small cakes (20 per tray) True Fan Cooking 1501) 20 - 35 3 Small cakes / Small cakes (20 per tray) Conventional Cooking 1701) 20 - 30 3 1) Preheat the oven.
Progress 23 Multilevel Baking Use the function True Fan Cooking. Cakes / pastries / breads on baking trays Food Temperature (°C) Time (min) Cream puffs / Eclairs 160 - 1801) Dry streusel cake 150 - 160 Shelf position 2 positions 3 positions 25 - 45 1/4 - 30 - 45 1/4 - 1) Preheat the oven.
Progress The default is 90 °C. After the temperature is set, the oven continues to cook at 80 °C. Do not use this function for poultry. Always cook without a lid when you use this function. 2. Put the meat together with the hot roasting pan into the oven on the wire shelf. 3. Select the function Slow Cooking. 1. Sear the meat in a pan on the hob on a very high setting for 1 - 2 minutes on each side.
Progress 25 Food Temperature (°C) Time (min) Shelf position Piroggen (Russian version of calzone) 180 - 2001) 15 - 25 2 1) Preheat the oven. 2) Use a deep pan. Roasting • Use heat-resistant ovenware to roast (refer to the instructions of the manufacturer). • You can roast large roasting joints directly in the deep pan (if present) or on the wire shelf above the deep pan. • Roast lean meats in the roasting tin with the lid. This keeps the meat more succulent.
Progress Pork Food Quantity Function Temperature (°C) Time (min) Shelf position Shoulder / Neck / Ham joint 1 - 1.5 kg Turbo Grilling 160 - 180 90 - 120 1 Chop / Spare rib 1 - 1.
Progress 27 Poultry Food Quantity Function Temperature (°C) Time (min) Shelf position Poultry portions 200 - 250 g each Turbo Grilling 200 - 220 30 - 50 1 Half chicken 400 - 500 g each Turbo Grilling 190 - 210 35 - 50 1 Chicken, poulard 1 - 1.5 kg Turbo Grilling 190 - 210 50 - 70 1 Duck 1.5 - 2 kg Turbo Grilling 180 - 200 80 - 100 1 Goose 3.5 - 5 kg Turbo Grilling 160 - 180 120 - 180 1 Turkey 2.5 - 3.
Progress Food Whole Fish, 500 - 1000 g Temperature (°C) Time (min) Shelf position 1st side 2nd side 210 - 230 15 - 30 15 - 30 3/4 Fast Grilling Food Time (min) Shelf position 1st side 2nd side Burgers / Burgers 8 - 10 6-8 4 Pork fillet 10 - 12 6 - 10 4 Sausages 10 - 12 6-8 4 Fillet / Veal steaks 7 - 10 6-8 4 Toast / Toast1) 1-3 1-3 5 Toast with topping 6-8 - 4 Food Temperature (°C) Time (min) Shelf position Pizza, frozen 200 - 220 15 - 25 2 Pizza American,
Progress 29 Frozen ready meals Food Function Temperature (°C) Time (min) Temperature (°C) Frozen pizza Conventional Cooking as per manufacturer’s instructions as per manufacturer’s instructions 3 French fries1) (300 - 600 g) Conventional Cooking or Turbo Grilling 200 - 220 as per manufacturer’s instructions 3 Baguettes Conventional Cooking as per manufacturer’s instructions as per manufacturer’s instructions 3 Fruit flans Conventional Cooking as per manufacturer’s instructions as per
Progress Preserving - Bottom Heat • Use only preserve jars of the same dimensions available on the market. • Do not use jars with twist-off and bayonet type lids or metal tins. • Use the first shelf from the bottom for this function. • Put no more than six one-litre preserve jars on the baking tray. • Fill the jars equally and close with a clamp. • The jars cannot touch each other. • Put approximately 1/2 litre of water into the baking tray to give sufficient moisture in the oven.
Progress 31 Vegetables Food Temperature (°C) Time (h) Beans 60 - 70 Peppers Shelf position 1 position 2 positions 6-8 3 1/4 60 - 70 5-6 3 1/4 Vegetables for sour 60 - 70 5-6 3 1/4 Mushrooms 50 - 60 6-8 3 1/4 Herbs 40 - 50 2-3 3 1/4 Temperature (°C) Time (h) Shelf position Plums 60 - 70 Apricots Fruit Food 1 position 2 positions 8 - 10 3 1/4 60 - 70 8 - 10 3 1/4 Apple slices 60 - 70 6-8 3 1/4 Pears 60 - 70 6-9 3 1/4 CARE AND CLEANING WARNING! Refer to
Progress 4. Touch or to set the duration of the cleaning procedure: 2 1 Install the shelf supports in the opposite sequence. Pyrolysis CAUTION! Remove all accessories and removable shelf supports. The pyrolytic cleaning procedure cannot start: • if you did not fully close the oven door. In some models, the display shows "C3" when this error occurs.
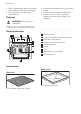
Progress 33 A A 9. Clean the glass panel with water and soap. Dry the glass panel carefully. When the cleaning is completed, install the glass panels and the door. Do the above steps in the opposite sequence. Install the smaller panel first, then the larger. Replacing the lamp 3. Close the oven door to the first opening position (approximately 70° angle). 4. Hold the door with one hand on each side and pull it away from the appliance at an upwards angle. 5.
Progress What to do if... Problem Possible cause The cooking zones do not operate. Refer to the operating instructions for the built-in cooking surface. Remedy You cannot activate or operate the oven. The oven is not connected to an electrical supply or it is connected incorrectly. Check if the oven is correctly connected to the electrical supply (refer to the connection diagram if available). The oven does not heat up. The oven is deactivated. Activate the oven. The oven does not heat up.
Progress 35 Problem Possible cause Remedy The display shows "F102". • You did not fully close the door. • The door lock is defective. • Fully close the door. • Deactivate the oven with the house fuse or the safety switch in the fuse box and activate it again. • If the display shows "F102" again, contact the Customer Care Department. The display shows an error code that is not in this table. There is an electrical fault.
Progress Model identification PHP5325X Energy Efficiency Index 103.5 Energy efficiency class A Energy consumption with a standard load, conventional mode 0.99 kWh/cycle Energy consumption with a standard load, fan-forced mode 0.88 kWh/cycle Number of cavities 1 Heat source Electricity Volume 71 l Type of oven Built-Under Oven Mass 40.5 kg EN 60350-1 - Household electric cooking appliances - Part 1: Ranges, ovens, steam ovens and grills - Methods for measuring performance.
Progress 37 ENVIRONMENT CONCERNS dispose appliances marked with the symbol with the household waste. Return the product to your local recycling facility or contact your municipal office. Recycle the materials with the symbol . Put the packaging in applicable containers to recycle it. Help protect the environment and human health and to recycle waste of electrical and electronic appliances.
Progress
Progress 39
www.progress-hausgeraete.