user manual Oven PHP5325X
progress CONTENTS Safety information Safety instructions Product description Before first use Control panel Daily use Clock functions 2 3 5 6 6 8 10 Automatic programmes 12 Using the accessories 12 Additional functions 13 Helpful hints and tips 15 Care and cleaning 26 What to do if… 28 Environment concerns 29 Subject to change without notice. SAFETY INFORMATION Before the installation and use of the appliance, carefully read the supplied instructions.
progress 3 • Before maintenance cut the power supply. • Do not use harsh abrasive cleaners or sharp metal scrapers to clean the glass door since they can scratch the surface, which may result in shattering of the glass. • Excess spillage must be removed before the pyrolytic cleaning. Remove all parts from the oven. • To remove the shelf supports first pull the front of the shelf support and then the rear end away from the side walls. Install the shelf supports in the opposite sequence.
progress Use Care and Cleaning Warning! Risk of injury, burns or electric shock or explosion. • Use this appliance in a household environment. • Do not change the specification of this appliance. • Make sure that the ventilation openings are not blocked. • Do not let the appliance stay unattended during operation. • Deactivate the appliance after each use. • Be careful, when you open the appliance door while the appliance is in operation. Hot air can release.
progress 5 • • • • – Remove any pets (especially birds) from the vicinity of the appliance location during and after the Pyrolytic cleaning and first use maximum temperature operation to a well ventilated area. Unlike all humans, some birds and reptiles can be extremely sensitive to potential fumes emitted during the cleaning process of all Pyrolytic Ovens.
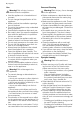
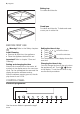
progress Baking tray For cakes and biscuits. Combi pan For cakes and biscuits. To bake and roast or as a pan to collect fat. BEFORE FIRST USE Warning! Refer to the Safety chapters. Initial Cleaning • Remove all parts from the appliance. • Clean the appliance before first use. Important! Refer to chapter "Care and Cleaning". Setting and changing the time After the first connection to the mains, all symbols in the display are on for some seconds.
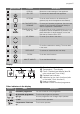
progress 7 Sensor Field Function - DISPLAY Shows the current settings of the appliance. 2 ON / OFF To activate and deactivate the appliance. 3 OPTIONS To set an oven function or an automatic programme (only when the appliance is activated). 4 MY FAVOURITE PROGRAMME To store your favourite programme. Use it to have access to your favourite programme directly or when the appliance is deactivated.
progress Symbols Name Description Temperature You can see or change the temperature. Door lock The door lock function operates. Oven light The light is off. Minute minder The minute minder function operates. Heat up indicator If you activate an oven function, the bars come on in the display. The bars show that the temperature in the appliance increases or decreases. When the appliance is at the set temperature, the bars go off the display. To use the appliance, press the control knob.
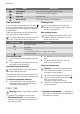
progress 9 Oven function Application 1 True Fan Cooking To bake maximum on 3 shelf positions at the same time and to dry food. Set the temperature 20 - 40 °C lower than for Conventional Cooking. 2 Pizza Setting To bake food on 1 shelf position for a more intensive browning and a crispy bottom. Set the temperature 20 - 40 °C lower than for Conventional Cooking. 3 Slow Cook To prepare very lean, tender roasted food. 4 Conventional Cooking To bake and roast food on 1 shelf position.
progress 1. Touch . The Temperature / Time display shows the temperature in the appliance. If you want to change the one more oven temperature, touch time and use or . 2. Touch to go back to the set temperature or the display shows it automatically after five seconds. Fast heat up function The Fast heat up function decreases the heat up time. Activating the Fast heat up function: for more than three Touch and hold seconds.
progress 11 Setting the DURATION 1. Activate the appliance and set an oven function and temperature. 2. Touch again and again until the display shows . flashes in the display. 3. Use or to set the minutes for DURATION. 4. Touch to confirm. 5. Use or to set the hours for DURATION. If you touch or while you set the DURATION, the appliance switches to the setting of the END function. 6. When the set time ends, an acoustic signal sounds for two minutes. and time setting flash in the display.
progress AUTOMATIC PROGRAMMES Warning! Refer to the Safety chapters. There are 20 automatic programmes and recipes. Use an automatic programme or recipe when you do not have the knowledge or experience on how to prepare a dish. You can find the list of the recipes for the automatic programmes in the "Helpful hints and tips" chapter. There are two types of automatic programmes: • Automatic recipes • Automatic programmes with weight input Automatic recipes Setting an automatic recipe: 1.
progress 13 Installing the wire shelf and the deep pan together Put the wire shelf on the deep pan. Push the deep pan between the guide-bars of one of the oven levels. ADDITIONAL FUNCTIONS My Favourite Programme function Use this function to save your favourite temperature and time settings for an oven function or programme. 1. Set the temperature and time for an oven function or programme. 2. Touch and hold for more than three seconds. An acoustic signal sounds. 3. Deactivate the appliance.
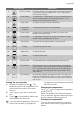
progress Settings menu Indicator of the setting menu Description Value to set SET1 SET+GO ON / OFF SET2 RESIDUAL HEAT INDICATOR ON / OFF SET3 CLEANING REMINDER ON / OFF SET41) KEY TONE CLICK / BEEP / OFF SET5 FAULTY TONE ON / OFF SET6 SERVICE MENU --- SET7 RESTORE SETTINGS YES / NO SET82) TIME EXTENSION ON / OFF 1) It is not possible to deactivate the tone of the ON / OFF sensor field. 2) Selected models only You can set the settings menu only when the appliance is off.
progress 15 HELPFUL HINTS AND TIPS Warning! Refer to the Safety chapters. For build - under ovens: Heat setting Use to: Examples of cooking applications for the hob The data in the table is for guidance only. Time Hints 1 To keep cooked food warm. as required Put a lid on the cookware. 1-2 To make Hollandaise sauce, and to melt butter, chocolate and gelatine. 5 - 25 min Mix at intervals. 1-2 To solidify fluffy omelettes and baked eggs. 10 - 40 min Cook with a lid on.
progress Tips on baking Possible cause Remedy The bottom of the cake is not browned sufficiently. Baking results The shelf position is incorrect. Put the cake on a lower shelf. The cake sinks and becomes soggy, lumpy or streaky. The oven temperature is too high. The next time you bake, set a slightly lower oven temperature. The cake sinks and becomes soggy, lumpy or streaky. The baking time is too short. Set a longer baking time.
progress 17 Type of baking Oven function Shelf position Temperature (°C) Time (min) Apple pie / Apple pie (2 tins Ø20 cm, diagonally off set) Conventional Cooking 1 180 70 - 90 Cheesecake Conventional Cooking 1 170 - 190 60 - 90 1) Preheat the oven.
progress Biscuits Oven function Shelf position Temperature (°C) Time (min) Short pastry biscuits True Fan Cooking 3 150 - 160 10 - 20 Short bread / Short bread / Pastry stripes True Fan Cooking 3 140 20 - 35 Short bread / Short bread / Pastry stripes Conventional Cooking 3 160 1) 20 - 30 Biscuits made with sponge mixture True Fan Cooking 3 150 - 160 15 - 20 Pastries made with egg white / Merungues True Fan Cooking 3 80 - 100 120 - 150 Macaroons True Fan Cooking 3 100 - 12
progress 19 Multileveled Baking Cakes / pastries / breads on baking trays True Fan Cooking Shelf position Type of baking Temperature (°C) Time (min) 2 shelf positions 3 shelf positions Cream puffs / Eclairs 1/4 - 160 - 180 1) 25 - 45 Dry streusel cake 1/4 - 150 - 160 30 - 45 Temperature (°C) Time (min) 1) Preheat the oven.
progress Type of baking Shelf position Temperature °C Time (min.) 2 230 - 2501) 10 - 20 2 160 - 180 1) 45 - 55 Flammekuchen (Pizzalike dish from Alsace) 2 230 - 2501) 12 - 20 Piroggen (Russian version of calzone) 2 180 - 200 1) 15 - 25 Unleavened bread Puff pastry flan 1) Preheat the oven. 2) Use a deep pan. Roasting • Use heat-resistant ovenware to roast (refer to the instructions of the manufacturer).
progress 21 Type of meat Quantity Oven function Shelf position Temperature °C Time (min.) Roast veal 1 kg Turbo Grilling 1 160 - 180 90 - 120 Knuckle of veal 1.5 - 2 kg Turbo Grilling 1 160 - 180 120 - 150 Type of meat Quantity Oven function Shelf position Temperature °C Time (min.) Leg of lamb / Roast lamb 1 - 1.5 kg Turbo Grilling 1 150 - 170 100 - 120 Saddle of lamb 1 - 1.
progress Caution! Always grill with the oven door closed. Grilling Food to be grilled Shelf position Temperature Roast beef 2 Filet of beef 3 Back of pork Time (min.) 1st side 2nd side 210 - 230 30 - 40 30 - 40 230 20 - 30 20 - 30 2 210 - 230 30 - 40 30 - 40 Back of veal 2 210 - 230 30 - 40 30 - 40 Back of lamb 3 210 - 230 25 - 35 20 - 25 3/4 210 - 230 15 - 30 15 - 30 Whole Fish, 500 1000 g Fast Grilling Food to be grilled Time (min.
progress 23 Temperature Sensor to guarantee that the meat has the correct core temperature (see table for the Core Temperature Sensor). In the first 10 minutes you can set an oven temperature between 80 °C and 150 °C. The default is 90 °C. After the temperature is set, the oven continues to cook at 80 °C. Do not use the automatic slow cook function for poultry. 1. Sear the meat in a pan on the hob on a very high setting for 1 - 2 minutes on each side. 2.
progress Food to be cooked Oven functions Shelf position Temperature (°C) Time (min.) Baguettes Conventional Cooking 3 as per manufacturer’s instructions as per manufacturer’s instructions Fruit flans Conventional Cooking 3 as per manufacturer’s instructions as per manufacturer’s instructions 1) Turn the French fries 2 or 3 times during cooking Drying - True Fan Cooking Use baking parchment as a cover for the oven shelves.
progress 25 Preserve Temperature in °C Cooking time until simmering (min.) Continue to cook at 100°C (min.) Strawberries / Blueberries / Raspberries / Ripe gooseberries 160 - 170 35 - 45 - Temperature in °C Cooking time until simmering (min.) Continue to cook at 100°C (min.) 160 - 170 35 - 45 10 - 15 Temperature in °C Cooking time until simmering (min.) Continue to cook at 100°C (min.
progress Programme number Programme name 18 CONVENIENCE CAKE 19 CONVENIENCE PIZZA 20 CONVENIENCE POTATO TYPES CARE AND CLEANING Warning! Refer to the Safety chapters. Notes on cleaning: • Clean the front of the appliance with a soft cloth with warm water and a cleaning agent. • To clean metal surfaces, use a usual cleaning agent. • Clean the appliance interior after each use. Then you can remove dirt more easily and it does not burn on. • Clean stubborn dirt with a special oven cleaner.
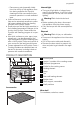
progress 27 Shelf supports Removing the shelf supports You can remove the shelf supports to clean the side walls. 1. Pull the front of the shelf support away from the side wall. 2. Pull the rear end of the shelf support away from the side wall and remove it. 2 1 Installing the shelf supports Install the shelf supports in the opposite sequence. Important! Valid for telescopic runners: The retaining pins on the telescopic runners must point to the front. Lamp Warning! There is a risk of electrical shock.
progress Cleaning the oven door Removing the door and the glass panels You can remove the oven door and the internal glass panels to clean it. The number of glass panels is different for different models. Warning! Be careful when you remove the door from the appliance. The door is heavy. 1. Open the door fully. 2. Fully press the clamping levers (A) on the two door hinges. 3. Close the oven door to the first opening position (approximately 70° angle). 4.
progress 29 Problem Possible cause Remedy The appliance does not heat up. The appliance is deactivated. Activate the appliance The appliance does not heat up. The clock is not set. Set the clock. Refer to "Setting and changing the time". The appliance does not heat up. The necessary settings are not set. Make sure that the settings are correct. The appliance does not heat up. The automatic cut-out is activated. Refer to „Automatic switch-off“. The appliance does not heat up.
progress help prevent potential negative consequences for the environment and human health, which could otherwise be caused by inappropriate waste handling of this product. For more detailed information about recycling of this product, please contact your local council, your household waste disposal service or the shop where you purchased the product. Packaging material The packaging material is environmentally-friendly and recyclable.
progress 31
www.progress-hausgeraete.