user manual Oven PHN3325X
progress CONTENTS Safety information Safety instructions Product description Before first use Control panel Daily use Clock functions 2 3 5 5 6 8 10 Automatic programmes 11 Using the accessories 12 Additional functions 12 Helpful hints and tips 14 Care and cleaning 25 What to do if… 28 Environment concerns 29 Subject to change without notice. SAFETY INFORMATION Before the installation and use of the appliance, carefully read the supplied instructions.
progress 3 • Before maintenance cut the power supply. • Do not use harsh abrasive cleaners or sharp metal scrapers to clean the glass door since they can scratch the surface, which may result in shattering of the glass. • To remove the shelf supports first pull the front of the shelf support and then the rear end away from the side walls. Install the shelf supports in the opposite sequence. SAFETY INSTRUCTIONS Installation Warning! Only a qualified person must install this appliance.
progress • Do not let the appliance stay unattended during operation. • Deactivate the appliance after each use. • Be careful, when you open the appliance door while the appliance is in operation. Hot air can release. • Do not operate the appliance with wet hands or when it has contact with water. • Do not apply pressure on the open door. • Do not use the appliance as a work surface or as a storage surface. • Always keep the appliance door closed when the appliance is in operation.
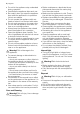
progress 5 PRODUCT DESCRIPTION 1 2 3 2 4 5 6 5 4 11 3 7 2 8 9 1 10 1 2 3 4 5 6 7 8 9 10 11 Control panel Lamps / symbols of the cooking zones Electronic programmer Knobs for the cooking zones Heating element Lamp Fan Rear wall heating element Bottom heat Shelf support, removable Shelf positions Accessories Wire shelf For cookware, cake tins, roasts. Baking tray For cakes and biscuits. Combi pan For cakes and biscuits. To bake and roast or as a pan to collect fat.
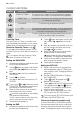
progress Important! Refer to chapter "Care and Cleaning". Setting and changing the time After the first connection to the mains, all symbols in the display are on for some seconds. For the subsequent few seconds the display shows the software version. After the software version goes off, the display shows h and 12:00. Setting the time of day: 1. Touch or to set the hours. 2. Touch . 3. Touch or to set the minutes. 4. Touch or . The Temperature / Time display shows the new time.
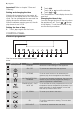
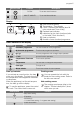
progress 7 Sensor Field Function Description 9 CLOCK To set the clock functions. 10 MINUTE MINDER To set the Minute Minder.
progress Operating the hob: 1. Turn the knob to a necessary heat setting. 2. To complete the cooking process, turn the knob to the off position. Automatic heat-up function Only applicable for hobs with the automatic heat-up function. The automatic heat-up function heats the cooking zone with full power for some time. To start the automatic heat-up: 1. Turn the knob for the cooking zone clockwise as far as possible (beyond the highest heat setting). 2. Immediately set the necessary heat setting. 3.
progress 9 Oven function 11 Bottom Heat 12 ECO Roasting Application To bake cakes with a crispy bottom and to preserve food. ECO functions let you optimize the energy consumption during cooking. Thus, it is necessary to set the cooking time first. To get more information about the recommended settings, refer to the cooking tables for an oven function that is almost the same. Setting the oven function 1. Activate the appliance with .
progress CLOCK FUNCTIONS SYMBOL FUNCTION DESCRIPTION COUNT UP TIMER To set count up. It shows how long the appliance operates. This function has no effect on the operation of the appliance. TIME OF DAY To examine the time of day. For changing the time of day refer to 'Setting the time of day'. DURATION To set how long the appliance operates. END To set when the appliance deactivates.
progress 11 the END or DURATION function. During these two minutes you can examine the results of the cooking, and, if necessary, add the END or DURATION time. Setting the MINUTE MINDER Use the MINUTE MINDER to set a countdown (maximum 2 h 30 min). This function has no effect on the operation of the oven. You can set the MINUTE MINDER at any time and also when the appliance is off. 1. Touch . and "00" flash in the display. 2. Use or to set the MINUTE MINDER.
progress 7. Touch a sensor field or open the door to stop the acoustic signal. USING THE ACCESSORIES Warning! Refer to the Safety chapters. Inserting the oven accessories The deep pan and the wire shelf have side edges. These edges and the shape of the guide-bars are a special device to prevent the cookware from slipping. Installing the wire shelf and the deep pan together Put the wire shelf on the deep pan. Push the deep pan between the guide-bars of one of the oven levels.
progress 13 SAFE comes on or goes out in the display. Function Lock You can activate the function only when the appliance operates. The Function Lock prevents an accidental change of the oven function. Activating / deactivating the Function Lock function: 1. Activate the appliance. 2. Activate an oven function or setting. 3. Touch and hold and at the same time for 2 seconds. An acoustic signal sounds. Settings menu Indicator of the setting menu Loc comes on or goes out in the display.
progress Brightness of the display There are two modes of display brightness: • Night brightness - when the appliance is deactivated, the brightness of the display is lower between 10 PM and 6 AM. • Day brightness: – When the appliance is activated. – If you touch a sensor field during the night brightness (apart from ON / OFF), the display goes back to the day brightness mode for the next 10 seconds. – If the appliance is deactivated and you set the Minute Minder.
progress 15 cooking times) and shelf positions to the values in the tables. • With longer baking times, you can deactivate the oven approximately 10 minutes before the end of the baking time and then use the residual heat. When you cook frozen food, the trays in the oven can twist during baking. When the trays become cold again, the distortions are gone. • If you cannot find the settings for a special recipe, look for the one that is almost the same.
progress Type of baking Oven function Shelf position Temperature (°C) Time (min) Fatless sponge cake / Fatless sponge cake True Fan Cooking 2 140 - 150 35 - 50 Fatless sponge cake / Fatless sponge cake Conventional Cooking 2 160 35 - 50 Flan base - short pastry True Fan Cooking 2 170 - 180 1) 10 - 25 Flan base sponge mixture True Fan Cooking 2 150 - 170 20 - 25 Apple pie / Apple pie (2 tins Ø20 cm, diagonally off set) True Fan Cooking 2 160 60 - 90 Apple pie / Apple pie (2 t
progress 17 Oven function Shelf position Temperature (°C) Time (min) True Fan Cooking 3 150 35 - 55 Conventional Cooking 3 170 35 - 55 Fruit flans made with short pastry True Fan Cooking 3 160 - 170 40 - 80 Yeast cakes with delicate toppings (e.g.
progress Oven function Shelf position Temperature (°C) Time (min) Conventional Cooking 3 1701) 20 - 30 Oven function Shelf position Temperature (°C) Time (min) Pasta bake Conventional Cooking 1 180 - 200 45 - 60 Lasagne Conventional Cooking 1 180 - 200 25 - 40 Vegetables au gratin1) Turbo Grilling or True Fan Cooking 1 160 - 170 15 - 30 Baguettes topped with melted cheese Turbo Grilling or True Fan Cooking 1 160 - 170 15 - 30 Sweet bakes Conventional Cooking 1 180 - 20
progress 19 True Fan Cooking Type of baking Shelf position Temperature (°C) Time (min) 2 shelf positions 3 shelf positions Biscuits made with egg white / Meringues 1/4 - 80 - 100 130 - 170 Macaroons 1/4 - 100 - 120 40 - 80 Biscuits made with yeast dough 1/4 - 160 - 170 30 - 60 Puff pastries 1/4 - 170 - 180 1) 30 - 50 Rolls 1/4 - 180 30 - 55 Small cakes / Small cakes (20 per tray) 1/4 - 1501) 25 - 40 1) Preheat the oven.
progress • Baste large roasts and poultry with their juices several times during roasting. This gives better roasting results. • You can deactivate the appliance approximately 10 minutes before the end of the roasting time, and use the residual heat. Roasting with Turbo Grilling Beef Quantity Oven function Shelf position Temperature °C Time (min.) Pot roast 1 - 1.
progress 21 Type of meat Quantity Oven function Shelf position Temperature °C Time (min.) Haunch of venison 1.5 - 2 kg Conventional Cooking 1 180 - 200 60 - 90 Quantity Oven function Shelf position Temperature °C Time (min.) Poultry portions 200 - 250 g each Turbo Grilling 1 200 - 220 30 - 50 Half chicken 400 - 500 g each Turbo Grilling 1 190 - 210 35 - 50 Chicken, poulard 1 - 1.5 kg Turbo Grilling 1 190 - 210 50 - 70 Duck 1.
progress Food to be grilled Time (min.) Shelf position 1st side 2nd side Pork fillet 4 10 - 12 6 - 10 Sausages 4 10 - 12 6-8 Fillet / Veal steaks 4 7 - 10 6-8 5 1-3 1-3 4 6-8 - Toast / Toast 1) Toast with topping 1) Preheat the oven. Defrosting Remove the food packaging, and then put the food on a plate. Do not cover it with a bowl or a plate, as this can extend the defrost time. Use the first oven shelf position from the bottom. Defrosting time (min.
progress 23 Food to be cooked Weight (g) Shelf position Temperature °C Time in min. 1000 - 1500 1 120 120 - 150 200 - 300 3 120 20 - 40 Shelf position Temperature (°C) Time (min.
progress Food to be dried Shelf position 1 level 2 levels Temperature (°C) Beans 3 1/4 60 - 70 6- 8 Peppers 3 1/4 60 - 70 5-6 Vegetables for sour 3 1/4 60 - 70 5-6 Mushrooms 3 1/4 50 - 60 6-8 Herbs 3 1/4 40 - 50 2-3 1 level 2 levels Temperature (°C) Time (h) Plums 3 1/4 60 - 70 8 - 10 Apricots 3 1/4 60 - 70 8 - 10 Apple slices 3 1/4 60 - 70 6-8 Pears 3 1/4 60 - 70 6-9 Time (h) Fruit Food to be dried Shelf position Preserving - Bottom Heat Things to
progress 25 Preserve Temperature in °C Cooking time until simmering (min.) Continue to cook at 100°C (min.) 160 - 170 50 - 60 15 - 20 Kohlrabi / Peas / Asparagus 1) Leave standing in the oven after it’s deactivated. RECIPE MENU The display shows the shelf position and the default cooking times for all automatic recipes.
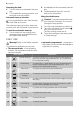
progress sharp-edged objects or a dishwasher. It can cause damage to the nonstick coating. Shelf supports Removing the shelf supports You can remove the shelf supports to clean the side walls. 1. Pull the front of the shelf support away from the side wall. 2. Pull the rear end of the shelf support away from the side wall and remove it. 2 1 Installing the shelf supports Install the shelf supports in the opposite sequence.
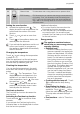
progress 27 Folding down the heating element 1. Remove the shelf supports. 3. Pull it forwards against the spring pressure and out along the supports on the two sides. 4. The heating element folds down. You can clean the oven ceiling. Installing the heating element 1. Install the heating element in the opposite sequence. Important! Install the heating element correctly above the supports on the inner walls of the appliance. 2. Install the shelf supports. 2.
progress 8. Hold the door glass panels on their top edge one by one and pull them up out of the guide. 9. Clean the glass panel with water and soap. Dry the glass panel carefully. Installing the door and the glass panels When the cleaning is completed, install the glass panels and the oven door. Do the above steps in the opposite sequence. Install the smaller panel first, then the larger. WHAT TO DO IF… Warning! Refer to the Safety chapters.
progress 29 Model (MOD.) ......................................... Product number (PNC) ......................................... Serial number (S.N.) ......................................... ENVIRONMENT CONCERNS The symbol on the product or on its packaging indicates that this product may not be treated as household waste. Instead it should be taken to the appropriate collection point for the recycling of electrical and electronic equipment.
progress
progress 31
www.progress-hausgeraete.