
User manual


• Slight discolouration and polishing of the
catalytic surface may occur in time. This
does not affect the catalytic properties in
any way.
• Follow the recommendations made in the
chapter "How to avoid staining while cook-
ing".
Cooking to reduce soilage
Cook at the recommended temperatures.
Higher temperatures during roasting will in-
crease soilage.
Try to cook at a lower temperature for a lon-
ger time.
That way you will save energy and the roast
will be more tender.
Use minimal, if any, extra oil or fat when
roasting meat; potatoes only require brush-
ing with fat before cooking. Extra fat in the
oven during roasting will increase splashing
and soilage.
It is NOT necessary to add water to the meat
tin when roasting. Water and fat juices flow
out of the roast during cooking and splatter
excessively, even at normal temperatures.
This also causes condensation.
Covering joints during cooking will also pre-
vent splashing onto the interior surfaces; re-
moving the covering for the last 20-30 mi-
nutes will allow extra browning, if required.
Some large joints and turkeys especially ben-
efit by this method of cooking, allowing the
joint to cook through before the outside is
overbrowned.
Please use the roasting dish. During roast-
ing, the fat from the joint will be contained
beneath the roasting dish and therefore pre-
vent it from splattering onto the ‚catalytic‘ lin-
er.
Telescopic Shelf Supports and Catalytic
Panels
The shelf support and the catalytic panels
rails on the left and right hand sides of the
oven can be removed for cleaning the side
walls.
First ensure that the oven has cooled down
and has been disconnected from the mains.
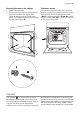
Removing the shelf support rails .
First pull the front of the rail away from the
oven wall and then unhitch at the back.
Fitting the shelf support rails
To install, first reattach the rails at the back,
then put them into position at the front and
press them into place.To clean the shelf sup-
port rails, soak in warm soapy water and re-
move stubborn marks with a well wetted
soap impregnated pad. Rinse well and dry
with a soft cloth.
Replacing the oven light
Important! Separate the appliance from
the power supply by switching off the
fuse.
If the oven bulb needs replacing, the new
bulb must have the following specifications:
progress 41