user manual Ceramic glass induction hob PAI6000E
progress Contents Safety Information Description of the Appliance Operating the appliance Tips on Cooking and Frying Cleaning and Care 2 3 4 8 10 What to do if ... Disposal Installation Instructions Service 11 12 12 14 Subject to change without notice Safety Information Warning! Please comply with these instructions. If you do not, any damage resulting is not covered by the warranty.
progress 3 • To avoid damaging cookware and glass ceramics, do not allow saucepans or frying pans to boil dry. • The ventilation gap of 5mm between the worktop and front of the unit underneath it must not be covered. • Cookware made of cast iron, cast aluminium or with damaged bottoms can scratch the glass ceramic if pushed across the surface. • Objects that melt and things that boil over can burn onto the glass ceramic and should be removed straightaway.
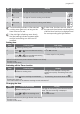
progress Sensor field Function On / Off To switch the appliance on and off Increase settings Increasing heat setting/time Decrease settings Decreasing heat setting/time Timer Timer selection Lock Locking/unlocking the control panel Power Switching the power function on and off Displays Display Description Cooking zone is switched off Heat settings Heat setting is set Fault Malfunction has occurred Pan detection Cookware is unsuitable or too small or no cookware has been placed on the
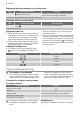
progress 5 Setting the heat setting Control panel Increase Touch Decrease Touch Switch off Touch Display to / to and at the same time Locking/unlocking the control panel The control panel, with the exception of the “On/Off” sensor field, can be locked at any time in order to prevent the settings being changed e.g. by wiping over the panel with a cloth. Control panel Switch on Touch Switch off Touch When you switch the appliance off, the locking function is automatically switched off.
progress Control panel Switch on Touch Switch off Touch Display Touch If the power function has ended, the cooking zones automatically switch back to the heat setting set previously. Power Management The cooking zones of the cooking surface have a maximum power available to them. Two cooking zones make up a pair (see figure).
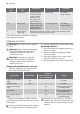
progress 7 Ste p Control panel Display 2. Touch once Pilot light of the second cooking zone flashes 3. Touch once Pilot light of the third cooking zone flashes 4. Touch once Pilot light of the fourth cooking zone flashes The heat setting indicator of the selected cooking zone goes out, as long as the timer time can be set. If other timer functions are set, after a few seconds the shortest remaining time of all the timer functions is displayed and the corresponding pilot light flashes.
progress Displaying the time remaining for a cooking zone Step Control panel field 1. Select cooking zone Display Pilot light of the cooking zone selected flashes faster The time remaining is displayed After a few seconds the pilot light flashes more slowly. Switching off the acoustic signal Step 1. Control panel field Acoustic signal Acoustic signal to acknowledge. Touch Acoustic signal stops.
progress 9 • ... a little water on an induction cooking zone set to heat setting 9 is heated within a short time. • ... a magnet sticks to the bottom of the cookware. Certain cookware can make noises when being used on induction cooking zones. These noises are not a fault in the appliance and do not affect operation in any way. Bottom of the cookware The bottom of the cookware should be as thick and flat as possible.
progress Heat setting Cooking process Suitable for Cooking time Tips/Hints 6-7 Gentle Frying Frying escalopes, veal cordon bleu, cutlets, rissoles, sausages, liver, roux, eggs, pancakes, doughnuts Steady frying Turn halfway through cooking 7-8 Heavy Frying Hash browns, loin steaks, steaks, Flädle (pancakes for garnishing soup) 5-15 mins.
progress 11 What to do if ... Problem Possible cause Remedy The appliance cannot be switch- More than 10 seconds have Switch the appliance on again.
progress Problem and number are displayed Possible cause Electronics fault If you are unable to remedy the problem by following the above suggestions, please contact your dealer or the Customer Care Department. Warning! Repairs to the appliance are only to be carried out by qualified service engineers. Considerable danger to the user may result from improper repairs.
progress 13 Warning! Risk of injury from electrical current. • Loose and inappropriate plug and socket connections can make the terminal overheat. • Have the clamping connections correctly installed by a qualified electrician. • Use strain relief clamp on cable. • In the event of single-phase or twophase connection, the appropriate mains cable of type H05BB-F Tmax 90°C (or higher) must be used.
progress PAI 6000 E 55GADD5AU 230 V 50 Hz 949 593 002 Induction 7,2 kW 7,2 kW PROGRESS Service In the event of technical faults, please first check whether you can remedy the problem yourself with the help of the operating instructions (section “What to do if…”). If you were not able to remedy the problem yourself, please contact the Customer Care Department or one of our service partners.
progress 15
www.progress-hausgeraete.