User Manual Hob PAI3100FC
Progress CONTENTS Safety information Safety instructions Product description Daily use Hints and tips 2 3 6 7 10 Care and cleaning Troubleshooting Installation Technical data 11 12 15 18 Subject to change without notice. SAFETY INFORMATION Before the installation and use of the appliance, carefully read the supplied instructions. The manufacturer is not responsible for any injuries or damages that are the result of incorrect installation or usage.
Progress 3 • • • • • • • • • • • heating elements. Children less than 8 years of age shall be kept away unless continuously supervised. Do not operate the appliance by means of an external timer or separate remote-control system. WARNING: Unattended cooking on a hob with fat or oil can be dangerous and may result in fire. NEVER try to extinguish a fire with water, but switch off the appliance and then cover flame e.g. with a lid or a fire blanket. CAUTION: The cooking process has to be supervised.
Progress • Keep the minimum distance from the other appliances and units. • Always take care when moving the appliance as it is heavy. Always use safety gloves and enclosed footwear. • Seal the cut surfaces with a sealant to prevent moisture to cause swelling. • Protect the bottom of the appliance from steam and moisture. • Do not install the appliance adjacent to a door or under a window. This prevents hot cookware to fall from the appliance when the door or the window is opened.
Progress 5 • Do not let the appliance stay unattended during operation. • Set the cooking zone to “off” after each use. • Do not rely on the pan detector. • Do not put cutlery or saucepan lids on the cooking zones. They can become hot. • Do not operate the appliance with wet hands or when it has contact with water. • Do not use the appliance as a work surface or as a storage surface. • If the surface of the appliance is cracked, disconnect immediately the appliance from the power supply.
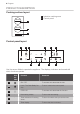
Progress PRODUCT DESCRIPTION Cooking surface layout 1 Induction cooking zone 2 Control panel 180 mm 1 180 mm 1 2 Control panel layout 1 2 3 4 10 9 5 8 6 7 Use the sensor fields to operate the appliance. The displays, indicators and sounds tell which functions operate. Sensor field Function Comment 1 ON / OFF To activate and deactivate the hob. 2 Lock / The Child Safety Device To lock / unlock the control panel. 3 STOP+GO To activate and deactivate the function.
Progress 7 Sensor field Function Comment - To select the cooking zone. / - To increase or decrease the time. / - To set a heat setting. Power function To activate and deactivate the function. 7 8 9 10 Heat setting displays Display Description The cooking zone is deactivated. The cooking zone operates. - STOP+GO function operates. Power function operates. + digit There is a malfunction. A cooking zone is still hot (residual heat). Lock / The Child Safety Device function operates.
Progress Automatic Switch Off The function deactivates the hob automatically if: • all cooking zones are deactivated, • you do not set the heat setting after you activate the hob, • you spill something or put something on the control panel for more than 10 seconds (a pan, a cloth, etc.). An acoustic signal sounds and the hob deactivates. Remove the object or clean the control panel. • the hob gets too hot (e.g. when a saucepan boils dry). Let the cooking zone cool down before you use the hob again.
Progress 9 cooking zones do not operate. The heat setting display shows . for 4 seconds. the hob with . To activate the function: touch . Touch or of the timer to set the time. When the time comes to an end, the sound operates and 00 flashes. To deactivate the function: activate the hob with . Do not set the heat setting. Touch for 4 seconds. comes on. Deactivate the hob with . To stop the sound: touch To override the function for only one cooking time: activate the hob with . comes on.
Progress exceeds maximum electricity loading of the phase. • The function divides the power between cooking zones. • The function decreases the power to the other cooking zones. • The heat setting display of the reduced zones changes between two levels. HINTS AND TIPS WARNING! Refer to Safety chapters. Cookware For induction cooking zones a strong electro-magnetic field creates the heat in the cookware very quickly. Use the induction cooking zones with correct cookware.
Progress 11 • Use the residual heat to keep the food warm or to melt it. Examples of cooking applications setting, it is not proportional to the increase of the cooking zone consumption of power. It means that the cooking zone with the medium heat setting uses less than a half of its power. The relation between the heat setting and the cooking zone consumption of power is not linear. When you increase the heat Heat setting The data in the table is for guidance only.
Progress • Scratches or dark stains on the surface have no effect on how the hob operates. • Use a special cleaner applicable for the surface of the hob. • Use a special scraper for the glass. Cleaning the hob • Remove immediately: melted plastic, plastic foil, sugar and food with sugar. If not, the dirt can cause damage to the hob. Take care to avoid burns. Put the special scraper on the glass surface at an acute angle and move the blade on the surface.
Progress 13 Problem Possible cause Remedy Residual heat indicator does not come on. The zone is not hot because it operated only for a short time. If the zone operated sufficiently long to be hot, speak to an Authorised Service Centre. The heat setting changes between two levels. Power management function operates. Refer to "Daily use" chapter. The sensor fields become hot. The cookware is too large or you put it too near to the controls. Put large cookware on the rear zones if possible.
Progress Problem comes on. Possible cause Remedy There is an error in the hob because a cookware boiled dry. Automatic Switch Off and the overheating protection for the zones operate. Deactivate the hob. Remove the hot cookware. After approximately 30 seconds, activate the zone again. If the cookware was the problem, the error message goes out. Residual heat indicator can stay on. Let the cookware become sufficiently cool. Check if your cookware is compatible with the hob.
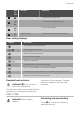
Progress 15 Labels supplied with the accessories bag Stick the adhesive labels as indicated below: A B MOD. MOD. PROD.NO. PROD.NO. SER.NO SER.NO DATA DATA C 0049 MOD. PROD.NO. SER.NO. TYPE IP20 03 IT MADE IN ITALY A. Stick it on Guarantee Card and send this part (if applicable). B. Stick it on Guarantee Card and keep this part (if applicable). C. Stick it on instruction booklet. INSTALLATION WARNING! Refer to Safety chapters.
Progress the seal stripe are located in the middle of one side of the hob. 3. Add some mm when you cut the seal stripe to the length. 4. Push the two ends of seal stripe together. Assembly min. 500mm min. 50mm min. 2mm min. 2 mm A min. 2 mm B < 20 mm B 57 mm 41 mm 31 mm B > 20 mm min. 500 mm A 12 mm 28 mm 38 mm A min 30 mm min.
Progress 17 min. 38 mm min. 2 mm R 5mm min. 55mm 490+1mm 270+1mm min. 12 mm min. 2 mm Installation of more than one hob min. 650 mm 40-50 mm 490 mm 55 mm 30 mm 270 mm If several 30 cm hobs are to be installed side by side into the same cut out, an assembly kit including a support side bracket and supplementary seals is available at our Authorised Service Centres. The relevant installation instructions are supplied within the kit package.
Progress TECHNICAL DATA Cooking zones specification Cooking zone Nominal power (maximum heat setting) [W] Power function [W] Power function maximum duration [min] Cookware diameter [mm] Middle front 1800 2500 10 145 - 180 Middle rear 1800 2500 10 145 - 180 The power of the cooking zones can be different in some small range from the data in the table. It changes with the material and dimensions of the cookware.
Progress 19
www.progress-hausgeraete.