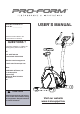
Model No. PFIVEX51811.0 Serial No. ___________ USERʼS MANUAL Write the serial number in the space above for reference. QUESTIONS ? If you have questions, or if there are missing parts, please contact us: UK Call: 08457 089 009 From Ireland: 053 92 36102 Website: www.iconsupport.eu E-mail: csuk@iconeurope.com Write: ICON Health & Fitness, Ltd. c/o HI Group PLC Express Way Whitwood, West Yorkshire WF10 5QJ UK CAUTION Read all precautions and instructions in this manual before using this equipment.
TABLE OF CONTENTS WARNING DECAL PLACEMENT . . . . . . . . . . . . . . . . . . . . . . . . . . . . . . . . . . . . . . . . . . . . . . . . . . . . . . . . . . . . 1 IMPORTANT PRECAUTIONS . . . . . . . . . . . . . . . . . . . . . . . . . . . . . . . . . . . . . . . . . . . . . . . . . . . . . . . . . . . . . . . . . 2 BEFORE YOU BEGIN . . . . . . . . . . . . . . . . . . . . . . . . . . . . . . . . . . . . . . . . . . . . . . . . . . . . . . . . . . . . . . . . . . . . . . 3 ASSEMBLY. . . . . . . . . . . . .
IMPORTANT PRECAUTIONS WARNING : To reduce the risk of serious injury, read all important precautions and instructions in this manual and all warnings on your bike before using it. ICON assumes no responsibility for personal injury or property damage sustained by or through the use of this product. 1. Before beginning any exercise program, consult your physician. This is especially important for persons over age 35 or persons with pre-existing health problems. 8.
BEFORE YOU BEGIN Thank you for purchasing the ProForm® 275 ZLX. The bike! provides an array of features designed to make your workouts at home more effective and enjoyable. number and serial number before contacting us. The model number is PFIVEX51811.0 and the location of the serial number decal are shown on the front cover of this manual. For your benefit, read this manual carefully before you use the bike. If you have questions after reading this manual, please see the front cover of this manual.
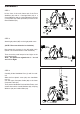
ASSEMBLY STEP 1 Lift the front of the main frame and fit the Front Stabilizer (56) with 2 x Carriage Bolts (35), 2 x Curved Washers (60), 2 x Spring Washers (59) and 2 x Cap Nuts (32). Now repeat this process for the Rear Stabilizer (34). 56 32 59 60 35 34 STEP 2 Attach right pedal (18R) on the right pedal crank. (NOTE: The screw direction is clockwise). Now repeat this process for the left pedal (18L). (NOTE: The screw direction is anti-clockwise).
STEP 4 Take the Handlebar (68) and fix into place using Metal Spacer (3) and Knob (4). Make sure you slide the Hand Pulse Cable (69) over the Computer Bracket through the hole on the back of handlebar post. Tighten fully. 69 4 3 68 STEP 5 Remove three preassembled washers (10) and nylon nuts (11) from back of the seat. Attach the Seat onto Sliding Set (9) and secure them with three washers (10) and three nylon nuts (11).
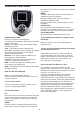
CONSOLE FEATURES the values of Time, Distance, Calories, Age or Gender or programs. MODE : During the time setting mode, press this button to validate the hours and minutes. During the setting mode, press this button to validate the adjusted values. During the STOP mode, press this button to reset the values. START/STOP: For a quick start, press this button to start the counting of the console, it will start at 0. If you hold this button for more than 2 sec it rests the values.
1. Turn on the console. To turn on the console, press a button or begin pedaling. The entire display will light for a moment; the console will then be ready for use. metal contacts using a soft cloth; never use alcohol, abrasives, or chemicals to clean the contacts. 6. When you are finished exercising, the console will turn off automatically. If the pedals do not move for a few seconds, the time will flash in the display and the console will pause.
HEART RATE CONTROL PROGRAMS : WATT PROGRAM : 1. Turn on the console 1. Turn on the console To turn on the console, press any button on the console or simply begin pedaling. To turn on the console, press any button on the console or simply begin pedaling. 2.Select your preset program 2.Select your preset program Press the UP and DOWN button to select Heart Rate program. Wait until the word PROGRAM begins flashing. Press the MODE button to validate.
USER SETTING PROGRAMS : BODYFAT TEST : 1. Turn on the console 1. Turn on the console To turn on the console, press any button on the console or simply begin pedaling. To turn on the console, press any button on the console or simply begin pedaling. 2.Select your preset program 2.Select your preset program Press the UP and DOWN button to select program (written U1 to U4). Wait until the word PROGRAM begins flashing. Press the MODE button to validate.
HOW TO OPERATE THE EXERCISE CYCLE HOW TO ADJUST THE HEIGHT AND LATERAL POSITION OF THE SEAT For effective exercise, the seat should be at the proper height. As you pedal, there should be a slight bend in your knees when the pedals are in the lowest position. To adjust the height or the lateral position of the seat, first loosen the seat post knob. Next, pull the knob, slide the seat post upward or downward to the desired position, and then release the knob.
HOW TO MEASURE YOUR PULSE Measure your heart rate if desired You can measure you heart rate using either the handgrip pulse sensor or the optional chest pulse sensor. Note: If you hold the handgrip pulse sensor and wear the chest pulse sensor at the same time, the console will not display your heart rate accurately. If there are sheets of clear plastic on the metal contacts on the handgrip pulse sensor, remove the plastic. In addition, make sure that your hands are clean.
EXERCISE GUIDELINES Burning Fat—To burn fat effectively, you must exercise at a low intensity level for a sustained period of time. During the first few minutes of exercise, your body uses carbohydrate calories for energy. Only after the first few minutes of exercise does your body begin to use stored fat calories for energy. If your goal is to burn fat, adjust the intensity of your exercise until your heart rate is near the lowest number in your training one.
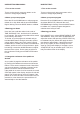
18L19L 20 21 22 23 13 33 34 35 32 31L 17 16 15 14 13 12 11 10 9 8 30 29 28 24 25 26 27 7 5L 64 65 4 63 3 2 36 37 38 39 40 6 52 5R 41 42 43 44 45 53 54 57 58 59 60 61 62 66 1 55 68 69 51 50 49 48 56 67 70 71 72 31R 47 75 74 73 46 19R 18R EXPLODED DRAWING—Model No. PFIVEX51811.
PART LIST—Model No.PFIVEX51811.0 Item Description 1 2 3 4 5 6 7 8 9 10 11 12 13 14 15 16 17 18 19 20 21 22 23 24 25 26 27 28 29 30 31 32 33 34 35 36 37 Computer Screw Metal spacer Knob Handlebar cover (L+R) Screw Handlebar post Saddle Sliding set Washer Nylon nut End cap Bolt Ф10*25*3t Washer M10 Knob Seat post Inner plastic cover Pedal (L+R) Crank (L+R) Crank end cap M8*25 Bolt End cap M4.
ORDERING REPLACEMENT PARTS To order replacement parts, please see the front cover of this manual.