
User guide

7
b) Adjusting the saddle
You have the ability to adjust the height of your saddle instantly via the quick
release clamp. There is also the ability to tilt the nose of the saddle up or down
and adjust your riding position to be further or closer to the handlebar. The latter
two require the use of the multi-use tool included with the purchase of your
Phantom. Please review the following details on adjusting your saddle.
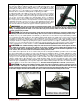
To adjust the height of the saddle or remove the seat post, no tools are required.
The quick release lever is opened by pulling the lever away from the seat tube
allowing for the seat tube clamp to loosen the grip around the post. This will allow
you to raise or lower the saddle to the desired height. There is a minimum
insertion line on the seat post which must be followed and you must not extend
the seat post past this mark. It is also important the seat tube clamp is tightened
sufficiently around the seat post for it not to slide downwards after the quick
release lever is closed. This can be accomplished by tightening the quick release
nut clock wise which is located on the opposite end of the quick release lever.
WARNING: The seat post includes a minimum insertion mark. It is important you do not allow the seat
post to be clamped below this mark. This mark must be inserted into the frame pass the top of quick release
clamp. If clamping below this mark, it can cause the seat post to break, failure to follow this warning could
result in serious injury or death.
CAUTION: The seat tube quick release clamp must be checked for tightness to ensure the saddle will not
accidentally slide into the seat tube when riding. This can cause a rider to lose balance and may result in a fall.
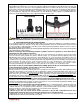
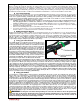
To tilt the nose of your saddle upwards or downwards, you will need to use the 5mm hex key included with your multi-
use tool kit that came with your bicycle. The saddle mounting clamp attaches the saddle to the seat post via a front and
rear barrel nut and bolt. To bring the nose of the saddle down, loosen the rear bolt by 1 full counter clockwise rotation
and tighten the front bolt by 1 full clockwise rotation. Check for comfort and if the nose is still too high, attempt the above
step again. Continue to adjust by repeating the step above until the desired nose height is established. If you prefer to
raise the nose, you can follow the above step but in the opposite direction (loosen the front bolt counter clockwise 1
rotation and tighten the rear bolt clockwise 1 rotation). All bolts should be tightened to 140 in*lb. (SEE PHOTOS)
CAUTION: The saddle mounting clamp front and rear barrel nut and bolt must remain tight at all times.
Test saddle for looseness or play in the rotation of the nose. If saddle is loose, tighten the bracket bolts to
ensure the saddle will not accidentally rotate up or down when riding. Both bolts should be tightened to 140
in*lb. If loose, this can cause a rider to lose balance and may result in a fall.
Your saddle can be adjusted to be closer or further away from the steering tube/handlebar (you will need to use the 5mm
hex key included with your multi-use tool kit). This adjustment is minimal but allows a 7.5mm adjustment in either
direction from center mount (15mm total, close to 5/8”). To adjust the saddle closer or further, you must loosen the rear
and front barrel nut and bolt set which connects the saddle rails to the saddle mounting clamp located at the top of the
seat post. Loosen both bolts by rotating 2 times counter clockwise each. This should allow for sufficient looseness to
slide the saddle rails in either direction on the saddle mounting clamp. You must not allow the edge of the saddle
mounting clamp to meet with the saddle rail bends. The edge of the clamp must be a minimum of 5mm from the saddle
rail bends. Upon establishing the correct position, tighten the saddle mounting clamp bolts 2 times in clockwise direction.
Check for tightness of bolts and continue turning if loose. All bolts should be tightened to 140 in*lb. (SEE PHOTOS)
CAUTION: The edge of the saddle mounting clamp must have a minimum of 5mm of clearance from the
saddle rail bends. If the edge of the clamp is mounted to close the saddle rail bends and the rider does not
position themselves properly on the saddle, this could result in the rails becoming unstable due to the leverage
of the riders weight. The rails can bend and can cause a rider to lose balance and may result in a fall.