
User guide

17
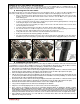
There are two kinds of bicycle tube valves: The Schrader or Presta Valve. The air pump you use must have the
appropriate fitting for the correct valve stem. The Phantom uses Schrader valves. The Schrader valve is the same as an
automobile. To inflate a Schrader valve tube, remove the valve cap and clamp the pump fitting onto the end of the valve
stem. To let air out of a Schrader valve, depress the pin in the end of the valve stem. The Presta valve has a narrower
diameter and is only found on bicycle tires. To inflate a Presta valve tube using a Presta headed bicycle pump, remove
the valve cap; unscrew (counterclockwise) the valve stem lock nut; and push down on the valve stem to free it up. Then
push the pump head on to the valve head, and inflate. To inflate a Presta valve with a Schrader pump fitting, you’ll need
a Presta adapter (available at your bike shop) which screws on to the valve stem once you’ve freed up the valve. The
adapter fits into the Schrader pump fitting. Close the valve after inflation. To let air out of a Presta valve, open up the
valve stem lock nut and depress the valve stem.
WARNING: Patching a tube is an emergency repair. If you do not apply the patch correctly, the tube can
possibly fail, which could cause you to lose control and fall. Replace a patched tube as soon as possible.
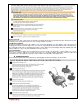
To remove a tire or tube, follow these instructions (you will need tire levers or a similar tool to hold open the bead of the tire):
Let all the air out from the tube of the wheel having the replacement.
Remove the wheel as described in detail in the previous sections.
Remove the inner tubes air valve cover.
Pull back the tire bead away from the rim. You will see the tube and the inside of the tire. If it requires too high pressure to
pull back the tire bead, there may be still air in the tube. Check to confirm all the air is out of the tube.
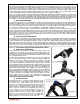
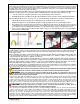
Using 2 tire levers or similar tools, insert one lever end in between the tire bead and the rim but make sure the lever
is on top of the tube and you are not pinching the tube.
Slide the second lever about 4-6 inches to the side of the first lever. Be sure not to pinch the tube and to confirm
you have the lever on top of the tube and not under the tube. Slide the lever down the side of the wheel between
the tire bead and rim edge while lifting the tire bead and sidewall over the rim edge.
If removing only the tube, you can now pull the tube outside the side of the tire wall. If replacing the tube, you can
now install the new tube.
If removing the tire, use the tire levers and repeat the previous steps and remove the opposite side of the tire’s
sidewall bead on the same side of the rim you removed the first tire bead. The tire may easily come off the rim if you
pull the tire bead over the edge of the rim and the tire levers may not have to be used.
To install a new tire, follow these instructions:
When installing a new tire you should first insert the tube into the tire. The tube should have been partially inflated to
a soft but full feel removing any wrinkles in the tube.
Check the mounting side of the rim and confirm the directional path of the tire. High performance tires are usually
directional tires and the arrow on the sidewall represents the rotation of the tire.
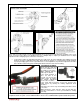
Place the valve of the tube into the valve hole of the rim and slide the bead of the tire over the edge of the rim.
Push the one side wall and bead of the tire around the edge of the wheel’s rim. The tire will slide into place and may
become tight as you finish.
Once one side of the tire is inserted in the rim, check to make sure the valve stem lines up properly and the tube is
smooth across the rim and inside of tire. The tube should not be bunched up in any area.
Where the tube valve is, slide the second wall and bead of the tire into the edge of time rim. Follow pushing the tire
wall and bead into the inside edge of the rim.
You will get to an area of only a few inches left and you will need to apply pressure to push the tire side wall and
bead behind the edge of the rim.
Once the tire is fully inserted, check for any areas on both sides if the tube is exposed. The tube must not get
trapped between the tire bead and rim edge.
Locate the tube valve and use your hand to push on the tire on the outside of the valve to help push the valve
further out through the rim.
Fill the tube with 50% air and then check the tire bead and rim edge again to see if the tube is protruding anywhere.
Once you confirm the tube is not protruding, you can fill the tire to your desired air pressure.
You are now ready to install the wheel back onto the bicycle according to the previous sections.
Chapter 7: Maintenance and Replacement
Your new Phantom was designed for ease of use and owner servicing. There are no tasks which require advanced skills.
Most maintenance and replacing of parts were designed to be accomplished by the typical bicycle rider. Please read this
section to learn how to keep your Phantom performing like new.
a) Keeping your bike clean
Your new Phantom is an outdoor friendly electric bicycle but should be kept clean and free from dirt. Dirt on and around
seals and drive train components can cause premature wear and dirt on paint and part finishes can cause premature
aging. If storing your bicycle outdoors under the elements, you must keep it covered with a high quality bicycle cover to
avoid rain, snow or dirt damaging your new bicycle.
To clean your bicycle, follow these instructions:
Your bicycle incorporates electrical components; it is advised when washing your bicycle you should first cover the
throttle and battery base. Use a plastic bag or a piece of plastic wrap to cover the components. Place the bag or wrap
around the complete throttle assembly and use a rubber band or tape to secure. The battery should be removed prior
to cleaning and a plastic bag or wrap secured by tape can be used to cover the battery base. If you are planning for a