
User guide

16
c) Removing and installing the front wheel
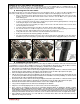
The front wheel on the Phantom can be removed or installed without tools. A quick release skewer through a hollow axle is utilized
for easy and quick wheel removal. A quick release skewer is a rod that has a threaded acorn nut on one end and a cam lever
assembly on the other end. The cam lever applies pressure and locks the axle in place. The majority of higher quality bicycles
produced in the last decade incorporates this design.
When removing the wheel, it will be easier to turn the bicycle upside down and rest the bicycle in its saddle and handlebar. Place a
few blankets on the ground as not to scratch the saddle or handlebar controls. To remove the wheel, follow these steps:
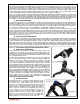
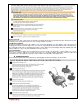
Locate the quick release and pull the quick release lever open and away from the fork dropout.
Opening the quick release lever will loosen the grip on the fork and then loosen the acorn nut to clear the safety tabs at fork dropouts.
When installing the wheel, it is the reverse process of “removing the wheel’. Follow these instructions to install the wheel:
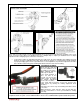
Slide the wheel axle into the fork dropouts, confirming they are mounted in the dropouts with no space.
Install the axle quick release skewer. With the quick release fully open, tighten the acorn nut until a slight resistance.
Once tightened, close the quick release lever with force to clamp and lock the axle into the dropouts. The force must be
strong enough for the axle not to later become loose. It should take some effort to close the lever but not so much that you
are straining or feel you are damaging the quick release. You should not be able to easily open the quick release lever.
Test to see if the quick release lever will open with 1 finger. If it opens, you must perform the previous step again until the
quick release lever clamp is tight.
d) Replacing a tube or tire
Read the previous sections a. and b. to learn how to remove and replace the front and rear wheel. You will need to understand
how to remove the wheel prior to replacing a tube or tire. This section only explains how to remove the tire from the rim and
how to replace a tube.
Before explaining how to replace a tube and tire, details on the Phantom’s tubes and tires are discussed. Tubes and tires are 2
of the most important components on your new bicycle and must always be in optimum condition. It is important you
understand about the tubes and tires equipped on your bicycle.
The Phantom uses high-performance Continental Traffic Low Resistance UNI-Directional tires with a 65 PSI rating. Bicycle
tires are available in many designs and specifications, ranging from general-purpose designs to tires designed to perform best
under very specific weather or terrain conditions. If, once you’ve gained experience with your new bicycle, you feel that a
different tire might better suit your riding needs; your dealer can help you select the most appropriate design.
The size, pressure rating, and on some high-performance tires the specific recommended use, are marked on the sidewall of
the tire. The most important part of this information for you is Tire Pressure. The best and safest way to inflate a bicycle tire to
the correct pressure is with a bicycle pump that has a built-in pressure gauge.
WARNING: Never inflate a tire beyond the maximum pressure marked on the sidewall. Exceeding maximum
pressure may blow the tire off the rim, causing damage to the bike and injury to the rider and bystanders.
WARNING: There is a safety risk in using gas station air hoses or other air compressors. They are not
made for bicycle tires. They move a large volume of air very rapidly, and will raise the pressure in your tire very
rapidly, which could cause the tube to explode.
Tire pressure is given either as maximum pressure or as a pressure range. How a tire performs under different terrain or weather
conditions depends largely on tire pressure. Inflating the tire to near its maximum recommended pressure gives the lowest rolling
resistance; but also produces the harshest ride. High pressures work best on smooth, dry pavement. Very low pressures, at the
bottom of the recommended pressure range, give the best performance on smooth, slick terrain such as hard-packed clay, and
on deep, loose surfaces such as deep, dry sand. Tire pressure that is too low for your weight and the riding conditions can cause
a puncture of the tube by allowing the tire to deform sufficiently to pinch the inner tube between the rim and the riding surface.
CAUTION: Pencil type automotive tire gauges can be inaccurate and should not be relied upon for
consistent, accurate pressure readings. Instead, use a high quality dial gauge.
Ask your dealer to recommend the best tire pressure for the kind of riding you will most often do, and have the dealer inflate
your tires to that pressure. Then, visually check inflation by sitting on the saddle with your weight and noticing your tires
response. You should also squeeze tires and feel resistance so you’ll know how correctly inflated tires should look and feel.
Some tires may need to be brought up to pressure every week or two. Other high-performance tires may also have
unidirectional treads, similar to the factory tires on your Phantom: their tread pattern is designed to work better in one direction
than in the other. The sidewall marking of a unidirectional tire will have an arrow showing the correct rotation direction. When
replacing your tires with tires that are unidirectional, be sure that they are mounted to rotate in the correct direction.