
User guide

14
b) Frame size
The Phantom is considered an 18” MTB frame. The typical measurement number when choosing a correct frame size for a
rider is the seat tube length. This number usually is between 17” to 19” for categorizing MTB bicycle measurements. The seat
tube length is measured from the centerline of the crank (bottom bracket) to the top of the seat tube (seat tube clamp). There is
another measurement sometimes forgotten which is actually more important and this is the top tube length (seat tube to the
steering tube). Most manufacturers will proportionally adjust the top tube length according to the seat tube length and with
stems being available in various lengths, fine tuning of this measurement is easily accomplished.
Prodeco Technologies Phantom’s frame measurement will differ from traditional bicycle frames due to the seat tube being
longer than a traditional bicycle. The addition of the battery mount required an extension to the seat tube by 2 inches; therefore
the measurement is 20”. The measurement of the top tube and other frame components however follow the principals of an
18” MTB frame. The Phantom’s further has a high rake seat tube angle. With the high angle seat tube, as a tall rider raises
their saddle to accommodate their longer legs, the saddle will pull back offering a longer distance to the steering tube.
c) Recommended sizing
In today’s bicycle industry, the top tube length is actually more important than the seat tube length. With seat posts now
available over 300mm, the seat tube length is no longer the most important number. The distance of the bottom bracket to
the road should also be taken into consideration when sizing a bike. The top tube length is traditionally the distance from the
center of the seat tube to the center of the steering tube. For purposes of sizing the Phantom, we will name the distance of
the center of the saddle to the center of the handlebar the steering length (similar to the top tube length).
You can adjust the steering length of your Phantom by establishing the saddle position and seatpost height. The saddle
position can be adjusted for height and distance from the steering tube via the quick release clamp and the saddle clamp.
Keep in mind by increasing the height of the saddle, this will also increase the steering length due to the high rake angle of
the seat tube. If you choose to use your bicycle as a scooter style vehicle only, you should establish saddle height at a
lower position to reduce the center of gravity. Saddle height can be reduced to just above your inseam. Your inseam is the
measurement of the inside of your leg.
d) Control position adjustments
The rotated position of the Phantom’s twist throttle and 8 Speed twist shifter are both adjustable. Both the throttle and shifter are
locked in place by a small hex bolt fastening a built in clamp to the handlebar. The clamp position can be rotated on the handlebar
using the small hex keys included with your multi-piece tool kit. You will need to find the small hex bolt at the clamp and loosen to
rotate. Once the desired control position has been determined, tighten the clamp bolt. There will be a limited amount of rotation
adjustment due to the brake lever assemblies. To find your ideal riding position, it may require all clamps (throttle, shifter and brake
levers) to be loosened. The most important control position is the brake levers. The brake levers should first be adjusted and the
throttle and shifter second. The next paragraphs explain show to adjust your
brake levers. Throttle/shifter clamp bolts should be tightened to 25 lb*in.
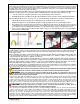
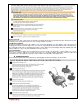
e) Brake lever adjustments
The preferred level of the brake lever assemblies will vary from rider to rider.
The brake lever assemblies can be rotated to a desired riding position. The
optimal position can be found by extending your fingers straight while sitting in
the saddle. Your fingers, when extended straight, should rest on top of the
levers or slightly above the levers.
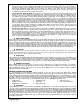
The brake lever assembly has a clamp bolt (see 1 in photo) accessible from
the top of the bracket. Using the T-25 Torx ® wrench included within your
multi-use tool, loosen the brake lever assembly by turning the T-25 bolt
counter clockwise. The lever assembly will now be loose and you can rotate it
up or down to establish the preferred position to apply the brakes. A brake
lever assembly may require the throttle clamp or shifter clamp to be loosened
to allow the brake lever assembly to rotate. The brake lever assembly, throttle
and shifter mount can prevent each other not to rotate at a certain point; one
will not rotate further without the other requiring to be rotated. A compromise
may be required when attempting to align the brake levers and establishing
the preferred throttle and /or shifter position. The optimum position to set your
brake levers depends on your riding position but it should be the extension of
your arm. Your brake lever should be located at the point where your fingers
extend straight out from your arms. Upon finding preferred brake lever
position, tighten the T-25 Torx ® bolt using your multi-use tool. Brake lever
clamp bolts should be tightened to 55 lb*in.
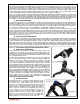
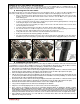
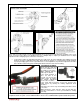
f) Suspension fork
The Phantom’s fork is a RockShox XC32 Suspension Fork.
The XC32 includes a lockout and preload adjustment feature.
The lockout does exactly what it states, it locks out the
suspension for a firm ride. Soft suspension can absorb power
from the motor or rider during climbing or sprinting. The lockout
feature includes Rockshox’s blow off system when hitting a
large rock or hole. The blow off system will bypass the lockout
in an emergency. The preload adjustment increases the
spring’s compression. The heavier a rider, the higher the
preload should be adjusted to offset the additional weight. You
will want to test various preload adjustments to determine the
proper suspension compression for your style riding. Both
adjustment knobs can be found at the crown of the fork.