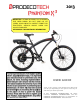
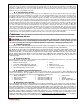
2013 IMPORTANT: ALUMINUM FRAME. NOT INTENDED FOR HARD RIDING. DO NOT JUMP OR HIT CURBS, AVOID IMPACTS. INSPECT FRAME FOR FRACTURES. SERIOUS BODILY HARM CAN OCCUR IF MISUSED. SEE MANUAL FOR ADDITIONAL INFORMATION. USER GUIDE Some of the content of this manual may differ from your bicycle depending on the options of the bicycle and what your dealer provided. © 2013 PRODECO TECHNOLOGIES. All rights reserved. PRODECO TECHNOLOGIES and the PRODECO TECHNOLOGIES logo are trademarks of PRODECO TECHNOLOGIES.
Table of Contents 1) Chapter 1: Introduction ……………………………………………………………………………………………….. 4 a. About this manual ………………………………………………………………………………………………….. 4 b. Important notices …………………………………………………………………………………………………… 4 c. General warning ……………………………………………………………………………………………………. 4 d. A special note to parents ………………………………………………………………………………………….. 5 2) Chapter 2: Getting Started …………………………………………………………………………………………… 5 a. Unpacking your box ……………………………………………………………………………………………….. 5 b.
8) Chapter 8: Battery Management …………………………………………………………………………………….. 23 a. About your battery ………………………………………..………………………..………………………………. 23 b. Removing the battery …………………..………………..………………………..………………………………. 23 c. Installing and locking the battery …………..…………..………………………..………………………………. 24 d. Charging the battery ………………………..……………………………………..………………………………. 24 e. Storing the battery ………………………………………..………………………..………………………………. 25 f. Battery power indicator ………………………..………………………..…………………………………………. 25 g.
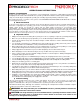
OPERATIONAL INSTRUCTIONS Chapter 1: Introduction Prodeco Technologies thanks you for your purchase of your new Phantom. Your bicycle is a high quality and environmentally friendly light electric vehicle. This manual will serve to provide you with the information needed to operate, maintain and enjoy it safely. Your electric bicycle should provide you with years of healthy enjoyment provided you follow these steps. For technical questions or customer service, please contact PRODECO TECHNOLOGIES at 800.943.
Many of the Warnings and Cautions say, “you may lose control and fall”. Because any fall can result in serious injury or even death, we do not always repeat the warning of possible injury or death. Because it is impossible to anticipate every situation or condition that can occur while riding, this Manual makes no representation about the safe use of the bicycle under all conditions.
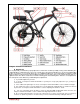
e) Familiarize yourself with your bicycle’s parts Chapter 3: Basic Instructions a) Bicycle Fit It is very important your Phantom is properly adjusted for comfort and to avoid the possibility of losing control while riding. The saddle will adjust to allow riders from 5’ 8” to 6’ 6” to set the proper measurement allowing for a safe and comfortable riding position.
b) Adjusting the saddle You have the ability to adjust the height of your saddle instantly via the quick release clamp. There is also the ability to tilt the nose of the saddle up or down and adjust your riding position to be further or closer to the handlebar. The latter two require the use of the multi-use tool included with the purchase of your Phantom. Please review the following details on adjusting your saddle. To adjust the height of the saddle or remove the seat post, no tools are required.
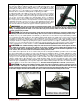
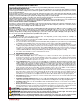
c) Installing the handlebar and stem (SEE PHOTOS) The handlebar of the Phantom is not secured to the stem when shipped. The handlebar is temporarily attached to the frame with shipping ties. Using scissors, cut the ties to free the handlebar from the frame. You will need to place the center of the handlebar into the stem’s concaved center and attach the handlebar clamp plate to the stem. There are 4 stem binder bolts which tighten the plate to the stem, securing the handlebar in place.
HR 727 SECTION 1, CONSUMER PRODUCT SAFETY ACT The Consumer Product Safety Act (15 U.S.C. 2051 et seq) is amended by added at the end of the following: LOW-SPEED ELECTRIC BICYCLES SEC. 38.(a) Notwithstanding any other provision of law, low-speed electric bicycles are consumer products within the meaning of section 3(a)(1) and shall be subject to the Commission regulations published at section 1500.18(a)(12) and part 1512 of title 16, Code of Federal Regulations.
g) Before your first motorized ride Before your first ride study this manual in its entirety. Make sure you are comfortable and confident when sitting on the bicycle. If an adjustment does not feel right or something feels loose, check to ensure you are properly fitted to the bike and do a mechanical safety check as explained in the previous section. Make sure you fully charge your battery with the appropriate charger included with your bicycle. Be sure to firmly attach the battery to the bicycle.
l) Pedaling Pedaling your Phantom is the same as pedaling a traditional bicycle. It is recommended you add pedaling to the power of the bicycle to enhance the distance per charge. The Phantom is a 8 speed bicycle and has the ratio of a 42T front chain ring (sprocket) against a 11-28T rear freewheel which is designed to offer an easy pedaling pace at any speed from 1 MPH to 18 MPH.
Chapter 4: Safety The manual has detailed safety riding methods. In this chapter we will further discuss additional safety guidelines. a) The basics Below is a safety guideline according to the CPSC (US Consumer Product Safety Commission) in regards to riding a bike. Always wear a helmet to help prevent head injuries. Observe all traffic laws and signals, just as automobiles must do. Don’t ride double or attempt stunts. Ride near the curb in the same direction as traffic.
Learn Rules of The Road: Obey Traffic Laws - Bicycles are considered vehicles. Bicyclists must obey the same rules as motorists. Read your State drivers handbook, and learn and follow all the traffic signs, laws, and rules for operating a vehicle on the road. Always signal your moves. Be courteous to pedestrians and other vehicle operators. Never wear headphones while riding as they impair your ability to hear traffic.
b) Frame size The Phantom is considered an 18” MTB frame. The typical measurement number when choosing a correct frame size for a rider is the seat tube length. This number usually is between 17” to 19” for categorizing MTB bicycle measurements. The seat tube length is measured from the centerline of the crank (bottom bracket) to the top of the seat tube (seat tube clamp).
Chapter 6: Tire, Tube, Wheel and Axle Repair The Phantom was designed for ease of servicing. Repairs are no more difficult than on a traditional bicycle. Any neighborhood bicycle shop should be able to repair a flat, change a tire or replace a wheel. Please review the following chapter on how to remove and replace the front and rear wheel of your Phantom. a) Removing the rear motor wheel The wheel incorporates a motor wire quick disconnect for removing the wheel.
c) Removing and installing the front wheel The front wheel on the Phantom can be removed or installed without tools. A quick release skewer through a hollow axle is utilized for easy and quick wheel removal. A quick release skewer is a rod that has a threaded acorn nut on one end and a cam lever assembly on the other end. The cam lever applies pressure and locks the axle in place. The majority of higher quality bicycles produced in the last decade incorporates this design.
There are two kinds of bicycle tube valves: The Schrader or Presta Valve. The air pump you use must have the appropriate fitting for the correct valve stem. The Phantom uses Schrader valves. The Schrader valve is the same as an automobile. To inflate a Schrader valve tube, remove the valve cap and clamp the pump fitting onto the end of the valve stem. To let air out of a Schrader valve, depress the pin in the end of the valve stem. The Presta valve has a narrower diameter and is only found on bicycle tires.
ride after washing, it is recommended the saddle also be covered. The saddle has miniature holes where there is stitching and water can seep into these small holes. To wash your bicycle you will need a small bucket of warm water with car soap, sponge, small brush, chain lube and a few rags or towels. Rinse your bicycle off with a light spray of water to remove any dirt on the surface.
Before each ride Check houses for signs of wear. Squeeze the brake lever firmly and check for proper brake function. Check pads for wear and replace if necessary. Ensure rotors are free of foreign substances and oils. Pad Break In and Noise It may take anywhere from 20 to 40 complete stops to break in Avid pads. You may begin to notice an increase in braking power after the first ride. Brake noise can occur not only during the break-in period but off and on throughout the life of the brake pads.
e) Derailleur adjustment (SRAM X7) If the chain of your bicycle falls off at the largest COG/sprocket or the chain is having problems remaining on the correct gear, you may need to adjust your derailleur. There are a multiple ways to adjust your derailleur but for a simple adjustment on the changing of gears, follow these instructions. Located at the shifter, the adjusting knob where the cable enters the shifter will adjust gear shifting. This knob allows the loosening or tightening of the cable.
Derailleur Troubleshooting Problem Chain jumps from smallest sprocket to frame dropout. Difficult or impossible to shift chain onto smallest sprocket. Chain jumps over largest sprocket and falls between the spokes and largest sprockets or inner cage plate scrapes on spokes. Delayed shifting. Rough shifting behavior. Shifts more gears onto smaller sprockets than intended. Delayed shifting onto larger sprocket. Delayed shifting onto smaller sprocket. Cause High gear limit screw is not adjusted properly.
j) Maintenance schedule: As a common practice you should follow your maintenance schedule. You should study it and allow it to become second nature to your riding.
Chapter 8: Battery Management This section describes your battery and similar to Chapter 3, section o. “Charging your battery” but goes into further detail. a) About your battery The Li-ion battery system of the Phantom is the latest technology with a LiFEPO4 chemistry. This battery is maintenance free with no serviceable parts. You must never open the battery as this will void the warranty. Each battery has a specific serial number and barcode which can be found on the underside of the battery.
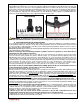
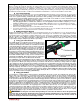
c) Installing and locking the battery As shown in the photos above, the battery has 2 thin “slotted rails” (1 on each side of the battery towards the front) and a “raised slot” (towards the rear and near the handle) at the underside of the battery. These rails and slots hold the battery in place when riding. The battery mount attached to the bicycle has one large metal tab at the rear and 2 small metal tabs at each side.
e) Storing the battery The Li-ion battery the Phantom utilizes is the safest and latest technology in Li-ion battery cells. It is recommended that you do not store the battery in extremely hot conditions. If the bicycle is being stored indoors in a cool environment, the battery should be stored on the bicycle in the “OFF” position. The battery should be kept away from fires or sparks and also away from possible water damage.
The motor offers a nominal 500W of power at 36 Volts and a peak of 720W. The power is sufficient to move the bicycle and rider on flat surfaces at speeds up to twice what a typical rider pedals. Steep inclines may require pedaling by the rider to power over the incline. It is highly suggested the rider pedals along with the motor to enhance traveling distance even on flat surfaces. The motor is powered through a “Hall Effect Sensor” approach. A “Hall Effect Sensor” motor is powered in 3 stator phases.
Chapter 10: Warranty Service and Repair Prodeco Technologies has taken great measures in designing and producing your new bicycle to be issue free while offering years of performance. The bicycle however is a mechanical item and an issue can arise. Your bike components are covered for a 2 year period from the date of purchase or within 30 months of the production date, whichever is sooner. The production date is part of your master serial number.
b) Registering your bike It is very important you register your new bicycle when purchasing. This is the only way your warranty will take effect. It is required you register your bicycle within 2 weeks from the date of purchase. You must save your receipt of purchase. To register your bicycle, you can fill out the form on the Prodeco Technologies website at www.prodecotech.com or you can fill out the registration card in the next section below and either scan it to service@prodecotech.com, fax it to 954.
e) Part replacement procedure In the occurrence of a component becoming defective, Prodeco Technologies tries to make part replacement as painless as possible. Simply contact Prodeco Technologies service department and explain the problem. A representative will assist you with getting the part at issue replaced quickly. You can also bring your bicycle to a local authorized dealer and they can assist you with any problem. Parts are always in stock and can be ship immediately.
Chapter 12: Parts # 1 2 3 4 5 6 7 8 9 10 11 12 13 14 15 16 17 18 19 20 21 22 23 24 25 26 27 28 29 30 31 32 33 34 35 36 37 38 39 40 41 42 43 44 45 46 47 48 49 50 51 52 53 54 Description ACCESSORY - BELL - Aluminum - v31 - Thumb Lever - 40mm Diameter - Black Shell ACCESSORY - TOOL - Multi Use Tool - 18018 - Anodized Red & Nickel ACCESSORY - TOOL - Y Tri Hex - 18021 - 4mm, 5mm & 6mm - Black BATTERY - Prodeco Technologies - LiFEPO4 - 38.4V - -- 16Ah -- - v1.3a BATTERY CHARGER - 43.