
User guide

14
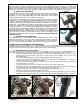
d) Reflectors
The CPSC (US Consumer Product Safety Commission) requires front, rear, wheel and pedal reflectors. Your Phantom X2
includes federal regulated reflectors and they should not be removed. If needing to be replaced, replace them with authorized
Prodeco reflectors or reflectors approved by the CPSC.
e) Night riding
Almost anywhere in the world today, bicycle night riding requires front and rear lights on your bicycle. You must install front and
rear lights if you plan on riding at night. Check your local laws on what is required for night riding. Always wear retro-reflective
clothing or material, not just white or florescent, especially on your ankles, wrists, back, and helmet. Only ride in areas familiar
to you. Brightly lit streets are best. Always assume you are not seen by a driver. Children should NOT ride at night.
f) Adding accessories
When adding accessories to your bicycle you must check to confirm they do not lower the safety value of your bicycle.
Prodeco Technologies offers authorized accessories for your bicycle which have been approved not to lower the safety value.
Ask your authorized dealer or contact us if you are not sure about adding an accessory to your bicycle and the possibility of
lowering your bicycle’s overall safety.
Chapter 5: Perfect Fit and Ride
It is very important your new Phantom X2 is adjusted properly for your size and for comfort. The Phantom X2 has multiple
adjustments available to offer a comfortable and safe position for riding. A properly sized and adjusted bicycle allows the rider
to remain fully alert and avoid injury. Review this chapter carefully and all the adjusting points of your new Phantom X2. If you
have difficulty in obtaining the most comfortable riding position or performing available adjustments, contact your authorized
dealer for advice. You can contact Prodeco Technologies directly by phone or email and we will assist you with the proper
adjustments for your bicycle and your size. The following list is the areas of adjustability the Phantom X2 offers:
Saddle height
Saddle nose angle
Saddle distance to handlebar
Handlebar height
Stem rise and rotation
Brake lever angle
Brake lever reach
Fork suspension firmness
a) The basics
Understanding the basics of a bicycle frame size will help in determining the correct positions and adjustments for your body
size and comfort. The Phantom X2’s frame was designed to easily accommodate all riders from 5’ 6‖ to 6’ 6‖ utilizing the
available adjustments. The frame size can be considered anywhere from an 18‖ to 23‖ if comparing to traditional
measurements. The most important information to remember when sizing your bicycle is that you are comfortable riding,
especially when pedaling. With throttled electric bicycles some riders may choose not to pedal and the measurement will be
different than for a rider who chooses to pedal and is the same size. Scooters for instance have a much lower saddle height
than bicycles due to scooters not being pedaled. A higher saddle height is only recommended for riders who pedal allowing
them a full extension of their leg per rotation of the crank.
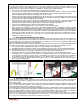
b) Frame size
The Phantom X2 is considered an 18‖ MTB frame. The typical measurement number used today in choosing a correct frame size
for a rider is the seat tube length. This number usually is between 17‖ to 19‖ for categorizing MTB bicycle measurements. The seat
tube length is measured from the centerline of the crank (bottom bracket) to the top of the seat tube (seat tube clamp). There is
another measurement sometimes forgotten which is actually more important and this is the top tube length (seat tube to the steering
tube). With the Phantom X2’s stem being available adjustable, fine tuning of this measurement is easily accomplished.
The Phantom X2’s frame measurement follows the principals of an 18‖ MTB frame; however the actual measurement will differ
from traditional bicycle frames. This is due to the seat tube being longer than a traditional bicycle. The addition of the battery
mount required an extension to the seat tube by 2 inches; therefore the measurement is 20‖. The Phantom X2 further has a
high rake seat tube angle. With the high angle seat tube, as a tall rider raises their saddle to accommodate their longer legs,
the saddle will pull back offering a longer distance to the steering tube.
c) Recommended sizing
In today’s bicycle industry, the top tube length is actually more important than the seat tube length. With seat posts now
available over 300mm, the seat tube length is no longer the most important number. The distance of the bottom bracket to
the road should also be taken into consideration when sizing a bike. The top tube length is traditionally the distance from the
center of the seat tube to the center of the steering tube. For purposes of sizing the Phantom X2, we will name the distance
of the center of the saddle to the center of the handlebar the steering length (similar to the top tube length).
You can adjust the steering length of your Phantom X2 by establishing the saddle position and handlebar height combined
with the adjusting of the stem rise via rotation. The saddle position can be adjusted for height and distance from the steering
tube via the quick release clamp and the saddle clamp. Keep in mind by increasing the height of the saddle, this will also
increase the steering length due to the angle of the seat tube. If you choose to use your bicycle as a scooter style vehicle
only, you should establish saddle height at a lower position to reduce the center of gravity. Saddle height can be reduced to
just above your inseam. Your inseam is the measurement of the inside of your leg.
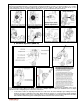
d) Control position adjustments
The Phantom X2 includes a twist variable throttle with an LED battery indicator on the right side and an 8 Speed twist shifter on
the left side of the handlebar. There is also a thumb sliding lever bell on the left side of the handlebar, required by law for electric
bikes as a sounding device. The throttle can be adjusted on the handlebar to rotate further up or down using the 3mm hex key
included with your multi-piece tool kit. The shifter can be adjusted on the handlebar to rotate using the multi-tool included with the
bicycle. The brake lever assembly and throttle mount together and at a certain point of rotation, one will not rotate further without
the other requiring to be rotated. If the factory settings on the throttle or shifter are uncomfortable for you or you cannot view the
LED battery, you can loosen the throttle clamp and move it into a preferred position. As stated above, you may have to loosen the
brake assemble to move the throttle to your desired position. Please see section e ―Brake lever height adjustments‖ following this
section to loosen and adjust the brake lever assembly and maintain correct brake lever height adjustments. To loosen and adjust
the throttle, locate the 3mm hex bolt at the front underside of the LED battery indicator on the throttle. Use your 3mm hex key and
insert it into the hex bolt and rotate a minimum of 3 times counter clockwise. The throttle will now be loose enough to move.
Throttle clamp bolts should be tightened to 25 lb*in.