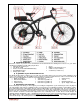
2013 IMPORTANT: ALUMINUM FRAME. NOT INTENDED FOR HARD RIDING. DO NOT JUMP OR HIT CURBS, AVOID IMPACTS. INSPECT FRAME FOR FRACTURES. SERIOUS BODILY HARM CAN OCCUR IF MISUSED. SEE MANUAL FOR ADDITIONAL INFORMATION. USER GUIDE Some of the content of this manual may differ from your bicycle depending on the options of the bicycle and what your dealer provided. © 2013 PRODECO TECHNOLOGIES. All rights reserved. PRODECO TECHNOLOGIES and the PRODECO TECHNOLOGIES logo are trademarks of PRODECO TECHNOLOGIES.
Table of Contents 1) Chapter 1: Introduction ……………………………………………………………………………………………….. 4 a. About this manual ………………………………………………………………………………………………….. 4 b. Important notices …………………………………………………………………………………………………… 4 c. General warning ……………………………………………………………………………………………………. 4 d. A special note to parents ………………………………………………………………………………………….. 5 2) Chapter 2: Getting Started …………………………………………………………………………………………… 5 a. Unpacking your box ……………………………………………………………………………………………….. 5 b.
8) Chapter 8: Battery Management …………………………………………………………………………………….. 23 a. About your battery ………………………………………..………………………..………………………………. 23 b. Removing the battery …………………..………………..………………………..………………………………. 23 c. Installing and locking the battery ……………………....………………………..………………………………. 24 d. Charging the battery ………………………..……………………………………..………………………………. 25 e. Storing the battery ………………………………………..………………………..………………………………. 25 f. Battery power indicator ………………………..………………………..…………………………………………. 25 g.
OPERATIONAL INSTRUCTIONS Chapter 1: Introduction Prodeco Technologies thanks you for your purchase of your new Phantom X2. Your bicycle is a high quality and environmentally friendly light electric vehicle. This manual will serve to provide you with the information needed to operate, maintain and enjoy it safely. Your electric bicycle should provide you with years of healthy enjoyment provided you follow these steps. For technical questions or customer service, please contact PRODECO TECHNOLOGIES at 800.
Many of the Warnings and Cautions say, ―you may lose control and fall‖. Because any fall can result in serious injury or even death, we do not always repeat the warning of possible injury or death. Because it is impossible to anticipate every situation or condition that can occur while riding, this Manual makes no representation about the safe use of the bicycle under all conditions.
c) Familiarize yourself with your bicycle’s parts d) Contents of the box Check the contents of your box.
Chapter 3: Basic Instructions a) Bicycle fit It is very important your Phantom X2 is properly adjusted for comfort and to avoid the possibility of losing control while riding. The saddle and handlebar have adjustments available to allow riders from 5’ 6‖ to 6’ 6‖ to set the proper measurements allowing for a safe and comfortable riding position. There are saddle height, rotation and distance to steering tube adjustments and also a handlebar height and rotation adjustment.
c) Installing and adjusting the handlebar stem (SEE PHOTOS NEXT PAGE) When the handlebar and stem of the Phantom X2 is shipped, it is not inserted into the steerer tube. The handlebar and stem is temporarily attached to the frame with shipping ties. Using scissors, cut the ties to free the handlebar and stem from the frame. You will need to slide the stem’s quill into the steerer tube and set the stem to the preferred height for riding. The steerer tube is at the inside and center of the headset.
electric bicycles (under 20mph) also as consumer products and not Motor Vehicles for safety standards. The NHSTA adheres for the most part to the CPSC guidelines. We included reference below on how electric bicycles are perceived by the Federal Government’s most important agencies. We do believe new regulation and rules will apply in the future upon the electric bicycle becoming one of the standard forms of transportation for the masses.
f) Mechanical safety check Check the condition of your bicycle before every ride. Nuts, bolts and straps: Make sure nothing is loose. Lift the front wheel off the ground by two or three inches then let it bounce on the ground. Anything sound, feel or look loose? Do a quick visual and tactile inspection of the whole bike. Are there any loose parts or accessories? If so, secure them. If you’re not sure, ask someone with bike experience to check.
j) Using your twist throttle The variable throttle on your Phantom X2 was designed to allow you the ability to choose the speed to ride at and determine the amount of torque off the line. The throttle operates similar to an automobile; the twisting of the throttle mimics the depressing of the accelerator. The throttle is located on the right side grip and considered a half twist throttle. It is a half twist, as only the inside portion will twist to power the bicycle. The grip itself will not twist.
n) Watching for obstacles around you Your new Phantom X2 travels at higher speeds than most riders are accustomed to, when compared to pedaling a traditional bicycle. It is very important you are aware of your surroundings and obstacles which may appear near you. You must watch the road surface you are traveling on which could cause the tires to slip or cause a flat. Examples are soft shoulders, rocks, pot holes, uneven paths, grates, construction sites.
Periodically inspect frame, fork, spindles and other components for cracking. Parts should be adjusted to manufacturer's torque specifications. Inflate tires to recommended pressure, and replace worn tires. Lightly oil and clean moving parts. Keep oil off rubber. Keep bicycle indoors when not in use. b) Riding safety Below are guidelines according to the NHSTA (National Highway and Traffic Safety Administration) on bicycle safety.
d) Reflectors The CPSC (US Consumer Product Safety Commission) requires front, rear, wheel and pedal reflectors. Your Phantom X2 includes federal regulated reflectors and they should not be removed. If needing to be replaced, replace them with authorized Prodeco reflectors or reflectors approved by the CPSC. e) Night riding Almost anywhere in the world today, bicycle night riding requires front and rear lights on your bicycle. You must install front and rear lights if you plan on riding at night.
Your Phantom X2 includes a thumb lever bell for you to use to warn other people around you when approaching. The thumb lever bell can be moved to a more comfortable position if the factory setting is unsatisfactory (you will need to use the Philips screw driver included with your multi-piece tool kit). On the underside of the bell handlebar clamp there is a small Philips screw. Using the Philips screw driver, turn the screw counter clockwise 4 rotations to loosen the clamp.
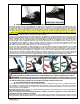
b) Installing the rear motor wheel The rear motorized wheel easily installs onto the rear frame dropouts within a few minutes. Follow the instructions below on installing the rear motor wheel. Additional cable ties are included with the Phantom X2. One cable tie will be needed to install the motor. Read the instructions fully before attempting to install the wheel. (SEE PHOTOS) Pull or push the rear derailleur lower pulley with chain out of the way of the dropouts.
WARNING: Never inflate a tire beyond the maximum pressure marked on the sidewall. Exceeding maximum pressure may blow the tire off the rim, causing damage to the bike and injury to the rider and bystanders. WARNING: There is a safety risk in using gas station air hoses or other air compressors. They are not made for bicycle tires. They move a large volume of air very rapidly, and will raise the pressure in your tire very rapidly, which could cause the tube to explode.
Chapter 7: Maintenance and Replacement Your new Phantom X2 was designed for ease of use and owner servicing. There are no tasks which require advanced skills. Most maintenance and replacing of parts were designed to be accomplished by the typical bicycle rider. Please read this section to learn how to keep your Phantom X2 performing like new. a) Keeping your bike clean Your new Phantom X2 is an outdoor friendly electric bicycle but should be kept clean and free from dirt.
FINE TUNING Before each ride Check cables for signs of wear or fraying. Squeeze the brake lever firmly and check for proper brake function. Adjust for pad wear if necessary. Check pads for wear and replace if necessary. Ensure rotors are free of foreign substances and oils. Cable Slack Adjustment Use the barrel adjuster on the brake lever to remove any cable slack from the system. Turn the adjuster out until there is no free play in the lever but not so far that the torque arm on the caliper is advanced.
Adjust the Pads Turn both pad adjustment knobs counterclockwise until desired pad/rotor clearance is achieved (approx. 2 or 3 clicks each). Important: only use the barrel adjuster at the brake lever to adjust for cable slack. For lever throw, use the outboard adjustment knob. For brake pad wear adjustment, use both the inboard and outboard knobs.
SHIFTING ADJUSTMENT Check that the chain and the rear derailleur are in the smallest cog position. While pedaling, twist the shifter up one detent. If the chain hesitates or does not shift to the second cog, increase the cable tension by turning the shifting adjustment knob counter clockwise. If the chain shifts beyond the second cog, decrease the cable tension by turning the shifting adjustment knob clockwise. Repeat the two former steps until shifting and cable tension is accurate.
Lubricating is always at the point where 2 surfaces touch together and friction is created. Your local neighborhood bicycle shop or most mass merchants who sell bicycles will offer various types of lubes for your bicycle. Below are the areas you should lubricate according to your maintenance schedule at the end of this chapter. Chain: The chain should be lubricated at each of the links. You can turn the crank counter clockwise while lubricating each area of pivot.
l) Torque specifications for common parts: Nuts and bolts for your bicycle are set to a standard torque setting at the factory. Over time of use and shipping, nuts or bolts could become loose. Below is a chart of the torque settings in Lb per Inch for the common parts of the Phantom X. They have also been converted to Lb per Foot and NM.
c) Installing and locking the battery As shown in the photos above, the battery has 2 thin ―slotted rails‖ (1 on each side of the battery towards the front) and a ―raised slot‖ (towards the rear and near the handle) at the underside of the battery. These rails and slots hold the battery in place when riding. The battery mount attached to the bicycle has one large metal tab at the rear and 2 small metal tabs at each side.
To remove the battery, follow these instructions: Locate the key ignition on the battery base and turn the key in a counter clockwise rotation to the ―UNLOCK‖ position. You must push the key in to turn from the ―OFF‖ position to the ―UNLOCK‖ position. Grab the handle at the back of battery and pull towards the back of the bicycle to slide it off. The battery is now transportable and can be charged away from the bicycle. d) Charging the battery The battery can be charged on or off the bicycle.
Chapter 9: Electrical Components The Phantom X2 electric components were developed to be maintenance free with no serviceable parts. There are 5 components used to power your bicycle. Each component can easily be replaced by the average person with minimal mechanical skills. The design has been simplified so your local bicycle shop can service it without issue and minimal time.
Chapter 10: Warranty Service and Repair Prodeco Technologies has taken great measures in designing and producing your new bicycle to be issue free while offering years of performance. The bicycle however is a mechanical item and an issue can arise. Your bike components are covered for a 2 year period from the date of purchase or within 30 months of the production date, whichever is sooner. The production date is part of your master serial number.
b) Registering your bike It is very important you register your new bicycle when purchasing. This is the only way your warranty will take effect. It is required you register your bicycle within 2 weeks from the date of purchase. You must save your receipt of purchase. To register your bicycle, you can fill out the form on the Prodeco Technologies website at www.prodecotech.com or you can fill out the registration card in the next section below and theither scan it to service@prodecotech.com, fax it to 954.
e) Part replacement procedure In the occurrence of a component becoming defective, Prodeco Technologies tries to make part replacement as painless as possible. Simply contact Prodeco Technologies service department and explain the problem. A representative will assist you with getting the part at issue replaced quickly. You can also bring your bicycle to a local authorized dealer and they can assist you with any problem. Parts are always in stock and can be ship immediately.
Chapter 12: Parts # 1 2 3 4 5 6 7 8 9 10 11 12 13 14 15 16 17 18 19 20 21 22 23 24 25 26 27 28 29 30 31 32 33 34 35 36 37 38 39 40 41 42 43 44 45 46 47 48 49 50 51 52 53 54 55 56 57 58 59 60 Part Description ACCESSORY - BELL - Aluminum - v31 - Thumb Lever - 40mm Diameter - Black Shell ACCESSORY - TOOL - Multi Use Tool - 18018 - Anodized Red & Nickel ACCESSORY - TOOL - Y Tri Hex - 18021 - 4mm, 5mm & 6mm - Black BATTERY - Prodeco Technologies - LiFEPO4 - 38.4V - -- 12Ah -- - v1.3a BATTERY CHARGER - 43.