
User guide

19
FINE TUNING
Before each ride
Check cables for signs of wear or fraying. Squeeze the brake lever firmly and check for proper brake function. Adjust for pad
wear if necessary. Check pads for wear and replace if necessary. Ensure rotors are free of foreign substances and oils.
Cable Slack Adjustment
Use the barrel adjuster on the brake lever to remove any cable slack from the system. Turn the adjuster out until there is no
free play in the lever but not so far that the torque arm on the caliper is advanced. The torque arm should return completely
when the brake lever is released. If necessary, repeat pad adjustments. Note: new cables will stretch and require adjustment.
Pad Break In and Noise
It may take anywhere from 20 to 40 complete stops to break in Avid pads. You may begin to notice an increase in
braking power after the first ride. Brake noise can occur not only during the break-in period but off and on throughout the
life of the brake pads. Noise is dependent upon factors such as brake setup, rider weight, riding style, braking style, and
riding conditions (i.e. dust, soil, and contamination of friction surfaces).
Care and Cleaning
Extreme care must be taken when cleaning both the bicycle and its new disc brakes. Under normal use, it is not
necessary to clean the caliper rotor or pads. If necessary, use only water and dish detergent to wash the caliper and
rotor being sure to thoroughly rinse all soap residues from the rotor. Dry with a clean paper towel.
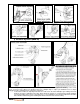
Spring Tension Adjustment
If necessary, spring tension can be adjusted by turning the spring tension adjustment screw with a 2.0mm hex wrench.
Turning the screw clockwise increases spring tension, which equals harder lever pull.
Pad Wear Adjustment
Over time, you will need to compensate for brake pad wear. You can do so with two very simple adjustments: 1) Unscrew the
barrel adjuster on the caliper. 2) Turn the inboard red adjusting knob clockwise one or two clicks as needed to restore your brake
to optimum settings. Both of these adjustments move the pads closer to the rotors. Try different settings until the brake feels just
the way you like. IMPORTANT: Make sure you tighten the locknut on the barrel adjuster after you adjust. NOTE: While you can
perform a similar adjustment on the barrel of your brake lever, Avid suggests that you adjust for pad wear at the caliper. That way
you leave the brake lever for ON-THE-FLY adjustments.
d) Pad Replacement
A pad should be replaced when its total thickness (backing plate and friction material) is less than 3mm. 1. REMOVE THE
OLD PADS – Back the inner adjustment knob all the way out (counterclockwise). Pull the spreader clip from between the pads,
and then pull the pads out of the caliper one at a time. 2. INSTALL THE NEW PADS AND SPREADER – Insert the new pads
one at a time into the caliper. IMPORTANT: Once the pads are in the caliper, you can slide the spreader clip back into position
between the pads.
Installing the Cable
Pass the brake wire through the anchor bolt on the actuating arm. Cable slack may be removed with a fourth hand tool. Be
careful not to advance the torque arm as you pull the cable. Tighten cable anchor bolt to the specified torque. Use the barrel
adjuster at the caliper to remove any remaining cable slack (if there is any). Important: After the cable is anchored, check to
ensure there is no more than 20 mm (3/4 in) of excess cable beyond the anchor bolt and trim as necessary. NOTE: Make sure
the caliper barrel adjuster is screwed all the way in before installing the cable.
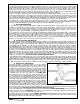
Align the Caliper
Use your fingers or a Torx® wrench to turn the inboard pad adjustment know clockwise until the rotor is centered in the
caliper. This positions the pads for the next step in the installation. B. Make sure the CPS bolts are loose enough for the
caliper to move freely. C. Squeeze the brake lever to compress the brake pads firmly on the rotor. D. While still holding the
brake lever, tighten the CPS bolts. Once they are tight, you can let go of the lever.