
User guide

14
b) Frame size
The typical measurement number used today in deciding if a frame size is the correct size for a rider is the seat tube length.
This number usually begins around 17‖ for MTB style bicycles and can go as high as 25‖ for Road style bicycles. The seat tube
length is measured from the centerline of the crank (bottom bracket) to the top of the seat tube (seat tube clamp). There is
another measurement sometimes forgotten which is actually more important, this is the top tube length (seat tube to the
steering tube). Most manufacturers will proportionally adjust the top tube length according to the seat tube length and with
stems being available in various lengths, fine tuning of this measurement is easily accomplished.
Prodeco Technologies Stride R‘s frame measurement will differ from traditional bicycle frames due to the seat tube being
longer than a traditional bicycle. The battery mount required an extension to the seat tube, therefore the better way to measure
the seat tube is from the base of the saddle clamp (seat post must be inserted at the lowest position) to the centerline of the
crank. When measuring this way, the Stride R would be considered an 18‖ frame. Even though considered an 18‖ frame, the
frame is unique in other areas, allowing for all size riders and adjustable to be similar to a 23‖ road bike frame.
The Stride R‘s has a high seat tube angle. With the high angle seat tube, as a tall rider raises their saddle to accommodate
their longer legs, the saddle will pull back offering a longer distance to the steering tube. For fine detailed adjusting, the narrow
seat post saddle clamp allows the saddle to be moved back or forward an additional 7.5mm each way.
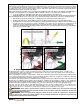
c) Recommended sizing
In today‘s bicycle industry, the top tube length is actually more important than the seat tube length. With seat posts now
available over 300mm, the seat tube length is no longer the most important number. The distance of the bottom bracket to
the road can also mislead the seat tube length. The top tube length is traditionally the distance from the center of the seat
tube to the center of the steering tube. For purposes of sizing the Stride R, we will name the distance of the center of the
saddle to the center of the handlebar the steering length (similar to the top tube length).
You can adjust the steering length of your Stride R by establishing the saddle position and handlebar height combined with
the adjusting of the stem rise via rotation. The saddle position can be adjusted for height and distance from the steering tube
via the quick release clamp and the saddle clamp. Keep in mind by increasing the height of the saddle, this will also
increase the steering length due to the angle of the seat tube. If you choose to use your bicycle as a scooter style vehicle
only, you should establish saddle height at a lower position to reduce the center of gravity. Saddle height can be reduced to
just above your inseam. Your inseam is the measurement of the inside of your leg.
d) Control position adjustments
The Stride R includes a twist variable throttle with an LED battery indicator on the right side and an 8 Speed twist shifter on the left
side of the handlebar. There is also a thumb sliding lever bell on the left side of the handlebar, required by law for electric bikes as
a sounding device. The throttle can be adjusted on the handlebar to rotate further up or down (you will need to use the 3mm hex
key included with your multi-piece tool kit). The shifter can be adjusted on the handlebar to rotate also (using the multi-tool
included with the bicycle). The brake lever assembly and throttle mount together and at a certain point of rotation, one will not
rotate further without the other requiring to be rotated. If the factory settings on the throttle or shifter are uncomfortable for you or
you cannot view the LED battery, you can loosen the throttle clamp and move it into a preferred position. As stated above, you
may have to loosen the brake assemble to move the throttle to your desired position. Please see section e ―Brake lever height
adjustments‖ following this section to loosen and adjust the brake lever assembly and maintain correct brake lever height
adjustments. To loosen and adjust the throttle, locate the 3mm hex bolt at the front underside of the LED battery indicator on the
throttle. Use your 3mm hex key and insert it into the hex bolt and rotate a minimum of 3 times counter clockwise. The throttle will
now be loose enough to move. Throttle clamp bolts should be tightened to 25 lb*in.
Your Stride R includes a thumb lever bell for you to use to warn other people around you when approaching. The thumb lever bell
can be moved to a more comfortable position if the factory setting is unsatisfactory (you will need to use the Philips screw driver
included with your multi-piece tool kit). On the underside of the bell handlebar clamp there is a small Philips screw. Using the
Philips screw driver, turn the screw counter clockwise 4 rotations to loosen the clamp. This will allow the bell to be moved. Move
the bell to the desired position and using your Philips screw driver, tighten the clamp screw by turning clockwise until tight.
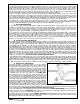
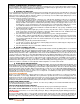
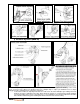
e) Brake lever adjustments
The Stride R utilizes an Avid Speed Dial 7 Lever. The following
instructions will explain how to adjust your lever for optimal comfort
and performance. The preferred level of the brake lever assembly
itself will vary from rider to rider. The brake lever can be rotated higher
or lower to a desired riding position. The optimal position can be
found by extending your fingers straight while sitting in the saddle.
Your fingers, when extended straight, should rest on top of the levers
or slightly above the levers. The clamp has a CLAMP BOLT
accessible from the top of the bracket. Using the 4mm hex key,
loosen the brake lever assembly by turning the hex bolt counter clock
wise 3 full turns. The lever assembly will now be loose and you can
rotate it up or down to establish the preferred position to apply the
brakes while riding. The brake lever assembly on the right side of the
handlebar may require the throttle clamp to be loosened to allow the
brake lever assembly to rotate. The brake lever assembly and throttle
mount together and at a certain point of rotation, one will not rotate
further without the other requiring to be rotated. A compromise may
be required when attempting to align the brake levers and establishing the preferred throttle position. Your brake lever should
be located at the point where your fingers extend straight out from your arms. Upon finding preferred brake lever height, tighten
hex bolt using 4mm key. Brake lever clamp bolts should be tightened to 80 lb*in.
If you have small hands, you can adjust the reach of the lever by adjusting the REACH ADJUSTMENT bolt. The speed dial 7
brake lever also incorporates a SPEED DIAL which sets the feel you want from softer (greater modulation) to a firmer feel. Turn
counter clockwise for a softer feel and clockwise for a firmer feel.
The Cable adjustment can be tightened via the BARREL ADJUSTER. The Barrel Adjuster removes slack in the cable and can
tighten the outboard pad of the brake caliper. The Barrel Adjuster however is strictly reserved for cable slack removal on the fly.
The adjustment of the pads should be done at the caliper itself.