
User guide

11
k) Using your brakes
Your Stride R is equipped with a high performance ―Tool Free‖ adjusting Avid BB5 Disc Brake system. The BB5 front and
rear disc brakes allow your new Stride R to stop quickly and accurately. Oversized Avid HS ―Heat Shedding‖ stainless steel
disc rotors are utilized for the axles for increased heat dissipation. When properly adjusted, the Stride R high performance
disc brake system offers tremendous stopping power. Prior to leaving the factory, the Stride R brakes were adjusted tight
and properly tested. Due to cable stretching from new condition, your brakes may need to be readjusted within a few weeks
of riding. Please refer to Chapter 7 ―Maintenance and Replacement‖, section c ―Brake adjustments‖ to adjust your brakes
for optimum performance. When braking, both brake levers should be applied simultaneously. Your left brake lever
manages your front brake and your right brake lever manages your rear brake. You should first become accustomed with
the stopping power of each brake (front & rear). Test each brake separately in a controlled environment for their ability to
stop the bicycle. Front brakes when locked can cause the rear wheel to come off the ground and the rider can be thrown off
the bicycle. In emergency situations, apply pressure to each brake lever, shift your weight to the back of the bicycle and
only attempt to use full force on the front brakes when the bicycle is not stopping quickly enough. Always keep a safe
distance between vehicles, pedestrians and other bicycle riders from yourself.
WARNING: Locking the front wheel during braking can cause the rear wheel to lift off the ground and
throw the rider off the bicycle. Both brake levers should be applied simultaneously. In an emergency situation
shift your weight to the back of the bicycle. Locking the front wheel can cause the rider to lose control, be
thrown off the bicycle and cause serious injury or death.
l) Pedaling
Pedaling your Stride R is the same as pedaling a traditional bicycle. It is recommended you add pedaling to the power of the
bicycle to enhance the distance per charge. The Stride R is a 8 speed bicycle and has the ratio of a 44T front chain ring
(sprocket) against a 11-28T rear freewheel which is designed to offer an easy pedaling pace at any speed from 1 MPH to 18
MPH. It is recommended on steep inclines, the rider utilizes the throttle to assist in powering the bicycle up the incline but
simultaneously drop the bicycle to a lower gear. If a rider‘s style of riding is throttle only with no pedaling, distance per charge
will be decreased and upon a steep incline, the rider is required to assist the motor by pedaling to power up the incline.
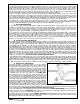
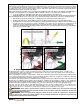
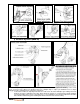
m) Shifting gears
The shifting of gears is required to change the ratio of the rotation of pedaling to allow
more or less torque and lower or higher speeds according to one complete rotation of
the crank set. If requiring more torque, you will shift to a larger rear sprocket for a higher
rotation of pedaling to a lower speed of the rear wheel. To switch to a larger rear
sprocket, you will need to shift to a lower gear. Gear 1 is the largest sprocket which is
28 Teeth and your lowest gear. One full crank rotation creates a 1.57 turn of the rear
wheel. For higher speeds from less rotation of the crankset on flat pathways, you will
shift to a smaller rear sprocket for a higher wheel rotation to a lower crankset speed. To
shift to a smaller sprocket, you will need to shift to a higher gear. Gear 8 is the smallest
sprocket with 11 Teeth and your highest gear. One full crank rotation creates a 4 turn of
the rear wheel. Please review the photo on shifting gears.
n) Watching for obstacles around you
Your new Stride R travels at higher speeds than most riders are accustomed to, when pedaling a traditional bicycle. It is very
important you are aware of your surroundings and obstacles which may appear near you. You must watch the road surface
you are traveling on which could cause the tires to slip or cause a flat. Examples are soft shoulders, rocks, pot holes, uneven
paths, grates, construction sites. Due to the higher rate of speed when riding under motor power versus pedaling, objects will
advance into your path at a faster rate. Pay attention to other riders in your area, automobiles, motorcycles, pedestrians, poles,
intersections and road signs to name a few. The Stride R resembles a traditional bicycle and people walking, driving or
standing may not realize you are on a motor powered vehicle and misjudge your traveling speed.
WARNING: Hitting a pot hole, soft shoulder or other road deviation may cause you to lose control, be
thrown and cause serious injury or death.
o) Safe riding in various conditions
Riders may find themselves riding in a condition they did not plan on encountering. It is important your new Stride R is
maintained properly for optimum performance. Please read Chapter 7 on the details required to keep your electric bicycle at its
best. An unexpected rain storm, snow flurry or night ride could arise during a day‘s trip and you should always be prepared.
Please read Chapter 4 on Safety, so upon encountering an unexpected riding condition, you will be confident and ready.
p) Charging your battery
The Stride R‘s battery system is the safest and latest technology in Lithium Ion battery cells and was designed to be
easily charged. Chapter 8 offers a detailed explanation on battery management but the following information is a basic
guide in charging your battery. The battery is a removable device and can be charged on or off the bicycle. If removing
the battery to charge it, please follow these instructions.
Locate the key ignition on the battery and turn the key in a counter clockwise rotation to the ―UNLOCK‖
position. You must push the key in to turn from the ―OFF‖ position to the ―UNLOCK‖ position.
Grab the handle at the back of battery and carefully pull towards the back of the bicycle to slide off.
The battery is now transportable and can be charged away from the bicycle when in ―UNLOCK‖ position.
For charging, please review the following instructions.
Lift up the handle of the battery to access the RCA charging input.
Insert the charging plug from the charger into the battery‘s RCA charging input.
Insert the charger‘s power cord into a wall outlet.
The charger‘s LED light will light RED while the charger is charging the battery.
The charger‘s LED light will light GREEN upon the battery being fully charged.